II-9
[ 2 ]
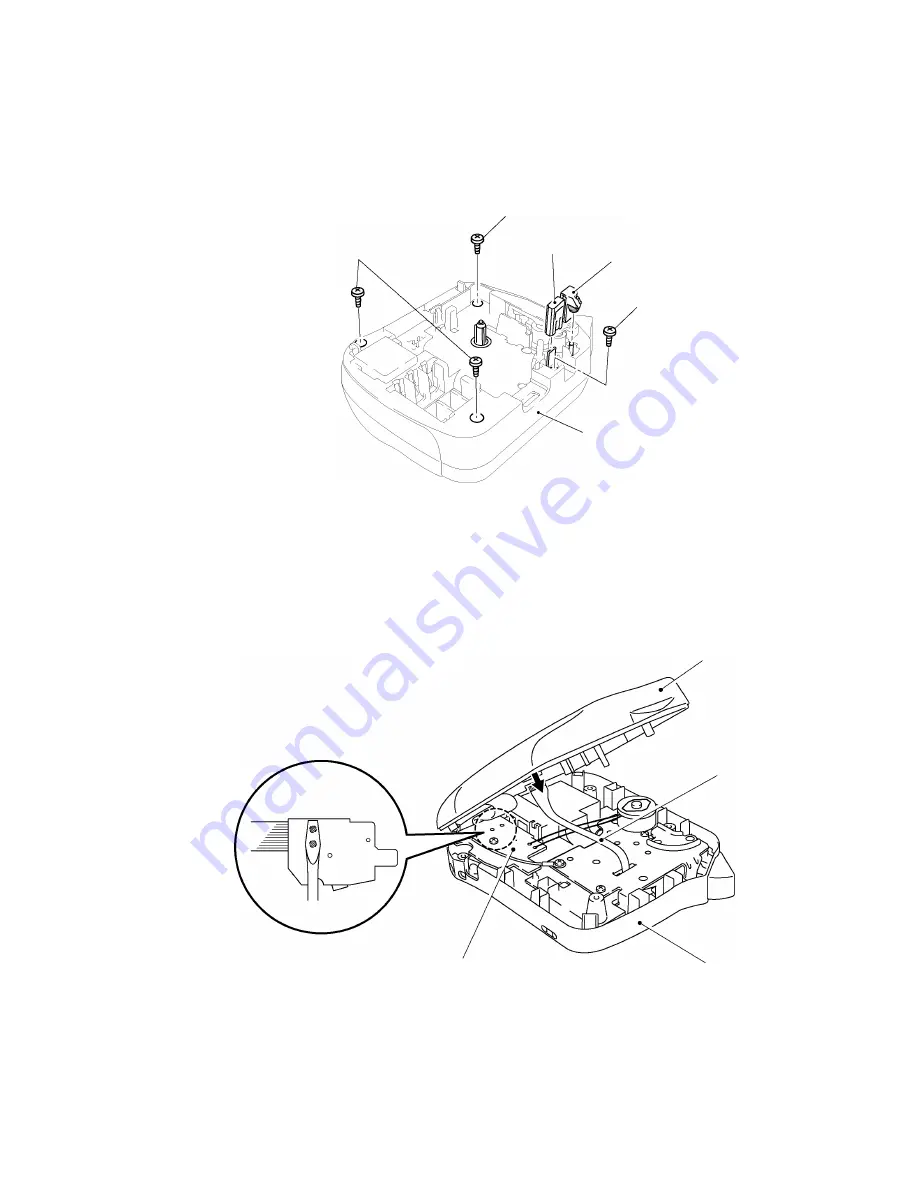
Removing the bottom cover, the cutter case ASSY and the board
(1)
Place the machine upside down.
(2)
Pull out the cutter case ASSY and the board from the frame.
(3)
Remove the four screws, then the bottom cover and the upper cover are able to be
separated.
Fig. 2.2-3 Removing the Bottom Cover, Cutter Case ASSY and the Board (1)
(4)
Open the upper cover to the left as shown below.
(5)
Discharge the condenser (C1) on the sub PCB ASSY with tool like a screwdriver.
(6)
Disconnect the thermal head flat cable from the main PCB.
Note: Discharge without fail before disconnecting the thermal flat cable, otherwise the electronic
part such as LSI or others should be damaged.
Fig. 2.2-4 Removing the Bottom Cover, Cutter Case ASSY and the Board (2)
Screw
Cutter case ASSY
Board
Screw
Screws
Bottom cover
Upper cover
Sub PCB
Bottom cover
Thermal head flat cable
Summary of Contents for P-touch PT-1100
Page 2: ...SERVICE MANUAL MODEL PT 1100 1130 1170 1180 11Q PT 1250 1160 ST 1150 Heavy Duty LabelerTM ...
Page 5: ...CHAPTER I SPECIFICATIONS ...
Page 9: ...I 3 Fig 1 1 2 Key Arrangement 1 ...
Page 10: ...I 4 Fig 1 1 2 Key Arrangement 2 ...
Page 11: ...I 5 Fig 1 1 2 Key Arrangement 3 ...
Page 13: ...CHAPTER II MECHANISMS ...
Page 50: ...35 II 2 3 4 Troubleshooting Flows 1 Tape feeding failure ...
Page 51: ...36 II ...
Page 52: ...37 II 2 Printing failure ...
Page 53: ...38 II ...
Page 54: ...39 II 3 Powering failure Nothing appears on the LCD ...
Page 55: ...40 II 4 No key entry possible ...
Page 56: ...CHAPTER III ELECTRONICS ...
Page 75: ...III 17 3 3 3 Troubleshooting Flows 1 Tape feeding failure 2 Printing failure ...
Page 76: ...III 18 3 Powering failure Nothing appears on the LCD ...
Page 77: ...III 19 4 Abnormal LCD indication ...
Page 78: ...III 20 5 No key entry possible 6 Tape cassette type not identified ...
Page 80: ......
Page 81: ......
Page 82: ......


