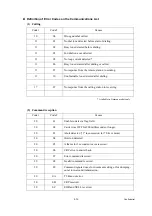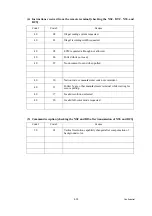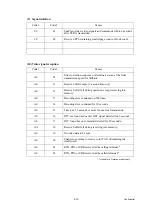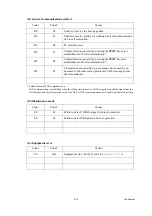
4-32
Confidential
4.2
TROUBLESHOOTING
4.2.1 Introduction
This section gives the service personnel some of the troubleshooting procedures to be followed
if an error or malfunction occurs with the machine. It is impossible to anticipate all of the
possible problems which may occur in future and determine the troubleshooting procedures, so
this section covers some sample problems. However, those samples will help service personnel
pinpoint and repair other defective elements if he/she analyzes and examines them well.
4.2.2 Precautions
Be sure to observe the following to prevent the secondary troubles from happening in addition
to the safety precautions given in
(1) Always unplug the AC power cord from the outlet when removing the covers and PCBs,
adjusting the mechanisms, or conducting continuity testing with a circuit tester.
(2) When disconnecting the connectors, do not pull the lead wires but hold the connector
housings.
(3) Static electricity charged in your body may damage electronic parts.
Before handling the PCBs, touch a metal portion of the machine to discharge static
electricity charged in your body. When transporting PCBs, be sure to wrap them in
conductive sheets.
When replacing the head/carriage unit, put on a grounding wrist band and perform the job
on a static mat. Also take care not to touch the conductor sections on the flat cables.
After repairing the defective section, be sure to check again if the repaired section works
correctly. Also record the troubleshooting procedure so that it would be of use for future trouble
occurrence.
4.2.3 Checking Prior to Troubleshooting
Prior to proceeding to the troubleshooting procedures given in
, make the
following initial checks:
Environmental conditions
Check that:
(1) The machine is placed on a flat, firm surface.
(2) The machine is used in a clean environment at or near normal room temperature (10
°
C to
35
°
C) with normal relative humidity (20 to 80%).
(3) The machine is not exposed to direct sunlight or harmful gases.
Power requirements
Check that:
(1) The power supply specified on the rating plate on the machine is used. The supply voltage
stays within the rating ±10%.
(2) Each voltage level on AC input lines and DC lines is correct.
(3) All cables and harnesses are firmly connected.
Summary of Contents for MFC-J220
Page 8: ...vi Confidential SAFETY PRECAUTIONS Symbols used in the documentation ...
Page 9: ...vii Confidential ...
Page 10: ...viii Confidential ...
Page 11: ...ix Confidential ...
Page 12: ...x Confidential ...
Page 13: ...xi Confidential ...
Page 14: ...xii Confidential ...
Page 15: ...xiii Confidential ...
Page 16: ...Confidential CHAPTER 1 PARTS NAMES AND FUNCTIONS ...
Page 20: ...1 3 Confidential 1 2 CONTROL PANEL DCP375CW ...
Page 21: ...1 4 Confidential ...
Page 22: ...1 5 Confidential DCP395CN ...
Page 23: ...1 6 Confidential ...
Page 24: ...1 7 Confidential MFC255CW 295CN ...
Page 25: ...1 8 Confidential ...
Page 26: ...1 9 Confidential MFC495CW ...
Page 27: ...1 10 Confidential ...
Page 28: ...1 11 Confidential MFC795CW ...
Page 29: ...1 12 Confidential ...
Page 30: ...1 13 Confidential DCPJ125 J315W J515W J715W 8 7 6 5 1 2 4 3 ...
Page 31: ...1 14 Confidential ...
Page 32: ...1 15 Confidential MFCJ220 J265W J270W J410 J410W J415W J615W J630W 6 7 8 5 2 4 3 1 ...
Page 33: ...1 16 Confidential Mono Start Colour Start ...
Page 34: ...1 17 Confidential DCPJ140W 6 7 8 5 2 4 3 1 ...
Page 37: ...Confidential CHAPTER 2 SPECIFICATIONS ...
Page 39: ...Confidential 2 12 PAPER 2 42 2 12 1 Paper Specifications 2 42 2 12 2 Printable Area 2 44 ...
Page 84: ...Confidential CHAPTER 3 THEORY OF OPERATION ...
Page 130: ...Confidential CHAPTER 4 ERROR INDICATION AND TROUBLESHOOTING ...
Page 135: ...4 3 Confidential For MFC only Replace Ink ...
Page 187: ...Confidential CHAPTER 5 HANDLING DATA HELD IN THE MACHINE PRIOR TO REPAIR ...
Page 191: ...Confidential CHAPTER 6 DISASSEMBLY REASSEMBLY AND LUBRICATION ...
Page 193: ...Confidential 6 2 LUBRICATION 6 103 ...
Page 302: ...Confidential CHAPTER 7 ADJUSTMENTS AND UPDATING OF SETTINGS REQUIRED AFTER PARTS REPLACEMENT ...
Page 309: ...7 5 Confidential 8 Alert warning message of WHQL appears Click Continue Anyway to proceed ...
Page 318: ...7 14 Confidential Head Positioning Test Pattern ...
Page 325: ...7 21 Confidential Vertical Alignment Check Pattern A 1 2 ...
Page 326: ...7 22 Confidential Vertical Alignment Check Pattern A 2 2 ...
Page 327: ...7 23 Confidential Vertical Alignment Check Pattern B ...
Page 331: ...7 27 Confidential Left Right and Bottom Margins Check Pattern ...
Page 342: ...7 38 Confidential ADF Copy Chart A B C D ...
Page 345: ...Confidential CHAPTER 8 CLEANING ...
Page 349: ...8 3 Confidential Maintenance unit Head wiper Head cap unit cleaning_duplex Rubycel stick ...
Page 350: ...Confidential CHAPTER 9 MAINTENANCE MODE ...
Page 359: ...9 7 Confidential Scanning Compensation Data List Models except DCPJ140W DCPJ140W ...
Page 362: ...9 10 Confidential Test Pattern ...
Page 367: ...9 15 Confidential Configuration List ...
Page 372: ...9 20 Confidential MFC255CW 295CN MFC495CW MFC795CW DCPJ125 J315W J515W J715W Key Entry Order ...
Page 373: ...9 21 Confidential DCPJ140W MFCJ220 J265W J270W J410 J410W J415W J615W J630W Key Entry Order ...
Page 397: ...9 45 Confidential Vertical Alignment Check Pattern A 1 2 ...
Page 398: ...9 46 Confidential Vertical Alignment Check Pattern A 2 2 ...
Page 399: ...9 47 Confidential Vertical Alignment Check Pattern B ...
Page 403: ...9 51 Confidential Left Right and Bottom Margins Check Pattern ...
Page 439: ...App 2 3 Confidential 8 Alert warning message of WHQL appears Click Continue Anyway to proceed ...
Page 521: ...App 5 3 Confidential DCPJ515W ...
Page 522: ...App 5 4 Confidential DCPJ715W MFCJ615W J630W ...
Page 523: ...App 5 5 Confidential DCPJ125 J315W MFCJ220 J265W J270W J410 J410W J415W ...
Page 524: ...App 5 6 Confidential DCPJ140W ...
Page 534: ...App 6 9 Confidential B Power supply PCB 200 V series ...

