


HE-800C
11. TROUBLESHOOTING
91
Cause Check
Remedy
Page
Upper thread trimmer
lever
Upper thread trimmer lever
operating force
Adjust so that the upper thread trimmer lever opens
gently when the stop plate is separated from the
stopper.
*
11-17. Needle breakage
Items with a “*” in the “Page” column should only be handled by a qualified technician.
Cause Check
Remedy
Page
Needle
Needle installation
As viewed from the direction of the face plate, attach
the needle so that the groove of the needle faces
frontward.
21
Rotary
hook
Needle bar height and
needle bar lift amount
(The gauge is an option
part.)
1. Adjust the needle bar height to “1” on the gauge.
2. Adjust the needle and rotary hook timing to “2” on
the gauge.
65*
66*
Gap between the needle
and the tip of the rotary
hook
Adjust the gap between the needle and the rotary hook
tip to 0.01 - 0.08 mm. (Adjust to as large as possible
without causing skipped stitches to occur.)
* Move the needle bar to the left and right with your
finger, and check that the tip of the rotary hook does
not strike the needle.
67*
Needle plate
Needle plate position
Adjust the forward/back position of the needle plate so
that the needle is in the center of the needle hole.
*
Burr on the screw hole
edge (in event of uneven
material feeding)
Polish with buff.
*
Upper thread trimmer
assembly
Needle strikes upper
thread trimmer
Refer to “11-16. Needle strikes upper thread trimmer”.
90, 91*
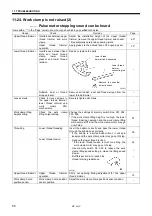
Cutter
Clearance between needle
bar and cutter
Install the cutter so that the clearance between the
needle bar and the cutter is 0.3 mm.
* The cutter release section of the needle bar should be
at a right angle to the cutter.
68*
4013Q
4015Q
Bisect
4014Q
4016Q
0.3 mm
(Needle plate cross section)
Check the chamfered side
finishing


