


Chapter 7 Maintenance
BES-961BC
•
BES-1261BC
137
r
q
w
u
t
y
e
r
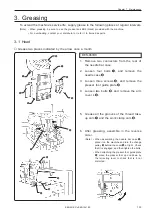
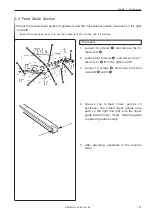
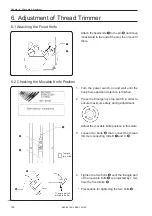
3-2 Feed Guide Section
■
Check the X-feed linear guides (3 positions) and the Y-feed linear guides (one each on the right
and left).
(Note) When greasing, be sure to use the grease tank 30 provided with the machine.
Procedure
1.
Loosen 12 screws
q
, and remove the X-
feed cover
w
.
2.
Loosen eight screws
e
, and remove the Y-
feed cover
r
from the right and left.
3.
Loosen 13 screws
t
, and remove the bed
covers B
y
and C
u
.
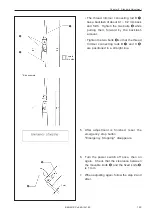
4.
Grease the X-feed linear guides (3
positions), the Y-feed linear guides (one
each on the right and left), and the linear
guide inside the No. 3 bed. Slide the guide
to spread grease entirely.
5.
After greasing, assemble in the reverse
order.
Summary of Contents for BES-1261BC
Page 7: ...5 BES 961BC BES 1261BC 2 1 7 1 6 3 4 5 7 3 2 Belt cover Finger guard BES 961BC ...
Page 13: ...11 BES 961BC BES 1261BC Setting of thread breakage sensor page 93 Setting of Machine page 96 ...
Page 18: ...16 BES 961BC BES 1261BC ...
Page 19: ...Chapter 1 Preparation of Embroidery Machine ...
Page 60: ...BES 961BC BES 1261BC 58 Chapter 2 Embroidering Procedures ...
Page 78: ...BES 961BC BES 1261BC 76 Chapter 3 Selection of Data and Embroidering ...
Page 118: ...BES 961BC BES 1261BC 116 Chapter 5 Setting ...
Page 119: ...Chapter 6 Operation of Machine ...
Page 130: ...Chapter 6 Operation of Machine BES 961BC BES 1261BC 128 ...
Page 131: ...Chapter 7 Maintenance ...
Page 140: ...Chapter 7 Maintenance BES 961BC BES 1261BC 138 ...
Page 141: ...Chapter 8 Standard Adjustment ...
Page 153: ...Chapter 9 List of Error Messages ...
Page 161: ...Connection and Installation of Optional Equipment ...


