


Chapter 6 Operation of Machine
BES-961BC
•
BES-1261BC
122
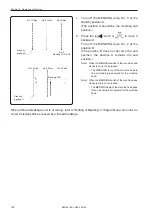
No.1 Stitch
No.2 Stitch
No.3 Stitch
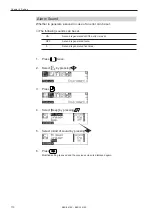
1.
Turn off the MENDING lamp No. 3 at the
standby position A.
(The position A should be the mending end
position.)
2.
Press the jog switch or
to move it
backward.
Turn off the MENDING lamp No. 2 at the
position B.
(The position B does not become the end
position; the position A remains the end
position.)
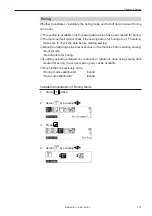
Note) When the MENDING switch of the machine head
whose lamp is off is pressed:
• The MENDING lamp of the machine head is
lit, and mending is executed for the machine
head.
Note) When the MENDING switch of the machine head
whose lamp is on is pressed:
• The MENDING lamp of the machine head goes
off and mending is not excuted for the machine
head.
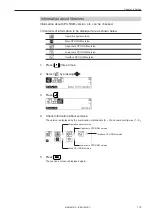
No.1 Stitch
No.2 Stitch
No.3 Stitch
No.3
Mending LED is off.
Stand by
position A
B
Stand by
position A
Mending LED
When a thread breakage error is occurring, refer to "Setting of Mending" (
→
Page 99) as well in order to
correct missing stitches caused by a thread breakage.
Summary of Contents for BES-1261BC
Page 7: ...5 BES 961BC BES 1261BC 2 1 7 1 6 3 4 5 7 3 2 Belt cover Finger guard BES 961BC ...
Page 13: ...11 BES 961BC BES 1261BC Setting of thread breakage sensor page 93 Setting of Machine page 96 ...
Page 18: ...16 BES 961BC BES 1261BC ...
Page 19: ...Chapter 1 Preparation of Embroidery Machine ...
Page 60: ...BES 961BC BES 1261BC 58 Chapter 2 Embroidering Procedures ...
Page 78: ...BES 961BC BES 1261BC 76 Chapter 3 Selection of Data and Embroidering ...
Page 118: ...BES 961BC BES 1261BC 116 Chapter 5 Setting ...
Page 119: ...Chapter 6 Operation of Machine ...
Page 130: ...Chapter 6 Operation of Machine BES 961BC BES 1261BC 128 ...
Page 131: ...Chapter 7 Maintenance ...
Page 140: ...Chapter 7 Maintenance BES 961BC BES 1261BC 138 ...
Page 141: ...Chapter 8 Standard Adjustment ...
Page 153: ...Chapter 9 List of Error Messages ...
Page 161: ...Connection and Installation of Optional Equipment ...


