background image

5. STANDARD ADJUSTMENT (MACHINE HEAD)

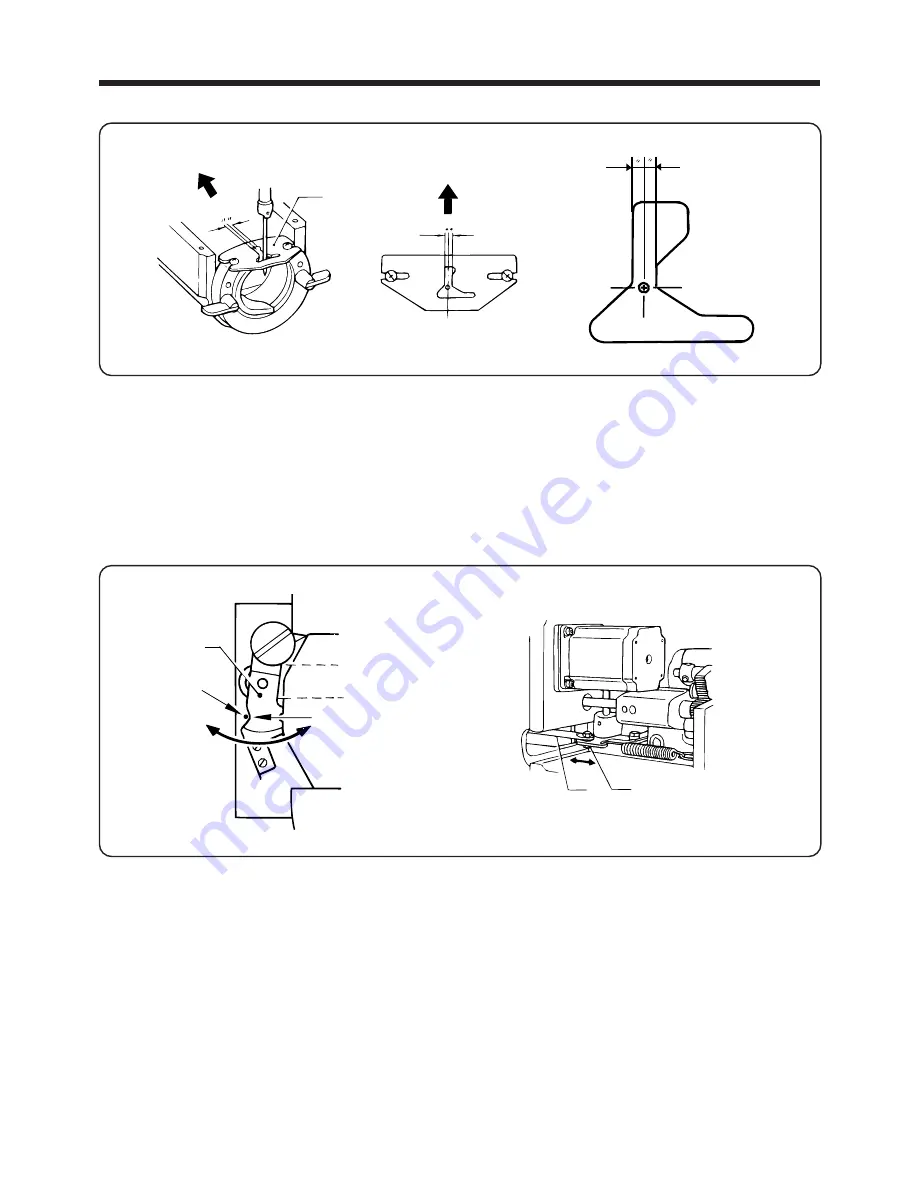
5-6. Adjusting the shuttle hook thread guide

Install the shuttle race thread guide 

q

 by pushing it in the direction of the arrow so that the needle groove is

aligned with the center of the needle plate hole.

NOTE: If the shuttle race thread guide is in the wrong position, thread breakages, soiled thread or catching of

the thread may occur.

5-7. Adjusting the movable knife

5-7-1. First bar tacking

1. Tilt back the machine head. (Refer to "5-1. Tilting back the machine head.")

2. Loosen the nut 

w

 and move thread trimmer rod L 

e

 to the left or right to adjust so that the V section 

A

 of the

    movable knife 

q

 is aligned with the index mark 

B

 on the needle plate when the machine is at the stop

    position.


40


                BAS-705

w

e

q

B

q

A

Summary of Contents for BAS-705

Page 1: ... 13 Initializing the sewing data 11 3 PANEL OPERATION 12 3 1 Explanation of panel 12 3 2 Data setting methods 13 3 2 1 Setting the belt loop feeding out length 13 3 2 2 Setting the bobbin counter 14 3 2 3 Clearing production counter 15 3 2 4 Setting the machine sewing speed 16 3 2 5 Loop feeding 17 3 2 6 Setting the program number 18 3 2 6 1 Pattern selection mode 19 3 2 7 Setting the X scale and ...

Page 2: ... height 36 5 3 Needle bar lift stroke adjustment 37 5 4 Shuttle driver needle contact adjustment 38 5 4 1 First bar tacking 38 5 4 2 Second bar tacking 38 5 5 Needle to shuttle hook point gap adjustment 39 5 5 1 First bar tacking 39 5 5 2 Second bar tacking 39 5 6 Adjusting the shuttle hook thread guide 40 5 7 Adjusting the movable knife 40 5 7 1 First bar tacking 40 5 7 2 Second bar tacking 41 5 ...

Page 3: ...for cleaning away belt scraps during V cutting 64 6 8 Replacing the movable knife and fixed knife 65 6 9 Adjusting the belt loop and presser foot height 65 7 MAINTENANCE AND INSPECTION 66 7 1 Cleaning the rotary hook 66 7 2 Lubrication 66 7 3 Draining the oil 67 7 4 Cleaning the eye guard 67 7 5 Checking the needle 67 7 6 Cleaning the machine pulley 67 8 DIP SWITCH 68 8 1 Panel DIP switch function...

Page 4: ...Belt loop length Belt loop width Stitch interval Belt loop thickness Needle Loop cutting Power supply Air pressure Weight Dimensions Table height 2 100 spm Bar tacking height 1 3 mm bar tacking width 7 22 mm 29 36 43 needle Half rotation double hook 48 78 mm finished length 9 16 mm V cut 9 20 mm Flat cut 40 70 mm 1 3 mm DP 17NY 19 21 Flat cut V cut selectable 3 phase 220V 380V 400V 415V 600VA 0 5M...

Page 5: ...terns which you can select and use Any pattern can be selected and used as long as you make sure that it is within the work clamp and feed plate in size 2 BAS 705 For denim Use No of stitches Standard bar tacking length Standard bar tacking width Program No 01 02 03 3mm 3mm 3mm 16mm 20mm 20mm 29 36 43 S E S E S E Sewing pattern ...

Page 6: ...rious electric shock CAUTION Be sure to wear protective goggles and gloves when handling the lubricating oil and grease so that they do not get into your eyes or onto your skin otherwise inflammation can result Furthermore do not drink the oil or eat the grease under any circumstances as they can cause vomiting and diarrhoea Keep the oil out of the reach of children Avoid setting up the sewing mac...

Page 7: ...e shaft fixing screw Removing the BM support slide shaft fixing screw q NOTE To ensure safety when moving the machine head tighten the BM support slide shaft fixing screw q before moving the machine head 4 BAS 705 q q NOTE To ensure safety when moving the head firsttighten the machine head fixing bolt q before moving the machine head ...

Page 8: ... two places and turn the level adjusters i to adjust the height of the casters y above the floor NOTE After adjusting securely tighten the nut u q w i t r y e u 2 5 Checking the loop cutting NOTE At the time of shipment from the factory the V cutting cylinder is in the lock position flat end cutting Changing to V shaped cutting 1 Remove the q set the knife stopper w to the posi tion shown in the i...

Page 9: ...under any circumstances as they can cause vomiting and diarrhoea Keep the oil out of the reach of children 1 Fill the arm side oil tank with oil 2 Fill the bed side oil tank with oil 3 Fill the oil tank at the side of the lower shaft module base with oil 2 6 1 Machine mechanism NOTE Fill the machine with oil when the oil level is down to about one third full in the oil sight glass If oil is not ad...

Page 10: ...ewing machine oil in the places shown by arrows in the illustration 7 BAS 705 Assemble the cotton stand q according to the direc tions given in the cotton stand instruction manual and then install it to the work table NOTE Securely tighten the screw w so that the cotton stand does not move q w ...

Page 11: ...he arrow 8 BAS 705 q t w r e y 1 Attach the air hose q to the air unit connector w with the nut e 2 Use air pressure at 0 49 MPa 0 54 MPa 5 5 5 kgf cm2 Pull up the cap at the top of the air unit r and adjust the pressure After adjustment push the cap down to lock it NOTE Every day close the air cock t and push the drain cock y to remove the water ...

Page 12: ...loop through the loop guide q the channel guide w and the actuator e in that order 2 While holding the knob r raise the feed roller t and insert the belt loop under the feed roller t 3 Turn the knob r in the direction of the arrow to fit the belt loop tip to the fixed knife q w e t r Fixed knife ...

Page 13: ...osition under the ac tuator the message shown at left will be dis played If this happens refer to 2 10 Passing through the belt loops on page 9 AUTO MODE Loop length 1st bobbin counter 2nd bobbin counter BAS 705 Main Ver 1 0 Panel Ver 1 0 X Y Ver 1 0 2 12 Checking the sewing data After the home position has been determined press the SELECT switches and The screen will then start scrolling so that ...

Page 14: ...he power switch 2 Open the control box cover and set DIP switch No 4 on the main circuit board to ON Refer to 8 2 Main circuit board DIP switch funtions on page 68 Initialized Check sewing data 3 Turn on the power After approximately 2 seconds have passed Initialized will appear on the display 4 Turn off the power switch set DIP switch No 4 on the main circuit board to OFF and then close the contr...

Page 15: ...changes made to any of the settings and selection of items This switch is used to reset the machine when an error occurs and to raise the presser foot when it has been lowered using the FOOT switch In addition it is used to lock a module which has been unlocked using the BOBBIN switch This switch is used to open a module when replacing a bobbin This switch is used to lower the presser foot when th...

Page 16: ...e setting will remain at the previous length setting 4 Press the ENTER switch t to accept the new length setting The cursor will then disappear This sets the length of belt loop material to be fed out before it is cut The length can be set to between 50 120 mm PROGRAM mode PROGRAM MODE 2nd bobbin counter Speed Loop length z 13 BAS 705 PROGRAM MODE 2nd bobbin counter Speed Loop length 選 択 SELECT モー...

Page 17: ...ration of the bobbin counter Enter 0 as the value when making the bobbin counter setting When the bobbin has been replaced you need to set the number of bar tacking stitches that the new bobbin can be used for The counter setting decreases by 1 each time a single bar tacking is sewn The bobbin counter operation can also be disabled if required The setting range is 0 999 14 BAS 705 PROGRAM MODE Pro...

Page 18: ...e display 4 Press the ENTER switch t The production counter setting will now be cleared The production counter increases by one each time a single belt loop is sewn The production counter can count up to a maximum of 9999 PROGRAM MODE Production counter 1st bobbin counter 2nd bobbin counter 15 BAS 705 選 択 SELECT モード MODE 確 定 ENTER リセット RESET 電 源 POWER 取り消し CANCEL 警 告 WARNING BAS 705 r t e w PROGRA...

Page 19: ...g will appear again on the display 4 Press the ENTER switch t The new sewing speed setting will appear on the display Set the machine sewing speed to the maximum sewing speed The sewing speed can be set to between 1 900 2 100 spm in units of 100 spm PROGRAM MODE 1nd bobbin counter 2nd bobbin counter Speed PROGRAM MODE 1nd bobbin counter 2nd bobbin counter Speed z PROGRAM MODE 1nd bobbin counter 2n...

Page 20: ...p by step in the forward direction If the SELECT switch e is pressed the machine will operate step by step in the backward direction Press the CANCEL switch r to resume normal operation AUTO MODE 2nd bobbin counter Speed Loop length ADJUSTMENT Loop feed X Y program X Y test feed LOOP FEED ADJ SW Forward step SW Backward step NOTE During step operation one of the steps is taken up with determining ...

Page 21: ...revi ously set program number will appear again on the display 6 Press the ENTER switch t The new program number setting will appear on the display At this time the feed mechanism will move to the sewing start position 3 PANEL OPERATION 3 2 6 Setting the program number This procedure is used to set the program number for a sewing pattern The standard sewing patterns are 1 29 stitches 2 36 stitches...

Page 22: ...L OPERATION 19 BAS 705 3 2 6 1 Pattern selection mode The following procedure lets you select the stitch pattern There are three different basic patterns which can be selected and these patterns are pre programmed into the sewing machine s ROM X Y PROGRAM ADJ Program No MM Xscale Yscale Operation method Use the and SELECT switches e to change the numbers and use the and SELECT switches e to move t...

Page 23: ...TER switch t The new scale ratio setting for the X scale or Y scale will appear on the display At this time the feed mechanism will return to the sewing home position This procedure is used to set the enlargement and reduction ratios for the sewing pattern in the X direction and Y direction The setting ranges for both the X scale and Y scale are between 45 150 However because the size of the patte...

Page 24: ...the SELECT switch e is pressed while the machine is sewing in the forward direction the opera tion will switch to backward step oper ation If the SELECT switch e is pressed while the SELECT switch e is being pressed the opera tion will switch to high speed forward step op eration If the SELECT switch e is pressed while the SELECT switch e is being pressed the op eration will switch to high speed b...

Page 25: ...switches e again to move the pointer so that X Y real feed is se lected and then press the ENTER switch t 5 Press the SELECT switch e Step operation will then be carried out at the real sewing speed The sewing pattern can be checked by operating the machine at the real sewing speed AUTO MODE 2nd bobbin counter Speed Loop length ADJUSTMENT Loop feed X Y program X Y test feed 22 BAS 705 選 択 SELECT モ...

Page 26: ...s the MODE switch w This will change the mode to ADJUSTMENT mode 3 Use the and SELECT switches e to move the pointer so that X Y program is selected and then press the ENTER switch t 4 Use the and SELECT switches e again to move the pointer so that X move or Y move is selected 5 While using the SELECT switch e to move the cursor press the and SELECT switches e to set the amount of movement If the ...

Page 27: ... w 2 To install the needle e for the second bar tacking loosen the set screw r insert the needle e as far as it will go so that the groove is facing away from you side A and then tighten the set screw r CAUTION Turn off the power switch before installing the needle otherwise the machine may operate of the start switch is depressed by mistake and serious injury could result 4 1 Replacing needle 24 ...

Page 28: ...read If the trailing length of the thread is too long it may cause the thread to become tangled If the thread coming from the thread block catches loosely on the cotton stand pass the thread through the thread guide spring when sewing Turn off the power switch before threading the thread otherwise the machine may operate if the start switch is depressed by mistake and serious injury could result C...

Page 29: ...owing the procedure described below To wind more thread onto the bobbin q loosen the screw r and move the bobbin presser arm e to adjust the thread winding amount 5 Once winding of the bobbin thread is completed remove the bobbin q from the bobbin winder shaft w and trim the thread using the thread trimmer t NOTE If the circuit protector y has been activated the bobbin winder motor will not operat...

Page 30: ...l be lowered and the X Y feed mechanism will be retracted If DIP switch No 1 4 is ON the fork will be retracted during loop setting when the fork is extended and the machine is in the standby condition 4 Use the operating panel to open the bobbin thread module e and then replace the bobbin case r 5 Press the RESET switch t to return the X Y feed mechanism to the sewing start position The presser f...

Page 31: ...may not be possible to cut the lower thread prop erly dur ing thread trimming 28 BAS 705 NOTE If the upper thread tension is too weak it will cause the thread to become tangled If this happens increase the upper thread tension q Stronger Stronger Weaker Weaker w q Stronger Stronger Weaker Weaker Weaker Weaker Weaker Weaker Stronger Stronger Stronger Stronger Specifications Upper thread Lower threa...

Page 32: ... tighten the screw r Thread take up spring tension The standard tension for thread take up spring L q and thread take up spring R w is 1 08 1 96 N 110gf 200gf for both sprnings NOTE The thread take up spring tension is the ten sion which is applied by the thread take up spring when it is horizontal to the lower end of the arm thread hook Thread take up spring Lq 1 Loosen the set screw e 2 Loosen t...

Page 33: ...annot be changed Press the RESET switch e to return to HEAD mode 4 6 Trial sewing 4 6 1 Raising and lowering the presser foot 1 With the machine in sewing standby mode press the FOOT switch q The presser foot will be lowered At this time the main thread tension discs will be opened simultaneously If DIP switch No 1 4 is set to ON the fork will be retracted during loop setting when the fork is ex t...

Page 34: ...ill continue until the end even if an upper thread breakage has been detected during sewing Obstructions to the thread may cause the 1st needle thread breakage and 2nd needle thread breakage messages to display even when there is no actual thread breakage E 181 1st needle thread breakage Press reset switch E 182 2nd needle thread breakage Press reset switch 31 BAS 705 リセット RESET 電 源 POWER q ...

Page 35: ...ill be set AUTO MODE 1st bobbin counter 2nd bobbin counter Production counter No loop Pass loop through the channel 32 BAS 705 Correcting the production counter While the production counter setting is being displayed press the SELECT switch to increase the counter setting by 1 and press the switch to decrease the setting by 1 If the bobbin thread counters are at 0 If DIP switch No 2 8 is set to OF...

Page 36: ...sser block B will be raised and it will then be possible to remove the loop 33 BAS 705 1 Unlock the EMERGENCY STOP switch During AUTO mode 1 Unlock the EMERGENCY STOP switch 2 Press the RESET switch The error will be cleared and the machine will switch to sewing standby mode Before the machine head starts 4 7 3 If the EMERGENCY STOP switch is pressed E 100 2 Press the RESET switch The error will b...

Page 37: ... the RESET switch The X Y feed mechanism will move back to the sewing start position and the presser foot will be raised Refer to 4 4 Bobbin case installation and threading on page 26 4 7 11 Altering the production counter value If the SELECT switch is pressed while the machine is in sewing standby mode the production counter value will increase by 1 If the SELECT switch is pressed the production ...

Page 38: ...ty precautions Use only the proper replacement parts as specified by Brother If any safety devices have been removed be absolutely sure to re install them to their original positions and check that they operate correctly before using the machine Any problems in machine operation which result from unauthorized modifications to the machine will not be covered by the warranty Maintenance and inspecti...

Page 39: ...eference line A from the bottom of the needle bar should be aligned with the bottom edge of the needle bar bracket w 2 Remove the screw r of the face plate e and then remove the face plate e 3 Loosen the screw t and then move the needle bar q up or down to adjust its height 5 STANDARD ADJUSTMENT MACHINE HEAD 36 BAS 705 q A w r e t q ...

Page 40: ...r guide will not obstruct each other 6 Turn the machine pulley to lower the needle bar t to its lowest point and then loosen the screw u and use a driver i to adjust so that the point of the shuttle hook is aligned with the center of the needle when the lowest reference line B on the needle bar t is aligned with the bottom edge of the needle bar bracket y 7 After adjusting turn on the air press th...

Page 41: ...e bar is aligned with the bottom edge of the needle bar bracket needle bar timing position 3 Turn the drive shaft w of the lower shaft module q and then loosen the set screw r and turn the eccentric connecting link stud t to adjust so that the driver e needle contact touches the needle when the point of the shuttle hook of the lower shaft module q is aligned with the center of the needle NOTE Exce...

Page 42: ...sition until the lowest reference 3 Turn the drive shaft w of the lower shaft module q and then loosen the set screw e and turn the eccentric connecting link stud r to adjust so that the clearance between the needle and the point of the shuttle hook is 0 01 0 08 mm when the point of the shuttle hook of the lower shaft module q is aligned with the center of the needle NOTE Because the upper shaft a...

Page 43: ...d guide is in the wrong position thread breakages soiled thread or catching of the thread may occur 5 7 Adjusting the movable knife 5 7 1 First bar tacking 1 Tilt back the machine head Refer to 5 1 Tilting back the machine head 2 Loosen the nut w and move thread trimmer rod L e to the left or right to adjust so that the V section A of the movable knife q is aligned with the index mark B on the nee...

Page 44: ...Loosen the screw of the thread trimmer lever u 1 Close the air cock q 2 Push the drain cock button w to release the air 6 While the thread trimmer lever roller i is touching the level surface of the thread trimmer cam o move the movable knife 0 to the left or right to adjust so that the V section A of the movable knife 0 is aligned with the index mark B on the needle plate 41 BAS 705 e r t y u q w...

Page 45: ...al play in the thread trimmer lever u 8 Let in the air and check that the clearance between the thread trimmer lever roller i and the level sur face of the thread trimmer cam o is 0 2 mm 9 Place the thread trimmer spring t onto the spring hook y and then install the BM front cover e with the six screws r 42 BAS 705 t y u i o i o 0 2mm ...

Page 46: ...ttle hook cover remove the screw q and then remove the feed plate w 2 Remove the two screws e and the two screws r and then remove the needle plate t 3 Remove the thread trimmer connecting rod y from the connecting rod lever pin u 43 BAS 705 first bar tacking second bar tacking e r t u y t q r w e t t y u ...

Page 47: ... knife o cut the thread cleanly If necessary adjust by using the appropriate movable knife washer 0 supplied as accessories 5 Install the fixed knife o at a distance of 1 mm from the needle hole plate 1 6 Place the thread trimming connecting rod y onto the connecting rod lever pin u and then install to the needle plate t 44 BAS 705 0 i o u y t o 1 1mm ...

Page 48: ...the RESET switch This will clear the error resulting from abnormal air pressure 5 8 2 Second bar tacking 1 Press the RESET switch on the operating panel to raise the needle to the needle up stop position 2 Press the FOOT switch to lower the presser foot The air will be released at this point 3 Loosen the set screw i and move the thread wiper u in the direction of the arrow to adjust so that the po...

Page 49: ...late with the two bolts 10 After adjusting move the feed plate to the home position and check that the window of the feed plate is aligned with the center of the needle Check using program no 0 46 BAS 705 q w r t A e 4 Loosen the three screws i and the screw o of the BM support base u and then move the bobbin module o in the direction of the arrow until the needle hole in the needle hole plate 0 a...

Page 50: ...sen the screw 4 of the presser set arm 3 and then move the presser set arm 3 to the left or right to adjust so that the needle down position is in the center of the oval hole in the presser foot 5 at the second bar tacking 13 Remove the needle hole jig and install the needle 47 BAS 705 Set home position Press the start switch 4 3 5 needle down position ...

Page 51: ...l them to their original positions and check that they operate correctly before using the machine Any problems in machine operation which result from unauthorized modifications to the machine will not be covered by the warranty Maintenance and inspection of the sewing machine should only be carried out by a qualified technician Ask your Brother dealer or a qualified electricianto carry out any mai...

Page 52: ...the position relative to the needle hole at this time if the air is released and the fork shaft y is lowered so that it is below the presser foot u The diameter of the fork shaft the loop thick ness and the amount of looseness will all have slight effects on the bar tacking position so carry out a test sewing to check the position 2 Loosen the two screws 0 and move the loosen loop presser plate i ...

Page 53: ... 0 gets in the way remove the two bolts 1 and then remove the upper guide plate 0 Refer to 6 1 5 Adjusting the upper guide plates on page 50 for details on the upper guide plate 2 Loosen the two bolts 1 move the loop hold plate 2 in between loop presser F i and loop presser B o and then tighten the bolt 1 1 Release the air loosen the bolt q and then move the cylinder stopper w up by the amount of ...

Page 54: ...f the upper guide plate interferes with the loop pressers remove the upper guide plate Installation Provisionally install upper guide plateAq or upper guide plate B to the presser unit setting plate w with the two bolts e adjust the upper guide plates so that the belt loops do not touch presser block F r and then se curely tighten the bolts e Upper guide plate A q can be used if the width be tween...

Page 55: ...gned move channel F right side r horizontally 3 Position the coupler of the channel to the coupler of the unit base Secure them using the bolt q 6 STANDARD ADJUSTMENT MECHANISMS 1 With loop presser B q and loop presser F w both in the raised position loosen the clamp lever e 2 Turn the bolt r so that the left edge of channel F t is aligned with the edges of loop presser B q and loop presser F w 3 ...

Page 56: ...oop presser r Check that the edge of the belt loop is parallel to the edge of the presser foot If they are at an angle loosen the bolt t and adjust as necessary 6 2 4 During sewing 53 BAS 705 If the horizontal position of the belt loops or the center position of the bar tackings is incorrect q r e w t graduation 1 Loosen the retract clamp lever q and retract the feeder w 2 Loosen the nut e 3 Turn ...

Page 57: ... that position t w q y e r If the 1st bar tacking position and 2nd bar tacking posi tion are not aligned 1 Check the items given in 6 6 Adjusting the folding 2 If the bar tacking positions are still not aligned after carrying out the adjustment check in step 1 loosen the bolt q and move the loop presser w to the left or right by the amount that the bar tacking is out of alignment 3 After adjusting...

Page 58: ...lt e NOTE1 Check that the loop sensor functions properly when the belt loop is not set When the loop sensor detects that the belt loop is not set the LOOP EMPTY indicator lights NOTE2 If the belt loop is thin adjust the dimension so that it is smaller than 2 0 5 mm 6 3 Adjustments required when the belt loop thickness is changed 1 If belt loops with no curls are being fed during step operation adj...

Page 59: ...6 Install the two retaining rings u and the fork bush ings i to the new fork 1 7 Secure the fork shafts L and S 00 with the two set screws o so that the bevelled surfaces face inward 8 Insert the new fork 1 into the rotary cylinder y 9 Turn the rotary cylinder t as shown in the illustration until it will not turn further and then hold fork shafts L and S 0 vertical beside each other and install th...

Page 60: ...t q and then remove the fork bracket e from the fork bracket shaft q 2 Insert the new fork bracket r onto the fork bracket shaft q until the end of the fork bracket r is aligned with the end of the loop presser t and then tighten the two set screws w When replacing fork shaft L and fork shaft S Loosen the set screw y and then replace for shaft L and fork shaft S u ...

Page 61: ...he thickness of the belt loops 3 Loosen the two bolts t of loop support B y and then align loop support B y with the top of loop presser B w 58 BAS 705 t y w coincidence 1 If the 1st bar tacking position and 2nd bar tacking position are not aligned Loosen the two bolts q and then move the fork bracket stopper w to adjust the position of the fork bracket so that the heights are the same After adjus...

Page 62: ...loop support B t and loop support F u when the belt loops o are being pressed during step operation 59 BAS 705 4 Loosen the two bolts A and then adjust so that the top of loop presser F e and the top of loop presser B w are aligned 5 Loosen the two bolts u of loop support F i and then align loop support F i with the top of loop presser F e o 0 t 1 u 2 e u i coincidence A ...

Page 63: ...ation 9 After adjusting tighten the nut 88 NOTE After adjusting the 1st bar tacking side check that there is the same amount of clearance at the 2nd bar tacking side If the clearances are different re check the adjustments given in steps 4 6 6 STANDARD ADJUSTMENT MECHANISMS 7 Loosen the two bolts 4 and adjust so that there is a slight distance about 0 3 mm between the belt loops o and loosen loop ...

Page 64: ...justing tighten the two bolts w of the loop hold plate q Adjust the air pressure using the air adjusting lever If it is parallel to the air tubes the air pressure will be greatest and if it is turned either way from this position the air pressure will become less Make the air pressure strong enough so that the belt loop joints are disposed of properly 6 4 Adjusting the looseness of the belt loops ...

Page 65: ...w in the direction of A To lengthen the folding margin Move the cutter unit base w in the direction of B 2 After adjusting tighten the two bolts q of the cutter unit base w NOTE Check that the cutter and the presser foot unit presser block etc do not interfere with each other Adjusting the folding margin at the second bar tacking Change the feeding out length setting for the belt loops using the o...

Page 66: ... loop guide plate is installed at an angle Adjust while referring to 6 4 Adjusting the loose ness of the belt loops on page 58 5 The machine head presser foot is touching the belt loop Adjust while referring to 6 9 Adjusting the height of the belt loop and presser foot on page 62 6 The loop presser foot is at an angle to the belt loop Adjust while referring to 6 2 3 Adjusting the loop spring guide...

Page 67: ... the air adjusting lever If it is parallel to the air tubes the air pressure will be greatest and if it is turned either way from this posi tion the air pressure will become less Make the air pressure strong enough so that the belt loop joints are disposed of properly NOTE Be sure to turn off the power switch and release the air before carrying out this operation Changing to flat cut 1 Remove the ...

Page 68: ... NOTE Remove all dust from the cutter unit 3 If the two screws r are removed the fixed knife t can be removed 4 Install by carrying out the above procedure in re verse NOTE When replacing the movable knife connect the loop support y to the new knife After replacing the movable knife if the mov able knife does not move smoothly or if it has a large amount of looseness loosen the four screws u and a...

Page 69: ...ated by the arrow and then remove the large shuttle hook w and the inner rotary hook e 3 Clean all the dust and thread ends from around the driver r the top of the rotary hook thread guide and the shuttle race NOTE Fill the machine with oil when the oil level is down to about one third full in the oil sight glass If oil is not added and the oil drops below this level there is the danger that the m...

Page 70: ...e Wipe the eye guard clean with a soft cloth Always check that the tip of the needle is not broken before starting sewing NOTE Do not use solvents such as kerosene or thinner to clean the eye guard 7 6 Cleaning the machine pulley 1 Remove the rubber plug at the bottom of the motor installation base 2 Use an air gun to blow air in through the four holes on the top of the machine head in order to cl...

Page 71: ...ead breakage detector To V cut a belt loop To display Japanese The fork is retracted when the FOOT switch or BOBBIN switch is pressed To activate loop set sensor Loops are fed at low speed To activate folding switch After automatic sewing the presser foot remains down Pressing the RESET switch will raise the presser foot OFF To deactivate the thread breakage detector To flat cut a belt loop To dis...

Page 72: ... SW2 8 ON Operation in cold climates Slow start up to the second stitch If the thread tangles at the sewing start the machine automatically resets and starts sewing again LOOP switch continuous setting resetting setting When bobbin counters reach 0 they are reset OFF Normal operation Normal operation Normal operation Normal operation When bobbin counters reach 0 they are reset and sewing resumes 1...

Page 73: ...cuit board DIP switch functions 70 BAS 705 DANGER Wait at least 5 minutes after turning off the power switch and disconnecting the power cord from the wall outlet before opening the face plate of the control box Touching areas where high volt ages are present can result in severe injury NOTE The DIP switches on the X Y feed circuit board should all be set to OFF X Y feed circuit board main circuit...

Page 74: ...T switch q Turn off the power w Release the air close the second bar tacking lower shaft module and then press the RESET switch q Close the cover of the second bar tacking lower shaft module w Press the RESET switch q Check the air pressure w Press the RESET switch q Turn off power switch w Check the power supply voltage q Check the operation of loop feed 1 sensor w Press the RESET switch q Check ...

Page 75: ... Error detecting X or Y home position for X Y feed Overheating of X Y feed circuit board Reading or writing error of EEPROM on in X Y feed circuit board q Turn off power switch w Initializethesewingdata q Close the lower shaft w Press the RESET switch q Check the lock cylinder and sensor w Press the RESET switch Refer to pages 29 q Remove the belt loop which was set incorrectly w Press the RESET s...

Page 76: ...rn the power back on again q Upper shaft motor and lower shaft motor synchronizati error w Open the second bar tacking lower shaft unit and clean away the thread scraps etc e Press the RESET switch Press the RESET switch to determine the home position q Turn off power switch w Check the installation position of the upper shaft q Turn off power switch w Wait 15 seconds and then torn the power back ...

Page 77: ... 45 Adjust the position of the thread wiper 45 Straighten the bend in the tube or replace the tube 7 Straighten the bend in the tube or replace the tube 7 Page Thread wiper does not operate correctly Presser does not rise Problem Lower thread winding amount is incorrect Cause Check Remedy Threads comes unthreaded Tension and height of thread take up spring Thread and needle Needle is too thick for...

Page 78: ... Adjust the needle clearance Adjust the needle bar lift amount Adjust the driver needle guard Replace the needle Install the needle so that the groove is facing forward Adjust the needle clearance 39 Adjust the needle bar lift amount 37 Replace the needle Select the correct needle for the sewing conditions Reduce the sewing speed File smooth or replace the affected part Adjust the tension and heig...

Page 79: ...sion and height are incorrect Damaged or burred shuttle race needle hole plate needle movable knife or shuttle race thread guide Upper thread breaks at the final stitch Thread jamming at the final stitch Adjust the tension and height of the thread take up spring 29 Reduce the thread amount 28 Decrease the tension or raise the height of the thread take up spring 29 Decrease the subtension 28 Decrea...

Page 80: ...t operate Turn the power off and clean away the thread scraps and dust from the shuttle hook surface Turn the power off and clean away the thread scraps and dust from the shuttle hook surface Turn the power off and clean away the thread scraps and dust from the shuttle hook surface Clean off the oil Turn the power off and clean away the thread scraps and dust from the shuttle hook surface Turn the...

Page 81: ... correct 44 Lower thread breaks at the final stitch Problem Page Remedy Check Cause Tension and height of thread take up spring Thread amount Thread take up amount is too large Incorrect height or tension of thread take up spring Double cutting during thread trimming Decrease the tension or raise the height of the thread take up spring 29 Reduce the thread amount ...

Page 82: ...loops are too curled Loop presser F is too high Widths of loop pressers F and B are too narrow Belt loops are too curled Belt loops are fed underneath loop presser F Belt loops are fed underneath loop presser B Adjust loop support T 55 Adjust the height of the loop presser B slider bracket 50 Replace with belt loops which are not so curled Adjust the height of the loop presser F slider bracket 50 ...

Page 83: ...nt position Distance between fork shafts is not suitable for belt thickness Knife stopper is stopping knife rotation base 2 DIP switch has not been changed before power was turned on Worn cutter knife Cutter does not cut properly Belt loops are not being picked up correctly The belt loops are not being held properly by the fork shafts Joints are not removed Replace the fork bracket assembly 56 Cha...

Page 84: ...ork Adjust the width adjustment plate Install correctly Replace with belt loops which are not so curled Adjust the loop guide spring Adjust the height of the sensor dog Adjust the height of the loosen loop presser set plate Adjust the height of the shock absorber underneath the driving cylinder arm 65 Belt loops are getting caught on presser foot Problem Cause Check Page Remedy Machine head presse...

Page 85: ...op guide Use 1 Set DIP switch 17 to ON and then turn on the power Refer to page 68 for operation of the DIP switch The belt loop guide will operate NOTE Always be sure to return the DIP switch to RESET when turning off the power 2 Put the cut off belt loop on loop presser foot B and loop presser foot F 3 Press the hand set switch q The belt loop will be folded NOTE At this time if the hand set swi...

Page 86: ...Bind the cord u of the thread breakage detector r with the band in the same way as the other cords and pass it inside the control box 5 Insert the connector i into the 16 pin connector o on the main circuit board When using the upper thread breakage detector assembly Set panel DIP switch No 1 1 to ON and then turn on the power When not using the upper thread breakage detector assembly Set panel DI...

Page 87: ... loops o through from the cylinder 1 to the channel guide 2 Attachment 1 Remove the two bolts and then remove the loop guide q from the sewing machine 2 Install the two posts e to the feeder base plate w 3 Install the belt slack device r to the posts e with the two bolts t 4 Connect the two air tubes 5 Install the solenoid valve u with the two screws and then connect the connector i 6 Connect the ...

Page 88: ...te 1 t loop sen sor plate 2 y and the sensor r 2 Move the sensor r up and down so that the sensor light beam is aligned with the reflective surface i of loop presser foot F u and then find the position where the LED of the sensor r illuminates steadily NOTE The appropriate distance between the reflective sur face i of loop presser foot F u and the sensor r is 40 45 mm 3 After adjusting tighten the...

Page 89: ...11 5 Clipping disposal funnel assembly S41906 001 1 Cut the magic tape q into three pieces and attach them to the power table 2 Set the clipping disposal funnel w then attach as shown in the figure 86 BAS 705 q w ...

Reviews: