Care and Maintenance
51
A
PPE
N
D
IX
3
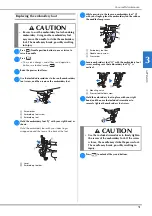
Replacing the embroidery foot
a
Press
(Needle position button) once or twice to
raise the needle.
b
Press .
The screen changes, and all keys and operation
buttons are locked (except
).
c
Raise the presser foot lever.
d
Use the included screwdriver to loosen the embroidery
foot screw, and then remove the embroidery foot.
1
Screwdriver
2
Embroidery foot screw
3
Embroidery foot
e
Hold the embroidery foot "Q" with your right hand, as
shown.
Hold the embroidery foot with your index finger
wrapped around the lever at the back of the foot.
1
Lever
2
Embroidery foot bar
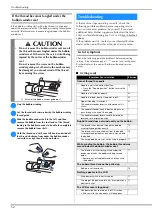
f
While pressing in the lever on embroidery foot “Q”
with your finger, place the embroidery foot bar above
the needle clamp screw.
1
Embroidery foot bar
2
Needle clamp screw
3
Presser bar
g
Secure embroidery foot “Q” with the embroidery foot
screw, making sure that embroidery foot “Q” is
vertical.
1
Mounting notch
2
Presser foot holder screw
h
Hold the embroidery foot in place with your right
hand, and then use the included screwdriver to
securely tighten the embroidery foot screw.
i
Press
to unlock all keys and buttons.
CAUTION
• Be sure to use the embroidery foot when doing
embroidery. Using another embroidery foot
may cause the needle to strike the embroidery
foot. The needle may break, possibly resulting
in injury.
a
c
b
a
b
CAUTION
• Use the included screwdriver to firmly tighten
the screw of the embroidery foot. If the screw
is loose, the needle may strike the presser foot.
The needle may break, possibly resulting in
injury.
a
b
c
b
a

