background image

Winding/Installing the Bobbin

GE
T

T

IN

G RE

A

D

Y

17

1

Setting the wireless LAN connection from the 
[Others] menu

The [Others] menu on page 8 of the settings screen 
contains the following items.

1

TCP/IP settings can be manually entered.

2

Shows the MAC address.

3

Use when proxy settings are required.

4

Resets the wireless LAN connection settings.

Winding the bobbin

This section describes how to wind thread onto a bobbin.

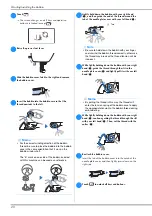
a

Open the top cover.

b

Place the bobbin on the bobbin winder shaft so that the 
notch in the bobbin aligns with the spring on the shaft, 
and then slide the bobbin winder shaft to the right until 
it snaps into place.

1
2

3

4

Winding/Installing the Bobbin

IMPORTANT

• Use the plastic bobbin that comes with this 

machine or bobbins of the same type. The 
bobbin's height is 11.5 mm (approx. 7/16 
inch). SA156 is a Class 15 type bobbin.

Note

• When winding bobbin for embroidery, be sure to 

use the recommended bobbin thread for this 
machine.

1

Notch

2

Bobbin winder 
shaft spring

Memo

• By placing the bobbin into the bobbin case in the 

same orientation that it was on the bobbin winder 
shaft, the bobbin can be installed with the correct 
winding direction of the bobbin thread. 

The “b” mark on one side of the bobbin included 
with this machine can be used as a reference.

a

b

Summary of Contents for 888-K80

Page 1: ...al Embroidery Machine Product Code 888 K80 L80 L82 Be sure to read this document before using the machine We recommend that you keep this document nearby for future reference Instruction Videos https s brother cvhaq ...

Page 2: ......

Page 3: ...ord or plug if it is not working properly has been dropped or damaged or water is spilled on the unit Return the machine to the nearest authorized Brother dealer for examination repair electrical or mechanical adjustment While the machine is stored or in use if you notice anything unusual such as an odor heat discoloration or deformation stop using the machine immediately and unplug the power cord...

Page 4: ...occurs or adjustment is required first follow the troubleshooting table in the back of the Operation Manual to inspect and adjust the machine yourself If the problem persists please consult your local authorized Brother dealer Use this machine only for its intended use as described in the manual Use accessories recommended by the manufacturer as contained in this manual The contents of this manual...

Page 5: ...owever there is no guarantee that interference will not occur in a particular installation If this equipment does cause harmful interference to radio or television reception which can be determined by turning the equipment off and on the user is encouraged to try to correct the interference by one or more of the following measures Reorient or relocate the receiving antenna Increase the separation ...

Page 6: ...upport website Visit support brother com Declaration of Conformity for RE Directive 2014 53 EU Europe and Turkey only Applicable to models with radio interfaces We Brother Industries Ltd 15 1 Naeshiro cho Mizuho ku Nagoya 467 8561 Japan declare that these products are in conformity with the provisions of the RE Directive 2014 53 EU The Declaration of Conformity DoC can be downloaded from Brother s...

Page 7: ...or any part of the Software 2 1 3 not to distribute provide or make available the Software in any form in whole or in part to any person without prior written consent from Company 2 1 4 not to copy the Software except where such copying is incidental to normal use of the Software with Company Product or where it is necessary for the purpose of back up or operational security 2 1 5 not to transfer ...

Page 8: ...e by a court of competent jurisdiction such provisions shall be severable and independent from the other provisions of this Agreement and the validity of the other provisions and of the entire Agreement shall not be affected thereby 6 5 This Agreement together with all exhibits or other attachments referenced herein constitutes the entire agreement between the parties on the subject matter hereof ...

Page 9: ...ompanies appearing on Brother products related documents and any other materials are all trademarks or registered trademarks of those respective companies This product includes software developed by the following vendor 2008 Devicescape Software Inc Make sure you use a router or firewall when connecting your machine to the Internet to protect it against unauthorized access from the Internet OPEN S...

Page 10: ...ting thread tension 36 Adjusting the bobbin case with no color on the screw 37 Using the automatic thread cutting function End Color Trim 38 Using the thread trimming function Jump Stitch Trim 38 Embroidering the appliqué patterns 39 Using a frame pattern to make an appliqué 40 Split embroidery patterns 41 Editing Patterns Pattern Editing Screen 41 Editing Patterns Embroidery Settings Screen 43 Al...

Page 11: ...wer supply jack page 11 I Air vent The air vent allows the air surrounding the motor to circulate Do not cover the air vent while the machine is being used J USB port for a USB flash drive page 46 Needle and presser foot section 1 Needle bar thread guide page 22 2 Needle plate 3 Needle plate cover page 20 4 Bobbin cover bobbin case page 20 page 50 5 Embroidery foot page 34 page 51 The embroidery f...

Page 12: ...en there are items that are not displayed on the LCD 4 Help key Touch to get help on using the machine 5 Settings key Touch to set the needle stop position the buzzer sound and more 6 Embroidery key Touch to display the pattern type selection screen 7 Back key Touch to return to the previous screen 8 Presser foot Needle exchange key Touch this key before changing the needle the presser foot etc Th...

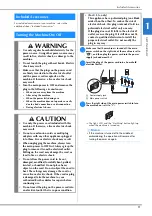
Page 13: ...nnection or a disconnection During electrical storms CAUTION Use only the power cord included with this machine Otherwise a fire or electric shock may result Do not use extension cords or multi plug adapters with any other appliances plugged into them Fire or electric shock may result When unplugging the machine always turn the main power to OFF first Always grasp the plug to remove it from the el...

Page 14: ...page 46 4 Touch this key to position the embroidery unit for storage Settings screen Touch to change the default machine settings Touch or after you changed necessary settings Note When you first turn on the machine Select the display language for the LCD The following message about a wireless LAN connection appears To set up a connection touch and then refer to steps c through f in Using the wiza...

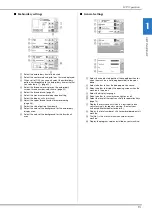
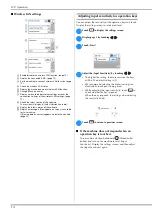
Page 15: ... display area A Select the color of the background for the thumbnail area General settings 1 Select the needle stop position the needle position for when the machine is not being operated to be up or down 2 Select whether to hear the beep operation sound 3 Select whether to display the opening screen when the machine is turned on 4 Select the display language 5 Select whether to turn work area lig...

Page 16: ...ut sensitivity for operation keys You can adjust the sensitivity of the operation keys to 5 levels Display the settings screen to set desired level a Touch to display the settings screen b Display page 5 by touching c Touch Start d Adjust the Input Sensitivity by touching The higher the setting the more sensitive the keys will be The default setting is 3 We recommend selecting the highest setting ...

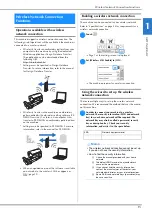
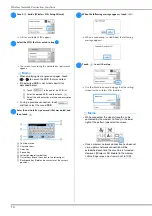
Page 17: ...ection The machine can be connected to your wireless network Refer to Specifications on page 58 for requirements for a wireless network connection a Touch Page 7 of the settings screen is displayed b Set Wireless LAN Enable to ON The machine prepares for wireless connection Using the wizard to set up the wireless network connection There are multiple ways to set up the wireless network connection ...

Page 18: ...tup Use the Machine name on page 8 of the settings screen for the wireless LAN function Memo When displaying next or previous pages touch or to search the SSID that was noted If the desired SSID is not listed specify it as described below 1 Touch in the end of the SSID list 2 Enter the desired SSID and then touch 3 Select the authentication method and encryption mode If using a previous connection...

Page 19: ...ng on the shaft and then slide the bobbin winder shaft to the right until it snaps into place 1 2 3 4 Winding Installing the Bobbin IMPORTANT Use the plastic bobbin that comes with this machine or bobbins of the same type The bobbin s height is 11 5 mm approx 7 16 inch SA156 is a Class 15 type bobbin Note When winding bobbin for embroidery be sure to use the recommended bobbin thread for this mach...

Page 20: ... be damaged Three spool cap sizes are available allowing you to choose a spool cap that best fits the size of spool being used If the spool cap is too small for the spool being used the thread may catch on the slit in the spool or the machine may be damaged When using mini king thread spool use the thread spool insert mini king thread spool 1 Note When using the spool as shown below use the thread...

Page 21: ...ead by simply inserting the bobbin in the bobbin case and guiding the thread through the slit in the needle plate cover a Turn on the machine b Press Needle position button once or twice to raise the needle Note Make sure that the thread is passed under the pretension disk Note Be sure to wind the thread clockwise around the bobbin otherwise the thread will become wrapped around the bobbin winder ...

Page 22: ...guiding the thread through the slit with your left hand 2 Then cut the thread with the cutter 3 j Reattach the bobbin cover Insert the tab of the bobbin cover into the notch of the needle plate cover and then lightly press down on the right side k Touch to unlock all keys and buttons Memo For the correct winding direction of the bobbin thread be sure to place the bobbin into the bobbin case in the...

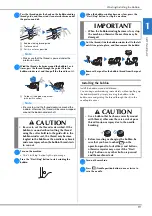
Page 23: ... pin Slide the spool cap as far as possible to the right as shown with the rounded side on the left Upper Threading CAUTION When threading the upper thread carefully follow the instructions If the upper threading is not correct the thread may become tangled or the needle may break and cause injury CAUTION When threading the needle be sure that you have touched on the operation panel to lock all ke...

Page 24: ... passed through the needle bar thread guide to the left then pass the thread through the notch of the thread guide and then firmly pull the thread from the front and insert it into the slit of the thread guide disk marked 7 all the way 1 Notch of the thread guide 2 Thread guide disk l Lower the presser foot lever to lower the presser foot m Cut the thread with the thread cutter on the left side of...

Page 25: ...d the higher the needle number the larger the needle Embroidery needles It is recommended to use a 75 11 home sewing machine needle However if the machine is not stitching well when embroidering on heavy weight fabric please try a 90 14 needle Checking the needle Before using the needle place the flat side of the needle on a flat surface and check that the distance between the needle and the flat ...

Page 26: ...loosening or tightening the needle clamp screw otherwise certain parts of the machine may be damaged The needle clamp screw can also be turned with the disc shaped screwdriver f With the flat side of the needle toward the rear of the machine insert the new needle until it touches the needle stopper Using the screwdriver tighten the needle clamp screw by turning it clockwise g Follow steps e to h R...

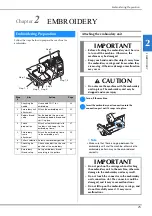
Page 27: ...e embroidery 34 8 Embroidery thread setup Set up embroidery thread according to the pattern 34 Step 3 Step 1 2 Step 5 Step 6 Step 4 Step 7 8 Step 9 IMPORTANT Before attaching the embroidery unit be sure to turn off the machine Otherwise the machine may be damaged Keep your hands and other objects away from the embroidery carriage and frame when they are moving Otherwise damage or malfunction may o...

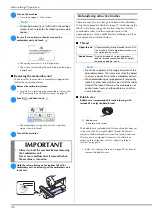
Page 28: ...ed for embroidering with included 90 weight bobbin thread 1 Bobbin case no color on the screw The bobbin case included with this machine has been set to be used with 90 weight bobbin thread If different weights of bobbin threads are used the tension screw on this case can be adjusted if necessary For details on adjusting thread tension refer to Adjusting thread tension on page 36 Refer to Cleaning...

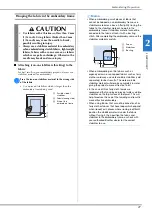
Page 29: ...se After lightly ironing the fabric to the stabilizer material hoop it in the embroidery frame If stabilizer material cannot be ironed onto the fabric attach it with a basting stitch After completing the embroidery remove the stabilizer material carefully When embroidering on thin fabrics such as organdy or lawn or on napped fabrics such as terry cloth or corduroy use water soluble stabilizer sold...

Page 30: ...efore beginning to embroider make sure that the top edges of the inner and outer frames are aligned g Tighten the adjustment screw while removing any slack in the fabric by hand The goal is to have a drum like sound when the fabric is struck lightly Using the embroidery sheet When you want to embroider the pattern in a particular place use the embroidery sheet with the frame a With a chalk pencil ...

Page 31: ... foot b While lightly holding the lever on the frame holder to the left align the two pins on the embroidery frame holder with the mounting brackets on the frame and then press the frame into the embroidery frame holder until a click is heard Hold the lever lightly to the left 1 Lever Press the front mounting bracket onto the pin until it fits into place 1 Front mounting bracket 2 Front pin Press ...

Page 32: ...h pins If only one of the pins is inserted the pattern may not turn out correctly Make sure that the notch on the side of the embroidery frame fits firmly under the bend in the lever 1 Notch on embroidery frame 2 Bend in lever 3 Carriage 4 Embroidery frame Notch 1 fits firmly under the bend in the lever 2 Notch 1 does not fit firmly under the bend in the lever 2 1 Notch on embroidery frame 2 Bend ...

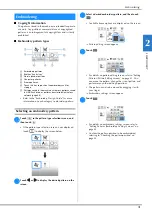
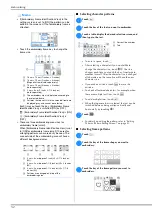
Page 33: ...tern a Touch in the pattern type selection screen and then touch If the pattern type selection screen is not displayed touch to display the screen below b Touch or to display the desired pattern on the screen c Select a desired embroidery pattern and then touch Available frame options are displayed on the screen Pattern editing screen appears d Touch For details on pattern editing screen refer to ...

Page 34: ...tion View in the settings screen is set to ON the pattern can be edited in the screen as if that embroidery frame is attached Touch the embroidery frame key to change the frame size 1 18 cm 13 cm 7 inches 5 inches 2 18 cm 10 cm 7 inches 4 inches Magnetic frame sold separately 3 10 cm 10 cm 4 inches 4 inches sold separately 4 2 cm 6 cm 1 inch 2 1 2 inches sold separately 5 The embroidery area is di...

Page 35: ...ouch and then select For details on character editing refer to Font editing screen on page 42 g Change the layout of the characters and then touch two times to return to the pattern editing screen h Touch to change the color i Change the color of the characters and then touch For details on changing colors refer to Pattern editing screen on page 41 j Edit the pattern position The pattern can be se...

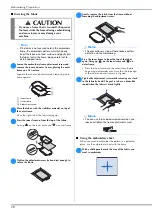
Page 36: ...nging the thread color display on page 35 The automatic thread cutting function will cut the thread at the end of embroidering each color This function is initially turned on To turn this function off touch key and then touch b Thread the machine and needle with embroidery thread Refer to Threading the upper thread on page 21 c Raise the presser foot lever and pass the thread through the embroider...

Page 37: ...olor is embroidered a message informing you the embroidering is finished will appear on the display Touch and the display will return to the initial screen i Cut the excess thread jumps within the color Changing the thread color display You can display the name of the thread colors or embroidery thread number a Touch and use or to display the following settings screen b Use or of the menu to selec...

Page 38: ...ring Resuming embroidery after turning off the power The current color and stitch number are saved when embroidery is stopped The next time the machine is turned on you have the option to continue or delete the pattern Adjusting thread tension The upper thread tension is changed a Touch b Touch to loosen the upper thread tension The tension number will decrease Touch to tighten the upper thread te...

Page 39: ...side of fabric seems to be lifting looping and bobbin thread is not seen on the wrong side of fabric If this occurs turn the slotted head screw counterclockwise being careful not to over loosen the screw approximately 30 45 degrees to decrease bobbin tension 1 Right side top of fabric 2 Wrong side bottom of fabric 1 Right side top of fabric 2 Wrong side bottom of fabric Note If the upper thread is...

Page 40: ...an select the length at which jump stitch trimming starts Your customized setting remains after turning the machine off and on Touch or to select the length of jump stitch For example Touch to select 25 mm 1 inch and the machine will not trim a jump stitch of 25 mm or less before moving to the next stitching IMPORTANT When adjusting the bobbin case be sure to remove the bobbin from the bobbin case...

Page 41: ... base fabric b After the appliqué piece is attached attach the embroidery frame to the machine Thread the machine with the embroidery thread lower the presser foot lever and then press the Start Stop button to embroider the appliqué Note The correct names and numbers of the thread colors to be used will not appear Select the thread colors depending on those in the appliqué pattern Some appliqué pa...

Page 42: ...shape as the appliqué Embroider over the appliqué and base fabric from step b to create the appliqué Method 2 a Select a straight stitch frame pattern and embroider the pattern onto the base fabric b Place the appliqué fabric over the pattern embroidered in step a and embroider the same pattern on the appliqué fabric Be sure that the appliqué fabric completely covers the stitched line c Remove the...

Page 43: ...mbroider the remaining sections of the pattern When a pattern is selected in the pattern selection screen and is touched the pattern editing screen appears After touching any of the keys to edit the pattern touch to return to the previous screen To finish all the editing touch to continue to the embroidery settings screen Pattern editing screen Editing Patterns Pattern Editing Screen CAUTION When ...

Page 44: ...use this key to select a part of the pattern to edit The selected pattern is outlined by the red box Pattern select key B Touch this key to add another embroidery pattern to currently displayed pattern Add key C Touch this key to make a horizontal mirror image of the selected pattern Horizontal mirror image key No Display Explanation Key Name D Touch this key to change thread density for some alph...

Page 45: ... spacing Touch to return the pattern to its original appearance Character spacing key 8 When a combined pattern is selected use this key to select a part of the pattern to edit The selected pattern is outlined by the red box If the line feed key was used while entering text single lines can be selected Select key No Display Explanation Key Name Editing Patterns Embroidery Settings Screen No Displa...

Page 46: ...me Example Linking DEF to the characters ABC using embroidery frame 10 cm 10 cm 4 inches 4 inches sold separately with some models a Select the character patterns for ABC and then touch and b Touch c Touch and then touch The needle is positioned in the lower left corner of the pattern The embroidery frame moves so that the needle is positioned correctly d Touch e Lower the embroidery foot and then...

Page 47: ...d press the Start Stop button to begin embroidering the remaining character patterns Thread color sorting This function allows you to embroider a combined pattern while replacing the thread spool a minimal number of times Before starting to embroider touch in the embroidery settings screen to rearrange the embroidery order and sort it by thread colors a Touch Touch again to check the sorted thread...

Page 48: ...sh drive or transferred via wireless network a When retrieving the embroidery patterns from a USB flash drive insert the USB flash drive into the USB port on the machine To retrieve embroidery patterns via wireless network use PE DESIGN version 11 or later or Design Database Transfer to transfer the patterns in advance For details on transferring embroidery patterns refer to the manual for PE DESI...

Page 49: ...eys 1 Touch 2 Touch the key for the desired destination Saves to the machine Saves to the USB flash drive Temporarily saves to the wireless function pocket When saving patterns retrieved via USB or wireless network to the machine touch When you touch the selected embroidery pattern will be deleted permanently ...

Page 50: ...Using the Memory Function 48 ...

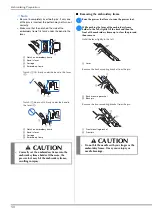
Page 51: ...r a flame heater or air conditioner Outdoors or exposed to direct sunlight Exposed to extremely dusty or oily environments Cleaning the race Stitching performance will suffer if lint and dust collects in the bobbin case therefore it should be cleaned regularly a Press Needle position button to raise the needle b Turn off the machine c Unplug the power cord from the power supply jack on the right s...

Page 52: ...ing If the screen does not respond correctly when you touch a key the machine does not perform the operation or performs a different operation follow the steps below to make the proper adjustments a Holding your finger on the screen turn the main power switch to OFF and back to ON The touch panel adjustment screen is displayed b Lightly touch the center of each in order from 1 to 5 c Turn the main...

Page 53: ...ace the embroidery foot bar above the needle clamp screw 1 Embroidery foot bar 2 Needle clamp screw 3 Presser bar g Secure embroidery foot Q with the embroidery foot screw making sure that embroidery foot Q is vertical 1 Mounting notch 2 Presser foot holder screw h Hold the embroidery foot in place with your right hand and then use the included screwdriver to securely tighten the embroidery foot s...

Page 54: ... Otherwise there is a risk of being injured by the cutter of the bobbin winder seat Do not remove the screw on the bobbin winder guide post otherwise the machine may be damaged you cannot wind off the thread by removing the screw 1 Screw of the bobbin winder guide post 1 Troubleshooting Symptom Cause solution Reference Cannot thread the needle Needle is not in the correct position Press the Needle...

Page 55: ...broidered 27 Bobbin thread is incorrectly wound 17 Symptom Cause solution Reference Upper thread breaks Machine is not threaded correctly used the wrong spool cap spool cap is loose the thread did not catch the needle bar threader etc 21 Knotted or tangled thread is being used Upper thread tension is too tight 36 Thread is tangled 21 Needle is turned bent or the point is dull 23 Needle is installe...

Page 56: ... for the proper stabilizer 27 There was an object placed near the machine and the carriage or embroidery frame hit the object during embroidering 25 Material coming out of the embroidery frame is causing problems Stretch the fabric on the frame once again so that the material coming out of the embroidery frame does not cause problems rotate the pattern and embroider 27 A heavy fabric is being embr...

Page 57: ...the bobbin runs out of thread during embroidering on page 36 to align the needle position and embroider the remainder of the pattern 6 Pattern extends to the outside of embroidery frame This message appears when the selected embroidery pattern is larger than the embroidery frame selected when Embroidery Frame Identification View is set to ON Select a larger frame 7 Pattern extends to the outside o...

Page 58: ...ess access point router is using MAC address filtering confirm the MAC address of this machine is allowed in the filter 2 If you manually entered the SSID and security information SSID authentication method encryption method network key password the information may be incorrect Reconfirm the SSID and security information and re enter the correct information as necessary page 15 Refer to How can I ...

Page 59: ...ve to manually enter the SSID 1 You should see the documentation provided with your wireless access point router 2 The default SSID wireless network name could be the manufacturer s name or the model name 3 If you do not know the security information please consult the router manufacturer your system administrator or internet provider 4 Some Wireless SSIDs and network keys passwords are case upper...

Page 60: ...s may change without notice Specifications Item Specification Dimensions of machine 888 K80 1 444 mm W 241 mm D 300 mm H Approx 17 15 32 inches W 9 16 32 inches D 11 13 16 inches H 888 L80 L82 1 444 mm W 248 mm D 300 mm H Approx 17 15 32 inches W 9 25 32 inches D 11 13 16 inches H Weight of machine Approx 8 0 kg Approx 17 lb Dimensions of machine with embroidery unit attached 598 mm W 339 mm D 300...

Page 61: ... software is available on our website Update the software No updated software is available Version information can be checked from the settings screen page 14 a Turn on the machine while pressing and holding Needle position button The following screen appears b Insert the USB flash drive into the USB port on the machine c Touch Do not turn off the machine during the update When updating is finishe...

Page 62: ...ch Trim 38 L Language 13 LCD 10 12 Light 13 M Maintenance 49 Memory 46 Metallic thread 18 22 Mirroring 42 N Needle 23 Needle plate 9 Needle plate cover 9 49 Needle position 13 Needle threader 22 O Operation beep 13 P Power supply 11 Presser foot replacement 51 R Race 50 Replacing presser foot 51 Retrieving 46 Rotate 42 43 S Saving 46 Size 42 Split embroidery patterns 41 Spool cap 18 Spool net 18 S...

Page 63: ......

Page 64: ......

Page 65: ......

Page 66: ......

Page 67: ......

Page 68: ...Play or App Store to download This machine is approved for use in the country of purchase only Local Brother companies or their dealers will only support machines purchased in their own countries Be sure to install the latest software A variety of functional improvements are being performed in the latest version Design Database Transfer is a dedicated Windows application for wirelessly transferrin...

Reviews: