background image

C.

D.

93123   Rev. A

5

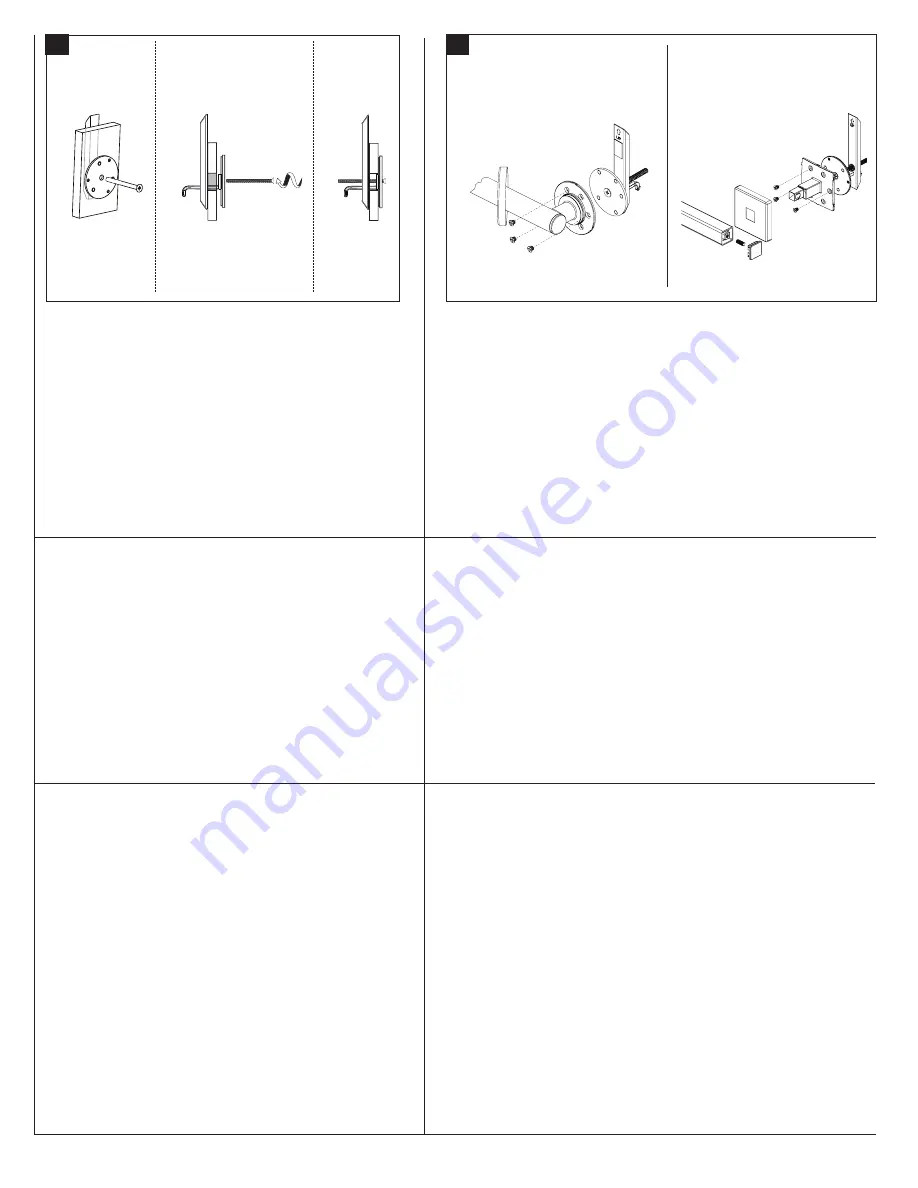
1.  Hold on tightly to the flange and keep pressure on the bar 

behind the wall to ensure that the bar stays upright with the 

longest part of the bar pointing upward. The bar behind the wall 

must always be upright and the longest part must be pointing 

upward for the anchor to perform properly.

2.  As you hold the flange and apply pressure to the bar by pulling 

outward, insert a 3” machine screw into the center hole of the 

flange. Then align the machine screw with the threaded insert in 

the bar and tighten until the flange plate is flush against the wall. 

Ensure flange is secure against wall without any movement.

Align holes in mounting flange of grab bar with threaded holes in installed anchor.  

Use the #10-24 machine screws supplied with the wall anchor to fasten the product 

to the wall anchor. Three screws are needed to properly secure the grab bar to the 

wall anchor.

Alinee los orificios de la brida de montaje de la barra de agarre con los orificios 

roscados en el anclaje instalado. Use los  #10-24 tornillos de máquina suministrados 

con el anclaje de pared para sujetar el producto al anclaje de pared. Se necesitan 

tres tornillos para asegurar adecuadamente la barra de agarre al anclaje de pared.

Alignez les trous dans la bride de montage de la barre d'appui avec les trous filetés 

dans l'ancre installée. Utilisez les #10-24 vis de machine fournies avec l'ancre 

murale pour fixer le produit à l’ancre murale. Trois vis sont nécessaires pour bien 

fixer la barre d'appui au mur.

For Traditional & Euro Round models 

Para los modelos de Traditional & Euro 

Round

Pour les modèles traditionnels et de la 

ronde d'euro

For Euro Square  models

Para los modelos de Euro Square

Pour les modèles Euro carré

1.  Sujete firmemente la brida y mantenga la presión sobre la barra 

detrás de la pared para asegurarse de que la barra permanece 

en posición vertical con la parte más larga de la barra 

apuntando hacia arriba. La barra detrás de la pared siempre 

debe estar en posición vertical y la parte más larga debe estar 

apuntando hacia arriba para que el anclaje funcione 

correctamente. 

2.  Mientras sujeta la brida y aplica presión a la barra halando hacia 

afuera, inserte un tornillo de 3" en el orificio central de la brida.  

A continuación, alinee el tornillo de la máquina con la inserción 

roscada en la barra y apriétela hasta que la placa de la brida 

esté alineada contra la pared. Asegúrese de que la brida esté 

segura contra la pared sin ningún movimiento.

1.  Tenez fermement la collerette et maintenez la pression contre 

l'arrière du mur pour vous assurer que le renfort reste à la 

verticale, sa partie la plus longue au sommet. Le renfort contre 

l’arrière du mur doit toujours être à la verticale et sa partie la 

plus longue doit pointer vers le haut, pour que l'ancrage soit 

utilisable.

2.  Alors que vous tenez la collerette et faites pression sur le renfort 

en tirant vers l'extérieur, insérez une vis à métaux de 3 po dans 

le trou central de la collerette. Ensuite, alignez la vis de la 

machine avec l'insert fileté dans la barre et serrez jusqu'à ce que 

la plaque de bride soit au ras du mur. Assurez-vous que la bride 

est bien fixée contre le mur sans aucun mouvement.

Summary of Contents for 69310

Page 1: ...ezas y hardware incluidos Pièces et matériel inclus Set of Mounting Hardware Six 6 10 x 2 1 2 Wood Screws Juego de Herramientas de Instalación Seis 6 10 x 2 1 2 Tornillos de Madera Set de Matériel de Montage Six 6 Vis à Bois 10 x 2 1 2 Wall Anchor 1 Anclaje de pared 1 Ancrage mural 1 ADA COMPLIANT GRAB BAR WHEN INSTALLED PER THE ACCESSIBILITY GUIDELINES OF THE ACT ADA DE CUMPLIMIENTO CON LA BARRA ...

Page 2: ...her obstructions exist behind wall 1 Retire la barra de agarre y los componentes desde el embalaje 2 Determine la ubicación y orientación de la instalación deseada Para las instalaciones montadas en los montantes utilice un buscador de montantes para verificar la ubicación de los montantes 3 Para los modelos de Tradicional Eurocopa tire suavemente los escudos desde las bridas de montaje para expon...

Page 3: ...2 Répétez l étape 1 pour l extrémité opposée de la barre d appui 3 Appliquez le produit d étanchéité dans les trous percés et sur les surfaces de bride de montage qui s accouplent au mur avec un mastic silicone approprié pour les applications humides 4 Pour les modèles traditionnels et en rondes d euros Fig C Mettez l ensemble de la barre d appui contre le mur et alignez les trous de vis dans la b...

Page 4: ...la instalación 6 Encuentre el ancla suministrada mueva la barra hacia abajo en el extremo del brazo La barra debe inclinarse ligeramente N INSTALLEZ PAS les ancrages muraux fournis dans un revêtement mural ayant moins de 1 2 po ou plus de 2 1 2 po d épaisseur N INSTALLEZ PAS les ancrages muraux fournis dans un revêtement mural endommagé par l eau ou pourri N INSTALLEZ PAS les ancrages muraux fourn...

Page 5: ... d appui au mur For Traditional Euro Round models Para los modelos de Traditional Euro Round Pour les modèles traditionnels et de la ronde d euro For Euro Square models Para los modelos de Euro Square Pour les modèles Euro carré 1 Sujete firmemente la brida y mantenga la presión sobre la barra detrás de la pared para asegurarse de que la barra permanece en posición vertical con la parte más larga ...

Page 6: ...nillos de Montaje 6 Vis de montage 6 RP93476 Mounting Screws 6 Tornillos de Montaje 6 Vis de montage 6 RP93475 Hollow Wall Anchor Anclaje de Pared Hueca Ancrage par mur creux RP93475 Hollow Wall Anchor Anclaje de Pared Hueca Ancrage par mur creux RP93475 Hollow Wall Anchor Anclaje de Pared Hueca Ancrage par mur creux RP93477p End Cap Set Screw Wrench Tapa Tornillo de Fijación Llave Capuchon de fin...

Page 7: ...or solid support at least two 2 of the three 3 screws on the end of the Grab Bar MUST go through the wallboard or tile and be tightly secured into the wall stud Given standard stud sizes only two 2 of the three 3 screws may screw into the wall stud Grab Bar may be installed vertically horizontally or at an angle so long as at least two 2 of the three 3 mounting screws on one end of the Grab Bar ar...

Page 8: ...D TO THE STATUTORY PERIOD OR THE DURATION OF THIS WARRANTY WHICHEVER IS SHORTER Some states provinces do not allow limitations on how long an implied warranty lasts so this limitation may not apply to you Limitation of Special Incidental or Consequential Damages BRIZO KITCHEN BATH COMPANY SHALL NOT BE LIABLE FOR ANY SPECIAL INCIDENTAL OR CONSEQUENTIAL DAMAGES INCLUDING LABOR CHARGES TO REPAIR REPL...

Reviews: