background image

6K689

Page 9

1

.

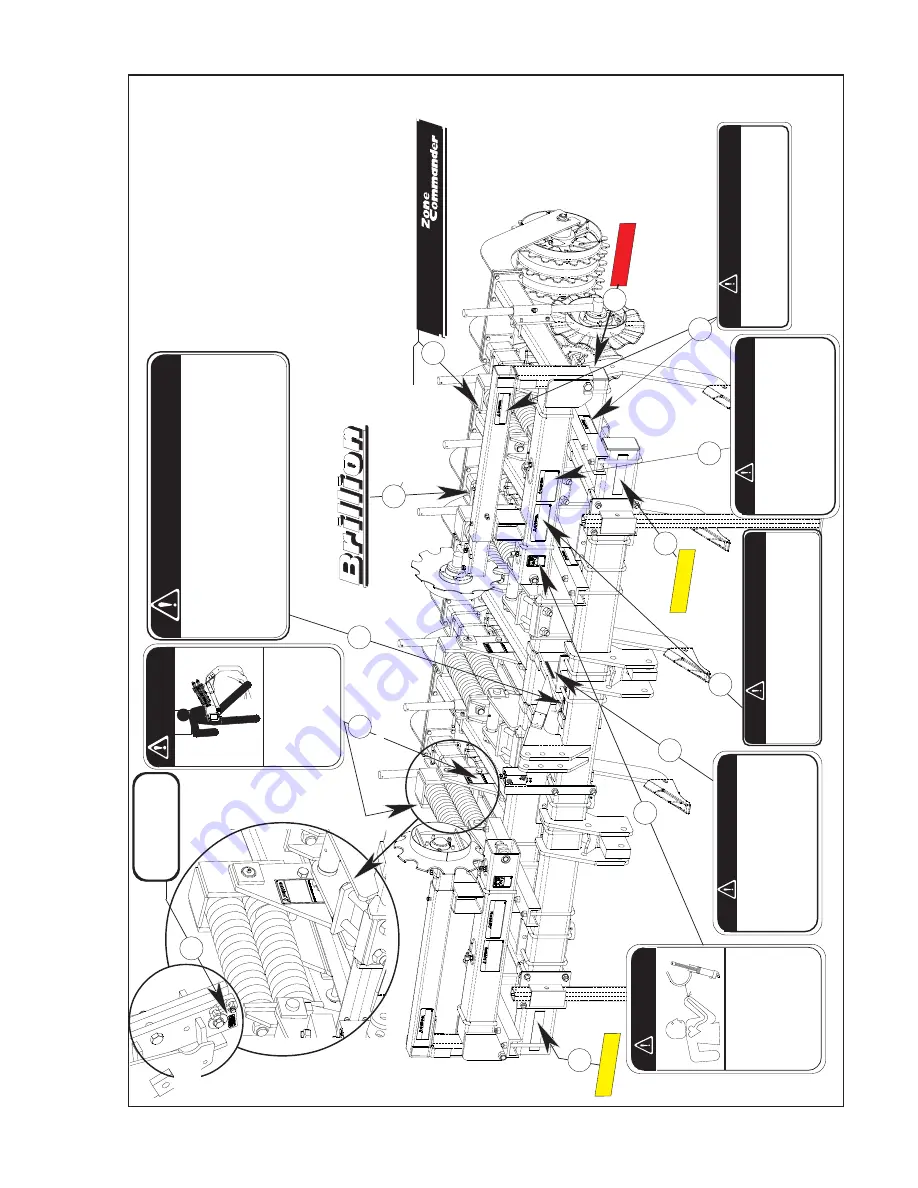
8J310 - Caution List

2

.

6K883 - Shank Under Load

3

.

2J431 -  

Amber Reflective

4

.

2J430 - Red Reflective

5

.

6K800 - Zone Commander

6

.

4K103 - Brillion

7

.

3K706 - Hydraulic Leak Hazard

8

.

3J678 - Bleed 

Air from Cylinders

9

.

9J629 - W

atch for Electrical W

ires

10.

3J675 - Falling Wings

13.

9K829 - Deep 

T

ill Caution

14.

9K129 - Shear Bolt decal

On Drawbar (Pull-type only -See pg. 5)

11

.

7K956 - Loss of Control W

arning

12.

7K957 - Drawbar Light Caution

SHANK IS ALWAYS UNDER LOAD

DO NOT USE HANDS OR FEET

TO DISLODGE ANY

OBSTRUCTION HOLDING THE

SHANK IN THE

TRIPPED POSITION

SHANK IS SPRING LOADED

6K883

AND SERIOUS INJURY

COULD

RESULT AS SHANK  RESETS

W

ARNING

Both

Sides

2

Rear-

Both Sides

 On RearFrame

Between Shanks

6

1

3

DANGER

WATCH FOR ELECTRICAL WIRES AND

OTHER OVERHEAD OBSTRUCTIONS

WHEN FOLDING WINGS.

FAILURE TO HEED THESE WARNINGS

MAY RESULT IN PERSONAL INJURY OR

DEATH.

9J629

4

DANGER

FALLING WINGS CAN CAUSE INJURY

OR DEATH.  STAND CLEAR WHEN WINGS

ARE BEING RAISED OR LOWERED.

3J675

9

8

10

1200

rev2-10-04

Both Row Markers and

all channel mount

s

Page 7

1. DO NOT LUBRICATE, ADJUST OR REPAIR WHEN MACHINE IS IN MOTION.

2. DO NOT TOW OR TRANSPORT FASTER THAN 15 MILES PER HOUR.

3. DO NOT RIDE OR ALLOW OTHERS TO RIDE ON THE MACHINE.

4.

BLOCK UP ALL HYDRAULICALLY OR MECHANICALLY RAISED COMPONENTS

T

O

PREVENT UNINTENDED LOWERING OR LOWER THE MACHINE TO THE GROUND TO

MAKE ADJUSTMENT  OR REPAIRS WHEN NOT IN USE.

5. KEEP ALL PERSONS AWAY FROM MACHINE DURING HITCHING AND OPERATING.

6. SLOW DOWN BEFORE MAKING SHARP TURNS OR USING THE BRAKES.

DRIVE SLOWLY OVER ROUGH GROUND, SIDE HILLS, AND AROUND CURVES TO AVOID TIPPING.

7. COMPLY WITH ALL LAWS WHEN TRANSPORTING THE MACHINE ON PUBLIC ROADWAYS.

8. INSTRUCT ALL OPERATORS IN THE SAFE OPERATION OF THE MACHINE.

REVIEW THE OPERATOR’S MANUAL FOR CORRECT PROCEDURES.

9. BLOCK IMPLEMENT TO PREVENT MOVEMENT WHEN UNHITCHED FROM TRACTOR.

10.

KEEP ALL GUARDS AND SHIELDS IN PLACE WHILE MACHINE OR PARTS ARE IN MOTION.

CAUTION

DO NOT GO NEAR LEAKS

HIGH PRESSURE OIL EASILY PUNCTURES

SKIN CAUSING SERIOUS INJURY,

GANGRENE OR DEATH.

IF INJURED, SEEK EMERGENCY MEDICAL

HELP.  IMMEDIATE SURGERY IS

REQUIRED TO REMOVE OIL.

DO NOT USE FINGERS OR SKIN TO

CHECK FOR LEAKS.

LOWER LOAD OR RELIEVE HYDRAULIC

PRESSURE BEFORE LOOSENING FITTINGS.

10813A

W

ARNING

3

CAUTION

DEEP TILL OPERATION CAN DAMAGE

UNDERGROUND UTILITIES CAUSING

DANGEROUS CONDITIONS AND

DISRUPTING SERVICES.  DETERMINE

THE DEPTH AND LOCATION OF BURIED

CABLES, PIPE LINES, AND DRAIN

TILES BEFORE OPERATION.

8K829

DANGER

BLEED THE AIR FROM WING LIFT CYLINDERS

BEFORE OPERATING.  FAILURE TO DO SO WILL

ALLOW WINGS TO FREE-FALL AND MAY CAUSE

SERIOUS PERSONAL INJURY.  SEE OPERATOR’S

MANUAL FOR CORRECT PROCEDURE.

3J678

Side of

Shank

Mt.

IMPORT

ANT

USE GRADE 2 BOL

T

 A

T

 THIS LOCA

TION

9K129

14

5

Figure 2B

13

7

Summary of Contents for Zone Commander ZP4301

Page 1: ...01 ZS5301 ZS6301 ZS7301 ZS8301 ZSR3301 ZSR4301 ZSR5301 ZSR6301 ZSR7301 ZSR8301 ZP33O1 ZP4301 ZP5301 ZP6301 ZP7301 ZP8301 ZPR3301 ZPR4301 ZPR5301 ZPR6301 ZPR7301 ZPR8301 6K689 ZSS5301 ZSSR5301 ZSP5301...

Page 2: ...6K689 Page 2 1200rev11 27 02...

Page 3: ...nstructions 12 Basic Machine 12 Stand Mount 12 Couter Assembly 13 Shank Assembly 14 Shear Bolt 14 Auto Reset 15 Shank Mount Replacement 16 Gage Wheels 17 Warning Lamp Assembly 18 Model Configuration 1...

Page 4: ...6K689 Page 4 1200rev11 27 02...

Page 5: ...means ATTENTION BE ALERT YOUR SAFETY IS INVOLVED Read the message that follows and be alert to the possibility of personal injury or death SAFETY ALERT Parts Ordering When ordering parts for this mac...

Page 6: ...equired 11 Block machine so it will not roll when unhitched from tractor 12 Relieve pressure in hydraulic lines before uncoupling hydraulic hoses from tractor On most tractors this can be done by oper...

Page 7: ...s through your BRILLION dealer Keep these signs clean so they can be observed readily It is important to keep these decals cleaned more frequently than the machine Wash with soap and water or cleaning...

Page 8: ...alling Wings 13 9K829 Deep Till Caution 14 9K129 Shear Bolt decal 8 9 10 1200rev2 10 04 BLEED THE AIR FROM WING LIFT CYLINDERS BEFORE OPERATING FAILURE TO DO SO WILL ALLOW WINGS TO FREE FALL AND MAY C...

Page 9: ...PREVENT UNINTENDED LOWERING OR LOWER THE MACHINE TO THE GROUND TO MAKE ADJUSTMENT OR REPAIRS WHEN NOT IN USE 5 KEEP ALL PERSONS AWAY FROM MACHINE DURING HITCHING AND OPERATING 6 SLOW DOWN BEFORE MAKI...

Page 10: ...ages when raising for the first time Install lower hitch pins as shown with pin stop to ward inside of machine Secure with 1 2 13 NC x 3 capscrews and lock nuts See Figure 3b ATTACHING TO TRACTOR OPER...

Page 11: ...s and tighten before operating See Figure 4 Manual Gauge Wheel Figure 4 NUT 5 8 11NC LOCKWASHER 5 8 CAPSCREW 5 8 11NC X 9 1 2 MOUNT GAGE WHEEL ADJUST HEIGHT Page 9 1200rev1 30 04 Figure 4 MOUNTING BRA...

Page 12: ...TOVER LOCK NUTS grade 2 grade 5 grade 8 grade B grade C min max min max 5 16 18 11 17 24 10 12 11 16 3 8 16 20 30 45 15 20 20 28 7 16 14 30 50 70 23 32 31 43 1 2 13 50 75 105 37 50 45 62 9 16 12 70 11...

Page 13: ...ement tires These tires must be inflated to 30 psi Lubrication Page 11 1200rev5 20 03 20 HRS Wheel bearings should be repacked annually Spring shanks and attachment supports should be greased at the p...

Page 14: ...VIS PIN 3 4 x 4 HAIRPIN COTTER U BOLT 3 4 COTTER PIN 3 16 x 3 NUT 3 4 10NC LOCK WASHER 3 4 FRAME Figure 6 Basic Machine 1 Place frame on supports approx 38 high Be sure supports will hold 1500 each DO...

Page 15: ...models where normal placement interferes with mast U BOLT 3 4 LOCK WASHER 3 4 NUT 3 4 10 NC SET SCREW 5 8 11 x 1 SQ HD NUT 5 8 11 NC MOUNTING BRACKET SHANK COLLAR COLLAR 3 Coulter Assemblies Attach 6...

Page 16: ...STRAIGHT SHANK PARABOLIC SHANK CAPSCREW 3 4 16 NC x 4 LOCK NUT 3 4 16 NC CAPSCREW 1 2 13 NC x 2 1 2 STOVER NUT 1 2 13 NC FRONT CLAMP REAR OF MACHINE Figure 8a 4 Shank Assemblies 1200rev3 6 03 Attach...

Page 17: ...4 10 NC x 5 LOCK NUT 3 4 10 NC HHCS 1 8 NC x 4 1 2 Lock Nut 1 8 NC 2 HHCS 5 16 18 X 1 Lock Washer 5 16 Flat Washer 5 16 Std HHCS 3 8 16 NC x 1 1 4 Lock Washer 3 8 Flat Washer 3 8 Std Figure 8a 1 Rigi...

Page 18: ...Straight Shank only FLAT POINT V WEARSTRIP Parablolic Shank V CAST STEEL POINT CAPSCREW 1 8NC x 8 LOCK NUT 1 8NC STRAIGHT SHANK PARABOLIC SHANK Bracket fits over wide part of wearstrip Fasten tight a...

Page 19: ...erefore the trunion casting and the trunion wear sleeve assembly have been given different part numbers Those castings which are directly interchangeable with their welded counterpart have kept the sa...

Page 20: ...d serious injury could result as shank resets Do not disassemble without following procedure outlined in operator s manual Do not use hands or feet to dislodge any obstruction holding the shank in the...

Page 21: ...eck the top 1 shank mounting bolt for tightness Torque to 250 ft lbs Excessive distortion of holes in the shear bolt bushings and or shank as well as improper bolt grade and length can result in prema...

Page 22: ...t end of the frame and one near the right end Their exact location on the frame is at the discretion of the owner operator Mount the brackets holding the red and amber safety decals provided because t...

Page 23: ...epair parts catalog for complete listing of parts LH Gage Wheel Assembly 7K709 TOP LINK GAGE WHEEL ARM 6 BOLT WHEEL ASSEMBLY HHCS 1 8 NC x 4 1 2 RH Gage Wheel Assembly 7K710 HHCS 1 8 NC x 7 1 2 LOCK N...

Page 24: ...with yellow wire to left side lamp as sembly Connect end with green wire to right side lamp assembly Run wishbone harness wires along rear frame member to center of machine At center of machine assemb...

Page 25: ...TION TION TION TION TION Page 19 1200rev5 20 03 Figure 11 ZS5301 With Wavy Coulter Basket Attachments The ZONE COMMANDER is designed to accommodate many configurations See figures 12 on the following...

Page 26: ...6K689 Page 26 Page 20 MODEL CONFIGURATION Single Bar Frames ZSS 3301 30 Spacing ZSS 5301 30 Spacing Figure 11a Note Wheels may be installed either direction 30 30 60 1200rev1001...

Page 27: ...6K689 Page 27 MODEL CONFIGURATION Double Bar Frames ZS 3301 24 Spacing ZS 3301 30 Spacing Figure 12a 0 24 24 0 30 30 Note Wheels may be installed either direction Page 21 1200rev601...

Page 28: ...6K689 Page 28 ZS 4301 24 Spacing ZS 4301 30 Spacing Figure 12b 0 45 45 15 15 0 36 36 12 12 Page 22 1200rev601...

Page 29: ...6K689 Page 29 ZS 5301 24 Spacing ZS 5301 30 Spacing Figure 12c 0 24 24 48 48 0 30 30 60 60 Note Wheels may be installed either direction Page 23 1200rev601...

Page 30: ...6K689 Page 30 ZS 6301 24 Spacing ZS 6301 30 Spacing Figure 12d 0 36 36 60 60 12 12 0 45 45 75 75 15 15 Page 24 1200rev601...

Page 31: ...K689 Page 31 6361 36 Spacing Figure 12e Note Wheels may be installed either direction Page 25 1200rev6 3 03 0 18 18 54 54 90 90 0 19 19 57 57 95 95 0 20 20 60 60 100 100 6381 38 Spacing 6401 40 Spacin...

Page 32: ...6K689 Page 32 Figure 12f 1200rev3 19 03 0 30 30 60 60 90 90 ZS 8301 30 Spacing 0 45 45 15 15 105 75 75 105 ZS 7301 30 Spacing Page 26...

Page 33: ...6K689 Page 33 THIS PAGE LEFT BLANK INTENTIONALLY 1200rev11 27 02 Page 27...

Page 34: ...permanantly Note Cradles are not required on 150 frames 3 Next using 3 4 x 6 13 16 x 7 5 8 U bolts and lock nuts mount each row marker Left hand marker toward the rear of the frame Be sure to mount e...

Page 35: ...901234 123456789012345678901234 123456789012345678901234 Rear of Machine To Tractor 1200rev11 27 02 Assemble the hoses as shown in the diagram above R 1 or R 2 connects hoses from shown valve ports to...

Page 36: ...lies centering them on the machine between shank assemblies and spacing them at 120 maximum as shown in the above illustration 120 Maximum Lift Assist Rear Assembly Beam Assembly Bracket Caster Assemb...

Page 37: ...Tip Adapter 06 Male JIC x 08 Male O Ring 067 Hose Clamp Pair Top Plate HHCS 1 4 x 1 1 2 Push I Beam forward as far as possible 8K451 Hydraulic Hose 3 8 x 424 Pull Type Kit 8K453 Hydraulic Hose 3 8 x 2...

Page 38: ...side as shown HHCS 1 2 13 NC x 2 1 2 Lock Nut 1 2 13 NC 7K872 for Auto reset Shank Models Apply Loc Tite to threads and tighten to 400 foot pounds Assemble support stand as shown depend ing upon your...

Page 39: ...c Coulter 20 Welded Disc Band Lock Nuts 1 2 13 NC HHCS 1 2 13 x 2 Hub Spindle Assembly Support Stand U bolt 1 2 13 NC x 5 1 2 x 4 1 2 Roll Pin 1 4 x 2 Set Screw 1 2 13 NC x 4 Lock Nuts 1 2 13 NC Coult...

Page 40: ...her 5 16 Hex Nut 5 16 18 NC HHCS 5 15 18 NC x 1 Lock Washer 5 16 Hex Nut 5 16 18 NC HHCS 5 15 18 NC x 1 Basket Flangette half Bearing Collar Crumbler End Wheel Ductile Notched End Wheel Pipe Weldment...

Page 41: ...6K689 Page 41 7K925 Ductile Wheel Kit or or 1200rev1 30 04 7K924 Optimizer Wheel Kit Page 33...

Page 42: ...o page 12 of the Repair Parts Catalog for more shank wearstrip and point options Set Back Extension Kit Optional 3K814 This set back extension is used to move the shank back approximately 15 Two of th...

Page 43: ...NC U bolt 5 8 11 NC x 5 11 16 x 13 Lock Nut 5 8 11 NC Outer Arm Outer Arm Center Arm Assemble to Zone Commander frame as shown with hardware provided in box assembly 9K089 Limitations apply to this k...

Page 44: ...to the intended shank combination of the machine example 5301 5 shanks on 30 spacing Basic Machine Specifications Overall Width ZSS ZSSR ZSP ZSPR3301 ZS ZSR ZP ZPR3301 ZS ZSR ZP ZPR4301 ZSS ZSSR ZSP Z...

Page 45: ......

Page 46: ...registration at all Landoll manufacturing facilities LANDOLL CORPORATION 1900 North Street Marysville Kansas 66508 785 562 5381 800 428 5655 WWW LANDOLL COM Copyright 2010 Landoll Corporation All righ...

Reviews: