background image

Pa

g

e

 5

The 

Brillion Zone Commander 

was designed 

as a primary tillage tool imparting minimum soil 
disturbance and soil eroison while providing ex-
cellent  break-up of compacted soil, lifting it up 
enough to promote air and water absorption.

To obtain maximum benefits,  please study this 
manual carefully before operating or starting as-
sembly of machine or optional equipment.

If items covered in this manual are not under-
stood, contact your local Brillion dealer. 


This safety alert symbol  


is used to call your    


attention to instructions  


concerning 

personal 

safety.  This symbol is found throughout this 
manual and will be found on safety signs on 
your  machine.  It points out important safety 
precautions.  It means 

“ATTENTION!  BE 

ALERT!  YOUR SAFETY IS INVOLVED!”


Read the message that follows and be alert to 
the possibility of personal injury or death.  

SAFETY ALERT


Location Reference

Right hand, left hand and forward designations 
are those related to the operator when sitting in 
the operating position.

Be sure to read the warranty form which is
shipped with the machine.  Return the proper
portion of the form for recording at the factory.

Parts Ordering

When ordering parts for this machine, include 
the complete model number and serial number.  
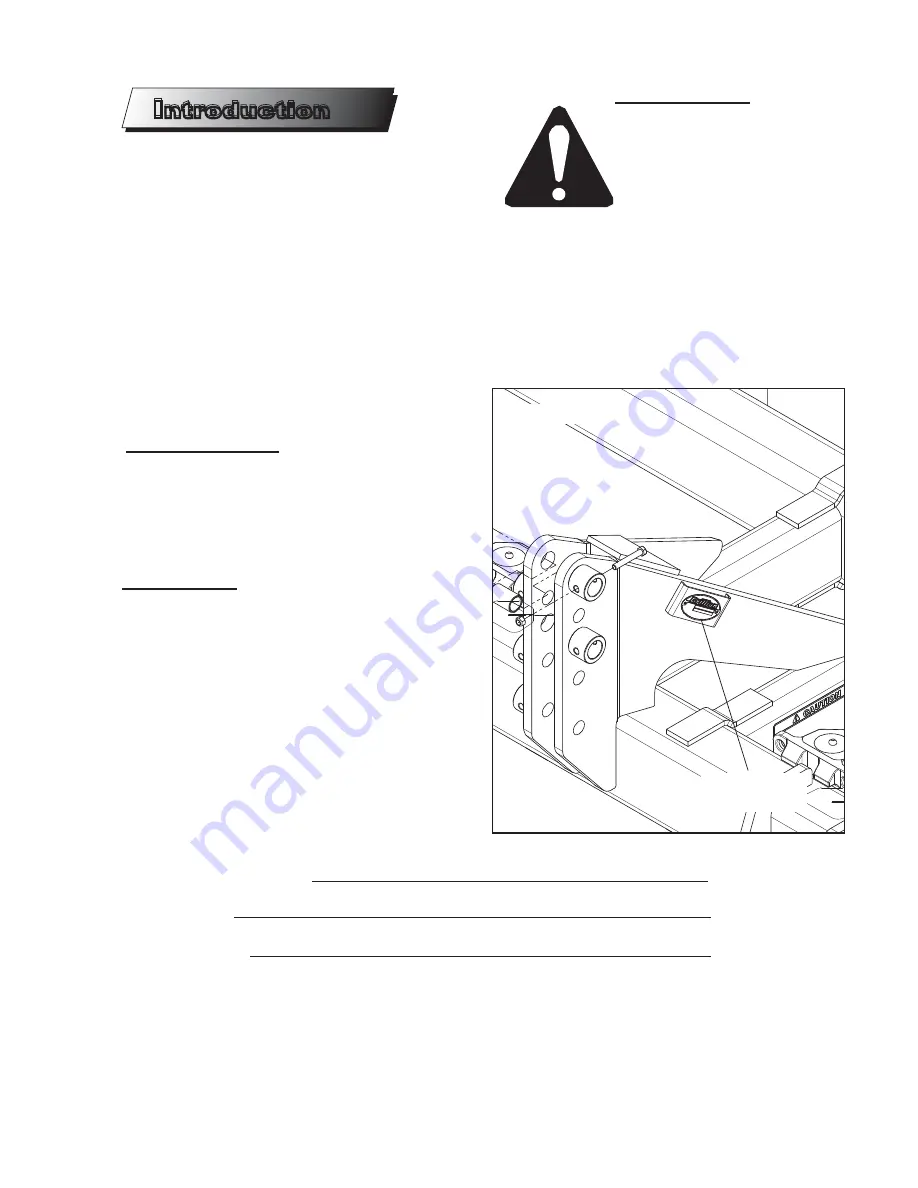
Refer to the name plate on the inside of the 
frame’s right hand  end plate.  Please record 
these numbers upon taking delivery of the unit.

Zone Commander Model 
  
Serial Number  

Date Purchased 

Figure 1

Nameplate 
located here.

I

ntroduction

I

ntroduction

9K162

504

Page 3

Summary of Contents for Zone Commander ZM3302

Page 1: ...ZP3302 4302 5302 6302 6362 7302 8302 ZS3302 4302 5302 6302 6362 7302 8302 Rigid Mount ZPR3302 4302 5302 6302 6362 7302 8302 ZSR3302 4302 5302 6302 6362 7302 8302 BRILLION 50 48 30 17 BRILLION WISCONSIN 54110 9K162 504rev6 16 08 Brillion Brillion R Zone Commander www brillionfarmeq com ...

Page 2: ...Page 2 ...

Page 3: ... 10 Fasteners 10 Torque Chart 10 Tires 11 Lubrication 11 Assembly Instructions 12 Basic Machine 12 Stand Mount 12 Couter Assembly 13 Shank Assembly 14 Shear Bolt 14 Auto Reset 16 Shank Mount Replacement 18 Gage Wheels 20 Warning Lamp Assembly 22 Model Configuration 24 28 Kits Attachments 30 Row Marker 30 Row Marker Hydraulics 31 Lift Assist Kit 32 Support Arm Kits 34 Coulter Disc Kits 35 Basket Ki...

Page 4: ...Page 4 ...

Page 5: ... machine It points out important safety precautions It means ATTENTION BE ALERT YOUR SAFETY IS INVOLVED Read the message that follows and be alert to the possibility of personal injury or death SAFETY ALERT Location Reference Right hand left hand and forward designations are those related to the operator when sitting in the operating position Be sure to read the warranty form which is shipped with...

Page 6: ...nd slow moving vehicle signs as required 11 Block machine so it will not roll when unhitched from tractor 12 Relieve pressure in hydraulic lines before uncoupling hydraulic hoses from tractor On most tractors this can be done by operating valves after engine is stopped 13 Securely block machine when working on or under it to prevent injury in case of hydraulic failure or inadvertent lowering by an...

Page 7: ...correct safety decals for the machine Order replacement decals through your BRILLION dealer Keep these signs clean so they can be observed readily It is important to keep these decals cleaned more frequently than the machine Wash with soap and water or cleaning solution as required Replace decals that become damaged or lost Also be sure that any new machine components installed during repair inclu...

Page 8: ... FROM WING LIFT CYLINDERS BEFORE OPERATING FAILURE TO DO SO WILL ALLOW WINGS TO FREE FALL AND MAY CAUSE SERIOUS PERSONAL INJURY SEE OPERATOR S MANUAL FOR CORRECT PROCEDURE DANGER WATCH FOR ELECTRICAL WIRES AND OTHER OVERHEAD OBSTRUCTIONS WHEN FOLDING WINGS FAILURE TO HEED THESE WARNINGS MAY RESULT IN PERSONAL INJURY OR DEATH 9J629 Brillion Brillion 9K162 504 Page 6 7k956 WARNING MACHINE IS DRAWBAR...

Page 9: ...ATH 9J629 DANGER FALLING WINGS CAN CAUSE INJURY OR DEATH STAND CLEAR WHEN WINGS ARE BEING RAISED OR LOWERED 3J675 DANGER BLEED THE AIR FROM WING LIFT CYLINDERS BEFORE OPERATING FAILURE TO DO SO WILL ALLOW WINGS TO FREE FALL AND MAY CAUSE SERIOUS PERSONAL INJURY SEE OPERATOR S MANUAL FOR CORRECT PROCEDURE 3J678 4 CAUTION DEEP TILL OPERATION CAN DAMAGE UNDERGROUND UTILITIES CAUSING DANGEROUS CONDITI...

Page 10: ...or possible interference between the tool bar and tractor linkages when rais ing for the first time Install 1 7 16 x 6 long lower hitch pins as shown with pin stop toward inside of machine Secure with 1 2 13 NC x 3 capscrews and lock nuts ATTACHING TO TRACTOR Operation Operation HHCS 1 2 13 NC X 3 LOCK NUT 1 2 13 NC PIN ASSEMBLY 1 1 8 DIA SLEEVE 1 5 32 I D x 1 7 16 O D x 2 7 8 LONG HHCS 1 2 13 NC ...

Page 11: ...nges to the working depth of the coulter blades can be made Lower the assembly by loosening the locking nuts and set screws which hold the shaft Adjust to desired depth make sure that the coulter stop is facing forward to al low the coulter arm to swing side to side Tighten the set screws and the locking nuts If your machine is equipped with coulters hav ing square shafts and a welded bracket simp...

Page 12: ...210 70 95 90 122 3 4 10 170 270 375 125 165 155 210 7 8 9 165 430 610 185 250 225 312 1 8 250 645 910 275 375 360 462 1 1 8 7 355 795 1290 1 1 4 7 500 1120 1820 1 3 8 6 745 1670 2710 1 1 2 6 870 1950 3160 VALUES ARE GIVEN IN FOOT POUNDS USE GRADE B LOCK NUTS WITH GRADE 2 AND GRADE 5 BOLTS ONLY USE GRADE C LOCK NUTS WITH GRADE 8 BOLTS ONLY Fasteners Before operating your Brillion tillage implement ...

Page 13: ...res These tires must be inflated to 30 psi Lubrication Wheel bearings should be repacked annually Spring shanks and attachment supports should be greased at the points intervals indicated in the drawings Coulter assemblies should be greased after every 20 hours of use and greased if the machine is not to be used for some time 20 HRS 20 HRS 20 HRS 9K162 504rev1 26 05 Page 11 Figure 5a Figure 5b Fig...

Page 14: ...shown Stands may not be shown in following figures in order to make other parts more identifiable Note Mount stands as far toward the outsides of the machine as possible Basic Machine 1 Place frame on supports approx 38 high Be sure supports will hold 1500 each DO NOT WORK UNDER MACHINE UNLESS IT IS BLOCKED UP SECURELY 2 If your model has frame extensions mount them to the frame ends with 5 8 caps...

Page 15: ...e front tube with 3 4 7 x 5 U bolts Collars are used to attach front coulter to coulter REAR OF MACHINE COLLAR 2 SET SCREWS 5 8 11 x 2 SQ HD 2 NUTS 5 8 11 NC 9K162 504rev1 26 05 Page 13 6K678a Cast MOUNTING BRACKET SET SCREW 5 8 11 x 1 SQ HD NUT 5 8 11NC COLLAR COLLAR bracket on top and bottom The tab on the collar fits between the ears on the casting to prevent rotation Attach coulter assemblies ...

Page 16: ... that could occur 9K290 mount bracket U bolt 3 4 dia Attach coulter assemblies to each mounting bracket Slide the square shank between the plates on the bracket and hold in place with1 2 13 NC x 5 capscrews lock washers and nuts as shown If you wish to use dual coulters on your machine the chart on the following page indicates where you will need left or right hand mounting tube configurations to ...

Page 17: ...h carrier ZC MODEL 9K320 9K376 9K377 ZS3302 2 1 ZS4302 2 1 1 ZS5302 2 2 1 ZS6302 2 2 2 ZS6362 4 1 1 Will require removal of hitch gusset with torch ZS6382 4 1 1 Will require removal of hitch gusset with torch ZS6402 4 1 1 Will require removal of hitch gusset with torch ZS7302 4 2 1 Will require removal of hitch gusset with torch ZS8302 4 2 2 Will require removal of hitch gusset with torch See Figu...

Page 18: ...Page 18 9K162 504rev9 22 05 Page 13d ZS3302 Z4302 DUAL COULTER PLACEMENT BY MODEL 9K377 9K320 9K376 9K320 9K376 9K320 9K320 ...

Page 19: ...Page 19 9K162 Page 13e 504rev7 13 05 ZS5302 DUAL COULTER PLACEMENT BY MODEL 9K320 9K376 9K320 ZS6302 9K376 9K377 9K320 9K320 ...

Page 20: ...Page 20 9K162 Page 13f 504rev7 13 05 ZS6362 ZS6382 DUAL COULTER PLACEMENT BY MODEL 9K376 9K377 9K320 9K320 9K376 9K377 9K320 9K320 ...

Page 21: ...DUAL COULTER PLACEMENT BY MODEL 9K320 9K376 9K320 9K377 NOTE For machines with 36 38 or 40 spacing see the folllowing pages 13g 1 13g 2 for alternate coulter placement using single coulters to eleimnate interference issues around 3 pt hitch area ...

Page 22: ...H 1P448 POST BACK RH 9K334 COULTER ARM ASM RH 1P449 POST FRONT LH 1P447 POST BACK LH 1C390 NUT HEX 1 2 13 1C109 WASHER LOCK 1 2 6C729 NUT LOCK 3 4 10 5D142 HHCS 1 2 13 x 5 3K176 U BOLT 3 4 10 1P445 BRACKET COULTER MNT 1P455 COUTLER SET FOR 36 38 40 SPACING 5D954 ROLL PIN 5 16 x 4 5D954 ROLL PIN 5 16 x 4 4D345 HHCS 1 2 13 x 3 3 4 1C109 WASHER LOCK 1 2 1C390 NUT HEX 1 2 13 LH RH 9K162 Page 13g 1 504...

Page 23: ... Spacing 19 1 8 for 40 Spacing 13 3 4 TYP 31 REF for 38 Spacing 32 1 2 REF for 40 Spacing 7 1 8 7 REF TYP BOTTOM VIEW U BOLTS IN INNER SET OF HOLES TOP VIEW 38 AND 40 SHANK SPACING U BOLTS IN OUTER SET OF HOLES TOP VIEW 36 SHANK SPACING 1P455 COULTER SET MACHINE CONFIGURATIONS 9K162 504rev11 5 07 Page g 2 ...

Page 24: ...Page 24 9K162 Page 13h 504rev11 5 07 ZS7302 9K320 9K377 9K320 9K376 DUAL COULTER PLACEMENT BY MODEL ...

Page 25: ...Page 25 ZS8302 DUAL COULTER PLACEMENT BY MODEL 9K320 9K377 9K320 9K376 9K162 504rev7 13 05 ...

Page 26: ...her 5 16 Flat Washer 5 16 Std HHCS 3 8 16 NC x 1 1 4 Lock Washer 3 8 Flat Washer 3 8 Std REAR CAPSCREW 1 8NC x 8 LOCK NUT 1 8NC PARABOLIC SHANK CAPSCREW 3 4 10 NC x 3 STOVER NUT 3 4 10 NC PARABOLIC SHANK LEG with V WEARSTRIP END VIEW OF ROLL PINS OPEN EDGES MUST NOT BE ON SAME SIDE LOCK NUT 1 8NC 9K162 504rev8 23 06 Page 14 Figure 8 NARROW SHANK NARROW SHANK LEG with WEARSTRIP Use only for shallow...

Page 27: ... of machine directly behind each coulter assembly Attach as shown in figure 8a using 4 1 8 NCx 8 gr 5 capscrews and locknuts Torque shank mounting clamp bolts to 200 ft lbs Lock Nut 1 8 NC FRONT CLAMP REAR OF MACHINE CAPSCREW 1 8NC x 8 LOCK NUT 1 8NC 9K162 504 Page 15 Figure 9 ...

Page 28: ...OINT LOCK NUT 1 8NC PARABOLIC SHANK Bracket fits over wide part of wearstrip Fasten tight against shank CAPSCREW 1 2 13 NC x 2 1 2 w STOVER NUT 1 2 13 NC REAR OF MACHINE 4 Shank Assemblies STRAIGHT SHANK LEG 8K370 HHCS 1 8 NC x 4 1 2 NARROW STRAIGHT SHANK LEG and WEARSTRIP END VIEW OF ROLL PINS OPEN EDGES MUST NOT BE ON SAME SIDE NUT 3 4 10 NC Use only for shallow operation 8K801 with WEARSTRIP RI...

Page 29: ...hank clamp as shown in using four 1 8 NC x 8 Gr 5 capscrews and locknuts Torque shank assembly clamp bolts to 200 ft lbs BUSHING 8K364 LOCK NUT 3 4 10 NC Lock Nut 1 8 NC 2 HHCS 5 16 18 X 1 Lock Washer 5 16 Flat Washer 5 16 Std HHCS 3 8 16 NC x 1 1 4 Lock Washer 3 8 Flat Washer 3 8 Std REAR OF MACHINE 9K162 504 Page 17 Figure 11 Figure 12 PLUG ASSEMBLY 8K367 HHCS 3 4 10 NC x 5 GRADE 2 HHCS 1 8 NC x...

Page 30: ...shank resets Do not disassemble without following procedure outlined in operator s manual Do not use hands or feet to dislodge any obstruction holding the shank in the tripped position Shank Mount Leg Replacement Procedure Figure 13 2 Remove the 3 bolts that secure the spring pivot plates to the shank mount 6 Insert plug assembly in shank mount Torque value for 3 4 lock nut is 155 210 ft lbs 5 Ins...

Page 31: ...rovide a square shear edge again 2 Examine the shear bolt hole in the shank for excessive distortion replace shank if needed 3 Install a 3 4 10 NC x 5 Gr 5 bolt and tighten to 155 210 ft lbs 4 Check the top 1 shank mounting bolt for tightness Torque to 250 ft lbs Excessive distortion of holes in the shear bolt bushings and or shank as well as improper bolt grade and length can result in premature ...

Page 32: ...s to the rear frame tube of the machine Mount one gage wheel and bracket near the left end of the frame and one near the right end Their exact location on the frame is at the discretion of the owner operator but should be placed in relation to the shank spacing so that they roll between the rows during operation 9K162 504rev8 4 06 Page 20 ...

Page 33: ...te listing of parts Gage Wheel Assembly 7K709 9K162 504rev8 4 06 Page 21 Figure 17 TOP LINK GAGE WHEEL ARM 6 BOLT WHEEL ASSEMBLY HHCS 1 8 NC x 4 1 2 Gage Wheel Assembly 7K710 HHCS 1 8 NC x 7 1 2 LOCK NUT 1 8 NC HUB SPINDLE ASSEMBLY PIVOT BOLT SLOTTED NUT COTTER PIN ...

Page 34: ...r each lamp Assemble Wiring 4 Connect wishbone wiring harness ends to connectors on lamp assemblies Run wishbone harness wires along the light bar to center of ma chine 5 At center of machine assemble the connector to the connector of the light module 3 Fasten the light module to the front side of the light bar at the center just under the SMVbracket 6 Assemble the connector of the light module to...

Page 35: ...wiring The plug on the other end of the straight harness connects to the tractor socket when in use When not in use it can be stored at the connector holder on the hose support bracket Allow enough har ness length to reach tractor socket and roll or fold up excess REAR AMBER AMBER Red Lamp Red Lamp Amber Lamp Amber Lamp Red Orange Red Red Orange Red Red Orange Red Red Orange Red 9K162 504rev6 16 0...

Page 36: ... commodate many configurations See figures on the following pages Use these diagrams as a guide also if the ones pictured do not exactly match your model specifications MODEL CONFIGURATION ZS 3302 30 Spacing Note Wheels may be installedeither direction 0 30 30 9K162 504rev6 16 08 Page 24 Figure 23a ...

Page 37: ...Page 37 0 60 30 60 30 0 15 15 45 45 4302 MODELS 5302 MODELS 9K162 504 Page 25 Figure 23b Figure 23c ...

Page 38: ...Page 38 0 15 45 45 75 75 15 6302 MODELS 6362 MODELS 9K162 504rev9 28 04 Page 26 Figure 23d Figure 23e 0 18 18 54 54 90 90 9K376 9K320 9K320 ...

Page 39: ...Page 39 6382 MODELS 6402 MODELS Figure 23f Figure 23g 0 19 19 57 57 95 95 0 20 20 60 60 100 100 9K162 504 Page 27 ...

Page 40: ...Page 40 0 30 60 90 30 60 90 7302 MODELS 8302 MODELS 0 15 45 75 105 45 75 105 15 9K162 504 Page 28 Figure 23h Figure 23i ...

Page 41: ...Page 41 9K162 504 Page 29 This Page Left Blank Intentionally ...

Page 42: ...rs Be sure to check for possible interferences before mounting them permanantly 3 Next using 3 4 x 6 13 16 x 7 5 8 U bolts and lock nuts mount each row marker You may mount them to the frame both rearward or both forward or offset as shown 4 Tighten all bolts Mounting Channel U bolts 3 4 x 5 13 16 x 10 1 2 Lock nuts 3 4 U bolts 3 4 x 6 13 16 x 7 5 8 Lock nuts 3 4 U bolts 3 4 x 6 13 16 x 5 3 4 Lock...

Page 43: ...hown valve ports to cylinder base port C 1 or C 2 con nects hoses from shown valve ports to cylin der rod end port Note C1 R1 and C2R2 valve ports must go to the same cylinder C 2 R 2 C 1 Sequence Valve Adapter 06 Male JIC x Male O Ring Male Tractor Connector Figure 15a R 1 To Tractor 9K162 Page 31 Figure 25 504rev8 30 05 ...

Page 44: ...3 1 7 6 3 1 5 6 3266 72 5 0 386 0 25 5 6 867 7 60 3 1 3 5 5 226 1 7 6 2 76 21 27 6 6 72 7 6 23 7 1 5 25 287 5 25 3523 5 7 127 0 685 7 7 7 6 17 5 25 7 7 1 1 2 76 3 1 67 5 60 0 7 1 6 1 60 6 6 2 1 17 5 7 66 67 60 LIFT ASSIST KIT 1P120 Pull Type Kit for use with Carrier 1P119 3 Point Hich Kit ...

Page 45: ...2 75 725 1 5 3 1 52 127 26 211 76 25 32 17 7 26 60 25 38 7 3 3 1 6 3257 1 3257 72 1 5 1 5 3 1 52 3 1 2 25 1 5 75 163257 326 7 21 127 6 2 1 1 3 1 5 3 1 277 5 3 1 9 6 3 1 21752 6 0 176 3 1 6752 75 163257 21752 127 25 37 77 1 5 8 3 1 1 5 5 8 3 1 7 66 67 0 60 3 1 1 5 3 1 6 3 1 723 3 7 5 0 6 1 66 5 5 26 60 75 163257 2 25 1 5 3 1 127 6 2 1 1 6725 326 7 21 NOTE Bring hoses over tops of brackets toward cy...

Page 46: ...t Shank Models Assemble support stand as shown depending upon your shank type HHCS 1 8 NC x 6 7K953 for Rigid Shank Models or Lock Nut 1 8 NC Torque to 360 ft lbs Sleeve Flat Washer 1 HHCS 1 8 NC x 7 1 2 Lock Washer 1 Arm HHCS 1 2 13 NC x 2 1 2 Lock Nut 1 2 13 NC HHCS 5 8 11 NC x 4 1 2 Lock Nut 5 8 11 NC Flat Washer 5 8 HHCS 5 8 11 NC x 4 1 2 Lock Nut 5 8 11 NC Flat Washer 5 8 Stop Place this flat...

Page 47: ...d Lock Nuts 1 2 13 NC HHCS 1 2 13 x 1 3 4 Hub Spindle Assembly U bolt 1 2 13 NC x 5 1 2 x 4 1 2 Roll Pin 1 4 x 2 Set Screw 1 2 13 NC x 4 Lock Nuts 1 2 13 NC Coulter Mount HHCS 1 2 13 x 3 3 4 Lock Washer 1 2 Block Depth Band Assemble to support arm as shown Disc Coulter Wavy 20 9K162 504rev9 15 05 Page 35 ...

Page 48: ...t and or Crumbler End Wheel Ductile Notched End Wheel Pipe Weldment Axle Clamp Assembly Axle Clamp Assembly 9K162 504 Page 36 Frame Lock Washer 5 16 Hex Nut 5 16 18 NC HHCS 5 16 18 NC x 1 Basket Flangette half Bearing Collar ...

Page 49: ...Page 49 7K925 Ductile Wheel Kit or or 7K924 Optimizer Wheel Kit 9K162 504 Page 37 ...

Page 50: ...Bar Welded Hitch U bolt 5 8 11 NC x 5 11 16 x 13 Lock Nut 5 8 11 NC Outer Arm U bolt 5 8 11 NC x 4 11 16 x 5 5 8 Lock Nut 5 8 11 NC Outer Arm Center Arm Rear Rigid Hitch Kit Pull type 9K071 Assemble to Zone Commander frame as shown with hardware provided ...

Page 51: ... ZM ZS ZP ZSR ZPR 6302 209 1 8 17 5 1 8 ZM ZS ZP ZSR ZPR 6362 6382 6402 7302 237 19 9 ZM ZS ZP ZSR ZPR 8302 269 1 8 22 5 1 8 Main frame 7 x 5 x 3 8 Tubing Hitch Three point hitch Category II or III Shank Assembly Shank Underframe Clearance 39 Shank Types Auto Reset Double coil spring 16 trip height Shear bolt type Shank Leg Types 1 1 4 Thick 180 sq in Straight Shank or 3 4 Thick Minimum Disturbanc...

Page 52: ...Page 52 ...

Page 53: ......

Page 54: ... registration at all Landoll manufacturing facilities LANDOLL CORPORATION 1900 North Street Marysville Kansas 66508 785 562 5381 800 428 5655 WWW LANDOLL COM Copyright 2010 Landoll Corporation All rights reserved including the right to reproduce this material or portions thereof in any form ...

Reviews: