background image


148 


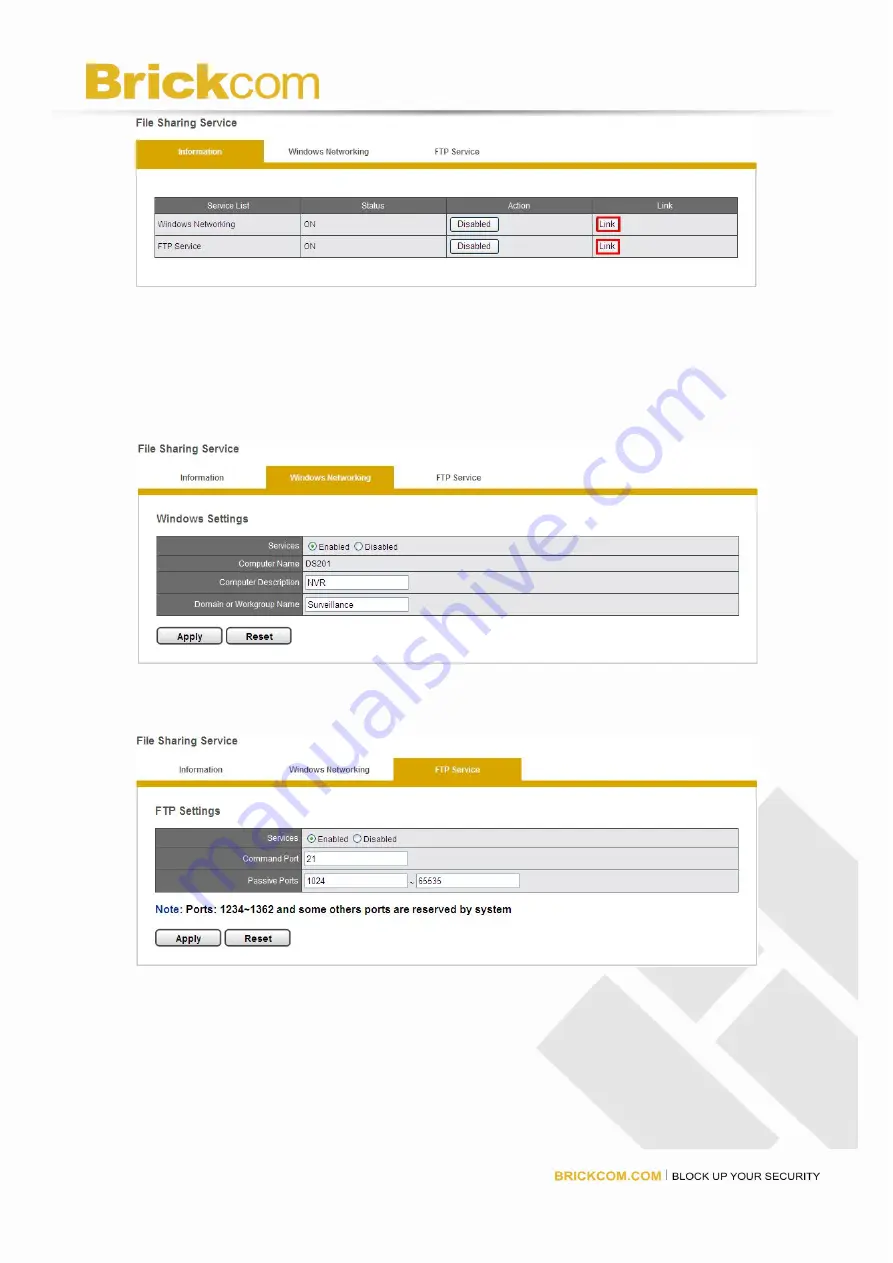
Windows Networking   

In Windows Networking field, users can enable or disable the services and 

Computer Name is already shown. Computer Description and Domain 

or Workgroup Name can be changed. 


FTP Service 


In FTP Settings, users can enable or disable FTP Services. User can arrange 

Command  Port  and  Passive  Port  and  configure  language  interface  in 

Client Coding Type.     

Please click “Apply” to finish FTP settings. 


Summary of Contents for NR-1104

Page 1: ...Video Recorder User Manual Product name NVR v1 0 0 x Release Date 2014 4 30 Manual Revision V1 0 Web site www brickcom com Email support brickcom com info brickcom com 2013 Brickcom Corporation All Ri...

Page 2: ...o NVR 11 Quick Guide 11 Install EZ Search 11 Install NVR Decoder 19 User Manual 21 Browse CD 21 Activate Live View 22 Quick Configuration 24 Start 24 Network Settings 25 Server Settings 26 Date Time 2...

Page 3: ...ents 123 Recording Settings 123 Recording Schedule 125 Event Action Management 128 Advanced Setting 137 Event Schedule 138 E Mail 143 Disk Management 144 Disk Management 144 File System Management 145...

Page 4: ...3 Device Information 179 System Upgrade 181 Language 186 Date Time 186 Buzzer 188 Reboot Shutdown 188...

Page 5: ...accessories listed on the Package Contents of Quick Installation Guide are included Before installing the NVR please read the instructions in the Quick Installation Guide to avoid misuse and then fol...

Page 6: ...1104 Figure 1 1 Front Rear View of NR1104 1 Power button 2 LED indicator HDD 3 USB 2 0 x2 4 Power connector 5 USB 3 0 x 2 6 DVI I 7 eSATA x 1 8 HDMI x 1 9 Gigabit LAN 10 USB 2 0 x 2 11 Audio mic input...

Page 7: ...1 4 Front Rear View of NR 2104 NR 2108 NR 2116 1 Power button 2 LED indicator HDD 3 USB 2 0 x2 4 Power connector 5 USB 3 0 x 2 6 DVI I 7 eSATA x 1 8 HDMI x 1 9 Gigabit LAN 10 USB 2 0 x 2 11 Audio mic...

Page 8: ...re 2 3 NR 1104 Front Panel Note To turn off your NVR long pressing power button at least 2 seconds To turn on your NVR long pressing power button at least 3 seconds NR 2104 NR 2108 NR 2116 Figure 2 4...

Page 9: ...8 Note To turn off your NVR long pressing power button at least 2 seconds To turn on your NVR long pressing power button at least 3 seconds...

Page 10: ...ers can connect both of HDMI and DVI I at the same time for video output Scenario A If both monitors are Full HD 1920x1080 those will be shown as Full HD Scenario B If both monitors are VGA 1024x768 t...

Page 11: ...hannels under 16 DDR3 4G or above For channels over 16 DDR3 8G or above Graphics Adapter AGP or PCI Express minimum 1024 768 16 bit colors 1G memory or above Note It is highly recommended to use a gra...

Page 12: ...duct CD the following menu is displayed Quick Guide Click Quick Guide to enter the folder and double click the file to open Please read Quick Guide to quickly understand the process of NVR installatio...

Page 13: ...12 When installing NVR Search Shield Wizard window for NVR Search will pop up Click Next to continue installation...

Page 14: ...continue installation Select a location of destination and select a folder where the setup can install files The default location is C Program Files Brickcom NVR Search Users can also install NVR Sear...

Page 15: ...ase wait until the Wizard completes the installation The Install Shield has successfully installed NVR Search Select Create Desktop Shortcut and please click Next to continue The installation is compl...

Page 16: ...e automatically and show NO Name IP Address Mac Address and Model name of connected Brickcom Users can click Search to search NVR Introduction of NVR Search NVR Search provides three kinds of toolbars...

Page 17: ...o enter the login information of NVR before being allowed to change the setting When accessing the NVR setting users will be prompted to enter username and password For the first time use the default...

Page 18: ...ess of adding a NVR to a local area network Once connected to a LAN NVR will automatically appear on the internet You can rename UPnP Name on the NVR Click OK to finish the setting 2 Network Two model...

Page 19: ...18 3 Option Option provides several languages Once you click Connect or double click the selected NVR list IE browser will pop up automatically for the web based interface...

Page 20: ...19 Install NVR Decoder Click Install NVR Decoder to install decoder and follow the instructions to setup Install Shield Wizard window will pop up and please click Next to continue installation...

Page 21: ...20 Read license agreement and click I accept the terms of the license agreement Click Next to continue installation The installation Wizard is installing NVR Decoder...

Page 22: ...is complete Please click Finish to close the window User Manual Click User Manual to open the folder and double click on user manual file to read Browse CD Click Browse CD to open the folder of curre...

Page 23: ...password For first time use the default username and password are admin admin Select the languages for the UI Allow ActiveX Control After logging in the NVR users are recommended to install ActiveX co...

Page 24: ...23 Left click on the description Run Add on Left click Run to use licensed ActiveX controls...

Page 25: ...structions of the Overview of wizard to complete system setup Start System will lead you to Start from the drop down menu of Configuration Utility to begin To initial the configuration please study th...

Page 26: ...onfigure IP address 1 Obtain an IP address automatically NVR Default Obtain an available dynamic IP address assigned by a DHCP server If this option is selected NVR will automatically obtain an availa...

Page 27: ...R in the same LAN To assign a static IP address to the NVR 1 Select Specify an IP address 2 Enter the IP address Subnet Mask Default Gateway IP Address and DNS server address 3 If IP Address is change...

Page 28: ...n admin account with password admin It s highly recommended to change the password upon the initial login Enter a new password in the New Password field and enter it again in Retype Password Since you...

Page 29: ...ving time Configure the time and date by verifying and adjusting current local time and daylight saving to avoid the following errors Incorrect display time for playback videos Inconsistent display ti...

Page 30: ...installed in NVR the page will show Disk doesn t exist Once an available hard disk drive is inserted into the tray Disk Information will show in Device Information and users can start to create new R...

Page 31: ...s available the status of Device Information shows Ready which indicates the hard disk drive is ready to be created Please click Create to enter the window for building New RAID Disk and select the ha...

Page 32: ...s in the below table Disk Configuration Big Drive Linear Big Drive is a collection of hard disk drives and does not provide any RAID protection The data are written to the disks continuously Performan...

Page 33: ...hard disk drive fails the array enters degraded mode The data can be rebuilt from other member drives after installing a new drive to replace the failed one Select a type of disk configuration and pl...

Page 34: ...g to finish the disk building Finally the RAID disk building is complete After the RAID disk is created RAID List shows RAID Name and available storage devices Device Information provides status of th...

Page 35: ...iption In Delete option user can remove or format RAID disk by selecting the RAID disk In the table RAID Name RAID type Capacity and Status are shown Remove Click Remove to delete RAID Disk Once Remov...

Page 36: ...ntinue the new RAID level configuration Note Once you remove the disk and continually create it the recorded video will be formatted Format Click Format to format the RAID disk all recorded videos wil...

Page 37: ...36 Camera Settings NVR provides two options for adding cameras UPnP Search and Detect Detect In this option users are asked to enter IP Address and vendor Then click Apply to start adding camera...

Page 38: ...users click Apply button Then the default username and password of that vendor will be replaced by the modified one Next time when users add new camera of the specific vendor username and password wi...

Page 39: ...tection is complete the camera list shows connected camera with Camera Name IP Address Port Vendor and Mode All applied cameras will be shown in Camera List and if no more camera needs to be connected...

Page 40: ...deleted from camera list Generic RTSP Generic MJPEG Brickcom NVR provides the interface for users to enter RTSP MJPEG URLs of IP cameras to receive the video streaming from IP camera The streaming wil...

Page 41: ...too Click apply to make parameters enable The most correct URLs should be provided from each camera vendors Users may also refer to websites https www soleratec com rtsp http www ispyconnect com sour...

Page 42: ...in default username and password of each vendor Camera Name User Name and Password can be modified by users Memorize modified username and password NVR will memorize username and password which is mo...

Page 43: ...Finish Please select Finish from the drop down menu of Configuration Utility to begin Once five steps of Quick Configuration are completed the window will show the completed status You can click Back...

Page 44: ...43 To review the setting or information of Quick Configuration user can also select Quick Configuration in the left of the Configuration main page...

Page 45: ...P cameras to the network Make sure the monitor is connected to the port HDMI VGA DVI I of NVR rear panel Please connect a USB mouse to the USB port of NVR Please connect power cord and connector to tu...

Page 46: ...configuration page will be disable While anonymous login is applied system will automatically log in without authorization process after boot up Start to setup the anonymous login Please go to Config...

Page 47: ...display of DIGISTOR or fill out columns with virtual keyboard The virtual keyboard in local display can be enabled from the right side of each column There are 3 types of virtual keyboard can be chos...

Page 48: ...the Overview of wizard to complete the system setup Start System will lead you to Start from the drop down menu of Configuration Utility to begin To initial the configuration please study the Overvie...

Page 49: ...onfigure IP address 1 Obtain an IP address automatically NVR Default Obtain an available dynamic IP address assigned by a DHCP server If this option is selected NVR will automatically obtain an availa...

Page 50: ...R in the same LAN To assign a static IP address to the NVR 1 Select Specify an IP address 2 Enter the IP address Subnet Mask Default Gateway IP Address and DNS server address 3 If IP Address is change...

Page 51: ...n admin account with password admin It s highly recommended to change the password upon the initial login Enter a new password in the New Password field and enter it again in Retype Password Since you...

Page 52: ...ving time Configure the time and date by verifying and adjusting current local time and daylight saving to avoid the following errors Incorrect display time for playback videos Inconsistent display ti...

Page 53: ...installed in NVR the page will show Disk doesn t exist Once an available hard disk drive is inserted into the tray Disk Information will show in Device Information and users can start to create new R...

Page 54: ...s available the status of Device Information shows Ready which indicates the hard disk drive is ready to be created Please click Create to enter the window for building New RAID Disk and select the ha...

Page 55: ...s in the below table Disk Configuration Big Drive Linear Big Drive is a collection of hard disk drives and does not provide any RAID protection The data are written to the disks continuously Performan...

Page 56: ...hard disk drive fails the array enters degraded mode The data can be rebuilt from other member drives after installing a new drive to replace the failed one Select a type of disk configuration and pl...

Page 57: ...g to finish the disk building Finally the RAID disk building is complete After the RAID disk is created RAID List shows RAID Name and available storage devices Device Information provides status of th...

Page 58: ...iption In Delete option user can remove or format RAID disk by selecting the RAID disk In the table RAID Name RAID type Capacity and Status are shown Remove Click Remove to delete RAID Disk Once Remov...

Page 59: ...ntinue the new RAID level configuration Note Once you remove the disk and continually create it the recorded video will be formatted Format Click Format to format the RAID disk all recorded videos wil...

Page 60: ...59 Camera Settings NVR provides two options for adding cameras UPnP Search and Detect Detect In this option users are asked to enter IP Address and vendor Then click Apply to start adding camera...

Page 61: ...users click Apply button Then the default username and password of that vendor will be replaced by the modified one Next time when users add new camera of the specific vendor username and password wi...

Page 62: ...tection is complete the camera list shows connected camera with Camera Name IP Address Port Vendor and Mode All applied cameras will be shown in Camera List and if no more camera needs to be connected...

Page 63: ...deleted from camera list Generic RTSP Generic MJPEG Brickcom NVR provides the interface for users to enter RTSP MJPEG URLs of IP cameras to receive the video streaming from IP camera The streaming wil...

Page 64: ...too Click apply to make parameters enable The most correct URLs should be provided from each camera vendors Users may also refer to websites https www soleratec com rtsp http www ispyconnect com sour...

Page 65: ...in default username and password of each vendor Camera Name User Name and Password can be modified by users Memorize modified username and password NVR will memorize username and password which is mo...

Page 66: ...Finish Please select Finish from the drop down menu of Configuration Utility to begin Once five steps of Quick Configuration are completed the window will show the completed status You can click Back...

Page 67: ...66 To review the setting or information of Quick Configuration user can also select Quick Configuration in the left of the Configuration main page...

Page 68: ...Live View Page On top right of live view users can select four view modes Mode Description Live View Click Live View to control the monitoring instantaneously Playback Click Playback to play and to ex...

Page 69: ...PEG 4 H 264 Audio Once camera supports audio NVR shows audio in blue Vice versa DIGISTOR shows audio in grey Event When event happens NVR shows warning to user for instant alert Recording status The w...

Page 70: ...ing and users can easily find the best balance in NVR Basic functions Icon Description Snapshot Take a snapshot on the camera that you select The snapshot will be saved in Public liveview_snapshot It...

Page 71: ...Click the icon of display mode to monitor live view When you click a display mode the mode icons will turn into blue Icon Description Full Screen 1 screen 4 screen 9 screen creen creen creen 25 scree...

Page 72: ...click on the arrows to pan and or tilt the camera The house in the middle can take you back to original monitoring position Preset positions Select the preset positions which are defined in PTZ camer...

Page 73: ...first time When a motion is detected the icon will start blinking By clicking the button a window will pop up to display the list of event log as below Users can view all detailed list of motion detec...

Page 74: ...ctly to do live view setting such as warning setting windows setting and sequential mode setting General Resize all video sizes at the same time Only a right click on the video users can set all video...

Page 75: ...d is a warning frame which will pop out on the channel when an event is detected When the motion event is awarded user can simply click on the channel with mouse the warning frame will be stopped Sequ...

Page 76: ...n which helps users to choose the proper streaming in live view with intuitive control To switch the different streaming users can select the channel in live view page and right click the mouse to sho...

Page 77: ...d to help user sort through the recorded videos quickly Steps to Playback Videos Users can easily search recorded videos by following playback steps Frame by frame playback and rewind features help us...

Page 78: ...ameras have recorded videos the date will be shown in a blue background in default Normal Record Users can select the date from calendar to start playback for a specific day Or users can set up specif...

Page 79: ...lor of background when users select different recording type 4 Click Play Please click play button to start playback Frame by Frame Playback 1 Follow above four steps of Playback 2 Click Pause 3 Click...

Page 80: ...ge can be enlarged by clicking digital zoom in button The image can also return to previous sizes by clicking the digital zoom out button Video playback speed control 1 2 3 4 5 6 7 Pause to temporaril...

Page 81: ...es from time table Scroll bar By moving scroll bar users can go to the specific recording time directly Date and time are shown above scroll bar to provide time reference Playback Audio The audio will...

Page 82: ...ot images and it will have 10 sequential images to be saved in the USB dongle Others Screenshot in Local Display Press PrtSc SysRq the image of full screen in local display can be pictured in the NVR...

Page 83: ...deos to your device 1 Enable USB backup in configuration page Management USB Backup 2 Insert USB dongle or USB type DVD burner in USB backup port When USB is ready to begin the Device Information will...

Page 84: ...will guide you to live view Users can view live video stream from IP camera via network and monitor the instantaneous view remotely Live view displays the video according to the camera list which has...

Page 85: ...Description Live View Click Live View to control the monitoring instantaneously Playback Click Playback to play and to export the recorded video files Configuration Click Configuration to configure ca...

Page 86: ...format M JPEG MPEG 4 H 264 Audio Once camera supports audio NVR shows audio in blue Vice versa DIGISTOR shows audio in grey Event When event happens NVR shows warning to user for instant alert Recordi...

Page 87: ...o more than 70 With changing the video configuration like resolution FPS and video quality or changing RAID type can influence the CPU loading and users can easily find the best balance in NVR Basic f...

Page 88: ...n out Select a channel to enable digital zoom function Drop Drop the camera from monitoring Drop all Drop all cameras from monitoring Add all Add all cameras from monitoring Camera information Consist...

Page 89: ...monitoring Click the icon of display mode to monitor live view When you click a display mode the mode icons will turn into blue Icon Description Full Screen One screen Four screen Nine screen creen cr...

Page 90: ...le network camera Pan tilt and zoom functions can be controlled remotely by users If device supports PTZ control users can click on the arrows to pan and or tilt the camera The house in the middle can...

Page 91: ...f motion detection at the very first time When a motion is detected the icon will start blinking By clicking the button a window will pop up to display the list of event log as below Users can easily...

Page 92: ...without blank grid after droping video from live view Resize all video sizes at the same time Only a right click on the video users can set all video size either in original size or fit size Highligh...

Page 93: ...lert sound If users enable the function the remote web browser will sound the alarm to notify users when motion detection is triggered Multi Server Users can save the camera list of multi server in li...

Page 94: ...oystick Users are able to manipulate PTZ camera with USB joystick Choose the joystick column and select joystick model then press Apply Joystick can work on PTZ cameras as the status bar is with PTZ i...

Page 95: ...rs to setup the dual streaming configurations in cameras parameters page if cameras support dual stream It is suggested stream 1 is set for higher resolution and stream 2 for lower which helps users t...

Page 96: ...tream from Server In case that NVR performance is violated by camera limitation stream from server is an optional choice for users to view video images It is highly recommend to use Enable Optimizatio...

Page 97: ...screen Fisheye Display Mode To view the best image quality by choosing use the proper engine of fisheye cameras or cameras with Immervision lenses Dewarp for fisheye cameras Choose mounting type Choos...

Page 98: ...97...

Page 99: ...to add to the local server and then the NVR which is located in LAN will appear including the local NVR Click cameras up to 144 channels to add them into camera list Click Ok to add cameras or Rescan...

Page 100: ...99...

Page 101: ...s sort through the recorded videos quickly Playback video can be viewed in full screen snapshots can be taken and saved during a video playback Steps to Playback Videos Before viewing recorded videos...

Page 102: ...Click Play 1 Select cameras from camera list Please select channel number from channel list to search recorded videos Up to 4 channels can be selected at the same time Once the camera is selected the...

Page 103: ...type There are five types of recorded videos in different colors Normal Record Event Video Clip Recovered File and Daylight Saving time With the changing of recording types time table will present in...

Page 104: ...ovide time reference Thumbnail in Playback With thumbnail function in the playback users can move the pointer of the mouse to the footage and the snapshot of the specific time will be shown It helps u...

Page 105: ...104...

Page 106: ...to display playback Video playback speed control 1 2 3 4 5 6 7 Pause to temporarily stop the playback Previous Image to show the earlier image Slow motion to play in slower speeds Play to play video f...

Page 107: ...on Snapshot Users can save the image of playback by clicking Snapshot Before taking snapshot from NVR users are recommended to set snapshot path from Setting Sequential snapshot in remote playback Use...

Page 108: ...type c Choose the display mode Change OSD color and font size Users can select different OSD color while having the playback of recording files Click Setting Click OSD color setting button the select...

Page 109: ...108 Select font size and click OK All OSD color will shown as the selection...

Page 110: ...Setting button Select the Storage AVI Path Playback setting page indicate the path where exported files to be saved Select cameras and time period Users can indicate which cameras and what time range...

Page 111: ...enable both in File Sharing Service in configuration page By using the link button on file sharing service page users can open the dialogdirectly after the service is enable Windows Networking Through...

Page 112: ...name of each connected NVR is from Mac Address of each NVR which can be found in configuration page To acquire Mac address users can refer to System Device Information System Information in configurat...

Page 113: ...you select the NVR a window will pop up and ask to enternetwork password If users don t amend the user name and password please enter the default ones admin admin After users enter accurate user name...

Page 114: ...gicallyby recording dates Please select a folder to enter All video files lists chronologically by recorded time and video length of each chunk is five minutes Select a video file to play Enter IP Add...

Page 115: ...network password If users don t amend the user name and password please enter the default ones admin admin After users enter accurate user name and password the folder of NVR displays the folder video...

Page 116: ...Windows Internet Explorer and enter NVR IP address which users configure As you enter the IP address a window will pop up and ask to typea user name and password to log in FTP server If users don t a...

Page 117: ...116 Please click Log On to proceed IE browser shows the folders on FTP server Please select folder videodata1...

Page 118: ...splays RecordFolder chronologically by recording dates Please select a folder to enter All video files lists chronologically by recorded time and video length of each chunk is five minutes Select a vi...

Page 119: ...isk Management NetworkManagement and System from each drop down menu Note NVR will automatically log out from configuration page after idle for 10 minutes IP Camera Camera Settings Please refer to Cam...

Page 120: ...frame rate resolution video quality audio enable and stream target via NVR in this page There are two parts in this section Parameter and Camera List Please select a camera in Camera List first As yo...

Page 121: ...ame Rate Select frame rate from drop down list Frame rate of IP camerawill be influenced by the network surroundings Resolution Select resolution from drop down listfor your camera Video Quality Selec...

Page 122: ...121 Furthermore click Go to Web for advanced camera configuration in camera s user interface At the same time a window will pop up to ask for user name and password for camera configuration...

Page 123: ...122 Camera Status Please select Camera Status from the drop down menu of IP Camera to begin Camera List shows connection status of recording...

Page 124: ...ers to combine various events and its triggered actions to achieve the security surveillance If the hard disk is not installed the following window will pop up when you click Recording Event After the...

Page 125: ...amera to apply Always Recording function The video will be recorded continuously NVR provides two ways to delete the recorded videos HDD Automatic Recycle Users can set recording percentage for keepin...

Page 126: ...125 Recording Schedule Users can configure Recording Schedule to define time range for all channels Insert schedule Select time range and channel for recording schedule and click Insert...

Page 127: ...nd camera channel Note A camera can set multi recording schedule at same time as below picture Delete schedule Users can erase the specific time in recording schedule by selecting the time then click...

Page 128: ...127 click Delete...

Page 129: ...esponding action When an event occurs NVR will perform certain actions This setting can strengthen security level during monitoring and recording to notify users when necessary Event Action NVR suppor...

Page 130: ...e is a set of parameters that defines different actions Check an event type and click Add to select NVR Action Note The action will be only triggered when the action is added to the event Disconnected...

Page 131: ...Select Contact List and Apply Options for cameras Then please click Ok to finish E MAIL Configuration If Attached with the snapshot is enabled the Email will be sent with snapshot of the event Click A...

Page 132: ...4200 Pro Series DS 4000 Series and DS 2000 Pro Series Digital Output1 and Digital Output2 are supported by other digital outputs of server and can be enabled up to 60 seconds Select Apply Options for...

Page 133: ...ter for the service It supports only for English message currently Settings 1 Fill out the correct username password and API ID about SMS server 2 Select country and input cell phone number 3 Put the...

Page 134: ...a various actions can be triggered Event Triggered Record You can enable Event trigger record and Video Clip Event triggered record When event is triggered NVR records video and records every five min...

Page 135: ...ions field to finish the configuration Digital Input You can set action as Event Trigger Record Send E Mail and Digital Output User Defined Action and SMS Once Digital Input is detected from camera va...

Page 136: ...ou can set action as Digital Output Once NVR loses its network connection the actions can be triggered NVR event Recording Error You can set action as Send E Mail and SMS Once NVR fails in recording t...

Page 137: ...er Defined Action and SMS Once Digital Input is detected from camera multiple actions can be triggered External event HTTP in You can set action as Event Trigger Record Send E Mail and Digital Output...

Page 138: ...to int is defined for what number 1 5 of external HTTP in event need to be triggered For example http 192 168 1 245 login cgi cgi_main cgi cgiName event_ip c cgi eventName Defined_3 The CGI is for se...

Page 139: ...dio is enabled camera audio will be recorded when an event is triggered When the event stops the audio will be disabled again automatically Click Apply to apply setting Event Schedule Users can setup...

Page 140: ...139 Setup event schedule Select the type of event Schedule By Day...

Page 141: ...the time period 3 Click Insert button to be effective 4 Designated duration will be displayed 5 Designated duration is shown on chart Press Apply By Week 1 Select the schedule as Week 2 Select the day...

Page 142: ...duration will be shown in chart Press Apply Remove event schedule Please follow the following steps to remove the certain period of duration 1 Designate the time period on chart by clicking on it 2 Cl...

Page 143: ...142 3 Click on Delete button 4 All durations of the camera are removed Note It will remain the alarm schedule as always mode...

Page 144: ...Body Enter the content for Body Authentication Depending on the mail sensor SMTP Server provides three types of authentication Select Authentication as PLAIN LOGIN or LOGIN with TLS according to the r...

Page 145: ...List and users can delete the contactor or continue to add a new contactor Disk Management NVR can create new RAID disk or delete format the RAID disk Also users can manage NVR s storage device for da...

Page 146: ...The steps for creating and deleting hard disk please refer to the disk management of Quick Configuration Please select Disk Management from the drop down menu of Quick configuration to begin File Sys...

Page 147: ...rd disk is installed the file system will show the volume of RAID as below File system provides an efficient method to organize data expected to be retained after a program is terminated by providing...

Page 148: ...hard disk installed in the DIGISTOR the screen will show No Filesystem Information Once the hard disk is installed the filesystem will show status as below Turn On or turn off sharing service to enabl...

Page 149: ...er Name is already shown Computer Description and Domain or Workgroup Name can be changed FTP Service In FTP Settings users can enable or disable FTP Services User can arrange Command Port and Passive...

Page 150: ...link Please select Dropbox from the drop down menu of Cloud to begin Setup Dropbox Service Please click Apply to start Dropbox webpage connection and to establish a folder in Dropbox At the same time...

Page 151: ...g to Dropbox the NVR will display as below If users want to cancel the Dropbox setting please click Apply to remove setup Share Files to Dropbox Server Users can move the files from Public snapshot co...

Page 152: ...151...

Page 153: ...box service from NVR All configuration and data of Dropbox in NVR will be deleted Online Sync Users can choose whether NVR automatically synchronizes with Dropbox Server If users want to enable synchr...

Page 154: ...153 A warning will pop up when the folder cannot open Please enter the same Lan domain as NVR Network Setup Network Setup Please select Network Setup from the drop down menu of Network to begin...

Page 155: ...l IP application to connect different network segments to maximize network efficiency Dual IP application allows users to efficiently communicate between internet and surveillance system Dual IP appli...

Page 156: ...If no DHCP server exists in the networking environment the IP address will be given as192 168 1 245 It should be sufficient in most network environments and users can maintain the default IP address...

Page 157: ...ission port to access NVR Default port for NVR connection is 80 Network Service Please select Network Service from the drop down menu of Network to begin Black White List Edit White or Black List to a...

Page 158: ...to White List or Black List Note The above IP address is only an example for reference User isrecommanded to add White List or Black List carefully according to different demand Also user can set eit...

Page 159: ...or disable UPnP search Rename UPnP Note The maximum character limitation for UPnP Name is32 characters Please click Apply to execute the settings DDNS Please select DDNS from the drop down menu of Ne...

Page 160: ...rs to easily access their camera even with a changing IP address NVR is compatible with four DDNS service providers 1 ipcam jp 2 mwcam jp 3 DynDNS and 4 No IP Note Before utilizing this function pleas...

Page 161: ...also be set here User Management Select User Management from the drop down menu of Management to begin NVR can be accessed by multiple users simultaneously Except the built in Administrator account us...

Page 162: ...username and password in User List and select a group from the Group drop down list to assign a new power user Live View Access and Playback Access are selected automatically for Power User Click Appl...

Page 163: ...below User Administrator can select a group from Group drop down list to assign a new User Please enter a username and password in User List And select Live View Access and Playback Access for the ne...

Page 164: ...selected account will turn to blue and the page for modifying user will appear as below You can change Live View Access and Playback Access Please click Apply to proceed After User is modified user l...

Page 165: ...login Select anaccount from User Name drop down list to change password Enter a new password in the New Password and enter it again in Retype Password Click Apply the password will be changed Log Syst...

Page 166: ...check Hardware Log NVR Log Event Log Current User Historical User Log and File Access Log Hardware Log The log information in Hardware Log includes RAID creation RAID deletion RAID modification CPU bu...

Page 167: ...tion in Event Log includes Camera is connected The camera is disconnected Digital Input Motion detected and Storage usage is out of limit etc Current User The log information in Current User shows the...

Page 168: ...cal User Log records any user who has logged in the NVR For example Execute detect Motion detected FTP service is configured Account is created Execute system shutdown etc File Access Log The message...

Page 169: ...d save log files from Log System page And each log types correspond to one log file The log content can be saved as html or txt format Save Load Configuration Please select Save Load Configuration fro...

Page 170: ...ave configuration in a format of cfg file and specify the File Name Notice Save configuration will just save Camera Setting Recording Settings Event Action Setting E Mail settings and Server Settings...

Page 171: ...e file name displayed click Apply to load configuration USB Backup Users can preset the latest duration and channels of USB Backup button on Remote Web Browser for quick backup the latest video files...

Page 172: ...elect USB Backup from the drop down menu of Management USB Backup Button Setting in Remote Web Browsers Enable USB Backup button function can be enabled or disabled for security concern The latest dur...

Page 173: ...ice is inserted to the NVR the USB Backup Device Information in Remote Browser will show the status Wait When the USB is ready to begin the Device Information will show the status Ready and the USB LE...

Page 174: ...ner When a USB type DVD burner is inserted to NVR the USB Backup Device Information in Remote Browser will show the status Wait When the USB type DVD burner is ready to begin the Device Information wi...

Page 175: ...er and NVRCheck will be downloaded with video files Advance Settings Encryption of Exported Files Users can encrypt exported files to USB or DVD deviceas ZIP files in remote playback Users need to dec...

Page 176: ...l pop up after users click export button in remote playback page Then a window will pop up to display download status After successfully export files a window will pop up to ask users to enter passwor...

Page 177: ...evices manually including Device Name IP Address User Name and Password Click Detect to check whether connection is successful or not Please click Apply to finish the setting Vender and Model will sho...

Page 178: ...of Management to begin UPS Uninterruptible Power Supply is designed to provide emergency power for unexpected power outage Note YEC UPS device is supported by NVR UPS Device Information Users can obt...

Page 179: ...n and Startup feature can maintain usual surveillance performance when users encounter power outage Please enable UPS Support Then fill in numbers to automatically shutdown or startup NVR With Smart S...

Page 180: ...drop down menu of System to begin System Information System Information shows Operating System OS Version NVR Version CPU Network Adapter MAC Address and Network Flow Locate Click Locate the NVR buzz...

Page 181: ...180 Enclosure Information Enclosure Information shows CPU Temperature and System Fan Speed Note Temperature of operation environment for NVR is 0 40 C...

Page 182: ...Windows IE Chrome Firefox Opera browser Download latest firmware file from Brickcom website www brickcom com Brickcom offers new firmware for NVR to update functions Please download the latest firmwar...

Page 183: ...he firmware Click Upgrade After selecting the file please click Upgrade to renew the NVR Once system upgrade is finished NVR will reboot itself Users could go to Device Information from the drop down...

Page 184: ...183...

Page 185: ...ce Please save the file to your USB device after downloading and unzipping the firmware Note To recognize the USB device well please format the USB device to FAT32 file system first and make sure you...

Page 186: ...r on the monitor and NVR and log in NVR Go to Configuration page and then select System Upgrade When the interface shows device is ready you can start upgrading NVR Once firmware upgrade finishes NVR...

Page 187: ...menu of System to begin NVR provides different languages for users Users can configure the language as AUTO or other languages Please click Apply and the language will be changed Date Time Please sele...

Page 188: ...to the correct time zone and adjust clock for daylight saving changes for your preference Please enter the hostname of a valid NTP server Built in NTP server in NVR NVR provides the NTP server functio...

Page 189: ...set Buzzer Notice Once the buzzer notice is disabled the buzzer action of digital output will not be performed Note To stop the buzzer sound user can press USB BACKUP button on the front panel of NVR...

Page 190: ...189 Click Reboot to restart the NVR Click Shutdown to turn off the NVR...

Reviews: