12
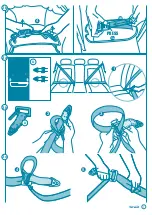
head-sides of the carrycot (pic.1).
1. ABDOMINAL BELT TO SECURE THE CHILD IN
THE CARRYCOT
Put the 2 ends of the belt through the holes in the bottom of the
plastic body passing through the lining (pic. 2a).
Ensure they are correctly secured pulling the belts upwards firmly
(pic. 2b).
2. PREPARE THE REAR SEAT-BELTS
Fasten the buckles of the
back seat
belts as per picture 3a.
Pull the lower-waist part of the car seatbelt (pic. 3a-1).
Take the Brevi connecting belt with the clip open (pic. 3b-D).
Make a loop in the belt and pass it through the metal ring on the
connecting belt (pic. 3b-2).
Pass the small red metal bar into the loop (pic. 3b-3).
To fasten the buckle on the car seatbelt, pull the Brevi connecting
belt, letting it slip to the external part of the belts (door side). To
adjust the connecting belt, raise the loop and slide the car belt (pic.
3c-4). To lock it in place, pull the belts again (pic. 3c-5).
Repeat the procedure with both the rear seat belts as per picture 3d.
3. FASTEN THE CARRYCOT TO THE SAFETY
BELTS
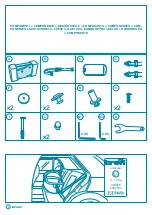
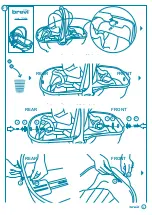
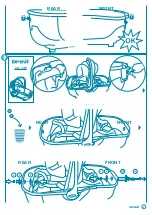
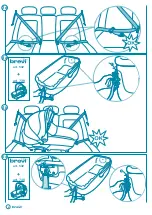
Assemble the two metal pins on the carrycot shell. The pins are to
be screwed to the front and back side of the shell (head and foot
side). See picture 01 for Brevi’s carrycot item 739. See picture 02
for Brevi’s carrycoot item 740.
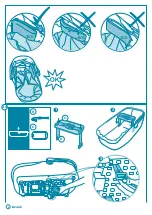
Fasten the carrycot to the car seat by clipping the connecting belts
to the external pins.
Push the clip against the pin, forcing the red plastic lever; then pull
it downward to lock.
Art. 739 (Fig.4a)
Art. 740 (Fig.5a)
Make sure to fasten at all times both the pins to the belts.
To release the carrycot, pull the red lever outwards, releasing the
pin, and then pull the metal clip upwards.
WARNING
Make sure that the clips are correctly in place by
pulling them up and downwards.
It must be impossible for the carrycot to move. To
fasten the carrycot more securely, use the seatbelt
tightening clip system. Also make sure that the 2
connecting belts are correctly distanced.
4. SECURE THE BABY IN THE CARRYCOT
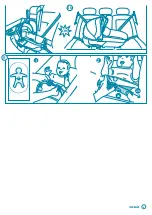
Adjust the backrest to the horizontal position and insert the shock
absorbers into the head side of the carrycot. The bumpers should
be put under the lining (pic.1).
Open the waist belt by pressing the red button on the buckle.
Press the button on the left-end of the adjuster to increase the leng-
th of the belt.
Put your baby in the carrycot and fasten the belt (pic. 6-1).
Tighten the waist belt (pic. 6-2).
Always use the chest pad (part C) by threading the belt sides into
the pad loops.
ATTENTION
Make sure the baby is secured with the safety belt
every time you use the Brevi carrycot in the car.
Be careful not to over-tighten the belt.
Check regularly that the baby does not manage to
open the buckle on his/her own.
Never leave the child unattended.
The backrest inside the carrycot, when used in the
car, has always to be in the horizontal position,
that’s to say flat.
5. REMOVE THE BABY FROM THE CARRYCOT
Release the safety belt by pressing the red button on the buckle,
and pull the edge out from the open loop of the pad.
NOTICE
This child restraint has been deemed “Universal” and classified ac
-
cording to Regulation No. 44, amendment series 04. It is suitable
for general use in vehicles and is compatible with most, but not
all, cars.
This child restraint has been classified “Universal” according to
stricter criteria than those applied to previous models which do not
include this notice.
In case of doubt, contact Brevi srl.
When the rear seatbelts are used for the protection of passengers,
remove the Brevi connecting belts.
The use of parts or accessories not approved by the manufacturer
could be dangerous.
Never leave the child unattended.
In the event of an accident, the carrycot and belts could be dama-
ged; we recommend to replace them.
Never leave the baby in the carrycot, exposed to the sun.
The carrycot body must be placed perpendicularly to the axis of the
vehicle, as per picture (4b-5b)
The rigid or plastic parts of the fastening system should not interfere
with the moving parts of the vehicle.
USEFUL SUGGESTIONS
-
Retain these instructions for future reference
-
Never use the carrycot without its lining
-
Never use the carrycot without its shock absorbers (side protec-
tions, part A and ventral pad, part C)
-
The carrycot’s lining must only be replaced with one supplied by
the manufacturer, as it is an integral part of the protection system
-
The carrycot must be installed strictly following the present in-
structions
-
Regularly check that, when playing, the baby does not acciden-
tally unfasten his/her safety-belt
-
Ensure that both the baby belt and the three-point seatbelt are
correctly tightened to guarantee the maximum protection to your
baby
-
Check that the belts are not twisted
-
Keep the belt band from being caught between the doors or rub-
bed against sharp objects.
-
If there are tears or frays on the belt, replace it
-
The belts must be cleaned with a damp cloth. Do not use sol-
vents or bleach, as these could damage the belts and make
them unsafe
Summary of Contents for 532
Page 3: ...3 art 739 P R E S S FRONT REAR E E F L F H L H FRONT REAR REAR N N M2 FRONT M2 01 ...
Page 4: ...4 FRONT REAR art 740 P R E S S PRESS FRONT REAR E E F L G I L H FRONT REAR 02 ...
Page 5: ...5 N M1 REAR FRONT N M2 FRONT REAR A 1 DX SX SX DX 2a 2b SX 1 ...
Page 6: ...6 3 SX SX SX A A 3 B C B C 1 2 2a ...
Page 7: ...7 D 1 4 5a 5b PRESS 2b 4 5 2 D 3 3a 3b 3c ...
Page 8: ...8 art 532 art 739 1 2 art 532 art 740 3 4 1 2 5a 4b 4a 3d ...


