9
E
N
G
L
IS
H
Multiple Zeppelin Air units can be connected to
the wireless network and used to provide audio
in separate rooms. Each will be available in the
iTunes devices menu, identified by either the names
specified in the setup page, or by default the last
three digits of their serial numbers.
6. Using the Zeppelin Air USB Input
The USB input enables you to connect your Zeppelin
Air to a Mac/PC in order to play stored or streamed
audio, or to synchronise data held on your Mac/PC
with your iPod or iPhone.
6.1 Playing Audio via USB
When Zeppelin Air is connected to a Mac/PC via
USB and its
USB
input is selected, the computer will
identify
Zeppelin Air
as an output only audio device.
Specifying Zeppelin Air in the Mac/PC audio control
panel will allow it to play audio data either stored
locally on the computer or streamed via a network or
the internet. The Zeppelin Air indicator will illuminate
green when the
USB
input is selected.
Note: The table in Section 4 describes all
the Zeppelin Air indicator colours and their
meanings.
Depending on the Mac/PC audio application in use,
the handset may be used to control playback, skip
tracks and adjust volume.
6.2 Data Synchronisation via USB
When Zeppelin Air is connected to a Mac/PC via
USB it can be used as an iTunes synchronisation
dock to synchronise data stored on the computer
with data stored on the iPod or iPhone.
To function as a synchronisation dock, the Zeppelin
Air must first be switched into
Sleep
mode by
pressing the handset
Standby
key, or pressing
and holding the
Standby
button for 2 seconds.
Once in
Sleep
mode, pressing and holding the
Standby
button again for two seconds switches
the Zeppelin Air into
Synchronisation
mode (entry
into synchronisation mode is not possible from the
remote handset). In synchronisation mode, a docked
iPod or iPhone will be linked directly to the Mac/
PC via USB so that iTunes can be used to manage
data synchronisation. The Zeppelin Air indicator will
illuminate yellow in synchronisation mode.
Note: If no iPhone or iPod is docked or no Mac/
PC is connected, Zeppelin Air will not enter
synchronisation mode.
When synchronisation is complete, synchronisation
mode can be cancelled either by un-docking the
iPod or iPhone or pressing and holding the Zeppelin
Air
Standby
button for two seconds. It is good
practice always to “eject” iPod and iPhone models
from iTunes before physically disconnecting the USB
connection. The Zeppelin Air will return to
Sleep
mode when synchronisation mode is cancelled.
Note: Cancelling synchronisation mode while
synchronisation is underway may result in data
loss.
7. Zeppelin Air Firmware Update
Updated Zeppelin Air firmware may from time to time
be made available for download from the Zeppelin
Air support section of the Bowers & Wilkins web
site. With the firmware file downloaded to your Mac/
PC, update your Zeppelin Air by following the steps
below:
• Un-dock any docked iPod or iPhone and
disconnect Zeppelin Air from its power supply.
• If it is not already connected, connect the Zeppelin
Air to the Mac/PC via USB.
• While holding down the Zeppelin Air
Standby
button, connect the Zeppelin Air power cable.
The indicator will illuminate white to confirm that
the Zeppelin Air is in firmware update mode and
connected to a Mac/PC.
• Launch the firmware updater on the Mac/PC and
follow the dialogue box instructions.
Note: On computers running Mac OS X,
launching the Zeppelin Air firmware updater will
install a Zeppelin Air Programmer application
in the OS X Applications folder. Launching the
application by double-clicking on its icon in the
Applications folder will begin the firmware update
process.
Note: On computers running Microsoft Windows
(XP or later), launching the Zeppelin Air firmware
updater will install a Zeppelin Air desktop
icon. Double-click on the icon to begin the
update process. If the process has not been
run before, a dialogue box will request that the
location of the USB Driver also installed by the
updater is specified (the default location is:
C:\Program Files\Bowers & Wilkins\Zeppelin
AirProgrammer\). Once the location of the USB
driver has been specified, the firmware update
process will continue.
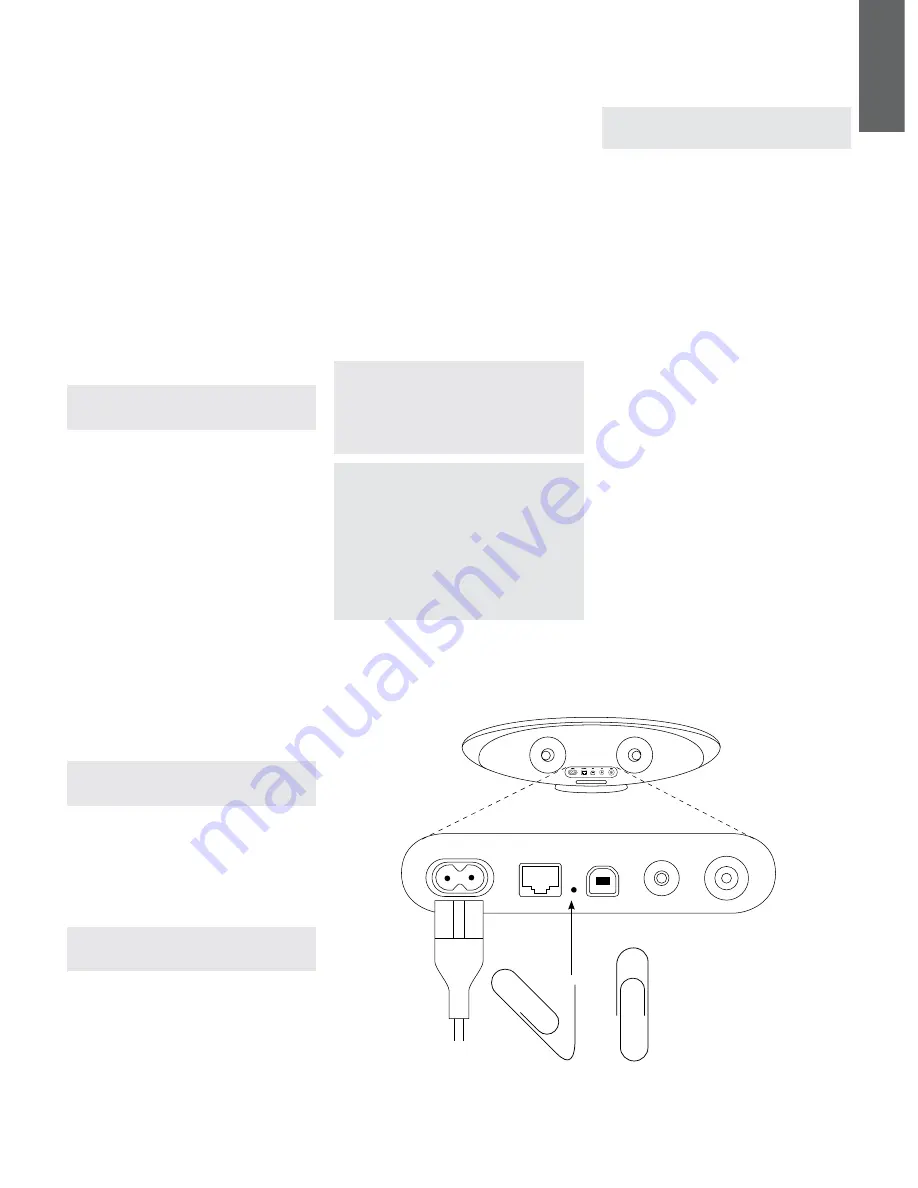
Diagram 9
Zeppelin Air factory reset
Once the firmware update is complete, the Zeppelin
Air indicator will illuminate dim red and the unit will
return to normal operation.
Note: Updated Zeppelin Air firmware may
incorporate new features. Download the most
recent owners manual for the latest information.
8. Zeppelin Air Factory Reset
Zeppelin Air has a pin-hole reset button located
on its rear connection panel. The reset button is
illustrated in Diagram 9. To return the Zeppelin
Air network settings (AirPlay input) to the factory
defaults, ensure the power cable is connected, and
power the Zeppelin Air on. Wait 60 seconds before
pressing and holding the reset button for 2 seconds.
The indicator will flash red five times.
9. Cleaning Zeppelin Air
Use a clothes brush or vacuum cleaner with nozzle
attachment to clean the grille cloth. Wipe other
surfaces with a clean lint-free cloth. If you wish to
use a cleaning agent, apply it onto the cleaning
cloth, not directly onto the Zeppelin Air. Test a
small area first, as some cleaning products may
damage some of the surfaces. Avoid products that
are abrasive, or contain acid, alkali or anti-bacterial
agents.
10. Troubleshooting
If you need help troubleshooting a specific problem,
or have a question you’d like answered, please
consult our Troubleshooting guide, or Frequently
Asked Questions section on the Zeppelin Air Product
Support page of our website.
www.bowers-wilkins.com
ETHERNET
POWER
USB
AUX
COMP
Summary of Contents for Zeppelin Air
Page 1: ...Zeppelin Air ...


