background image

19

ENGLISH

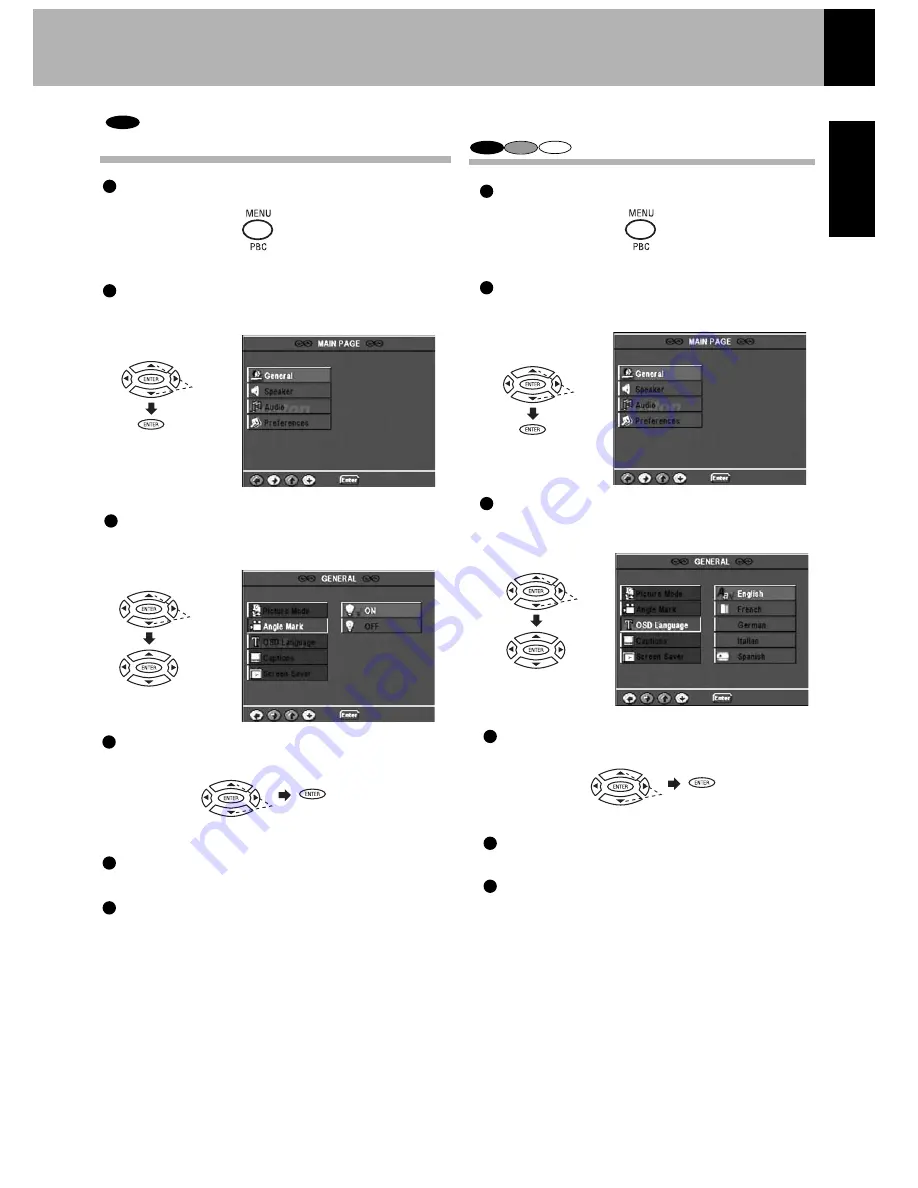
During stop mode, press the MENU button on
the remote.

CD

VCD

1

2

3

4

5

6

5

6

4

3

Set Up Functions

Please refer to pages 16 and 17 for setup.

Press cursor up/down (  /  ) buttons on the remote
to select GENERAL SETUP, then press the ENTER
button to access the sub features.

Press cursor up/down (  /  ) buttons on the remote
to select ANGLE MARK, then press the cursor
right (  ) button to access the sub features.

Press cursor up/down (  /  ) buttons on the remote
to select ON or OFF, then press the ENTER button.

Press cursor left (  ) button on the remote to return
to the previous menu.

Press cursor up/down (  /  ) buttons on the remote
to select EXIT SETUP, then press the ENTER button.

W

W

W

W

W

W

W

W

During stop mode, press the MENU button on the
remote.

Press cursor up/down (  /  ) buttons on the remote
to select GENERAL SETUP, then press the ENTER
button to access the sub features.

Press cursor up/down (  /  ) buttons on the remote
to select OSD LANG, then press the cursor right 
(  ) button to access the sub features.

Press cursor up/down (  /  ) buttons on the remote to
select the specific language, then press the ENTER
button.

Press cursor left (  ) button on the remote to return to
the previous menu.

Press cursor up/down (  /  ) buttons on the remote to
select EXIT SETUP, then press the ENTER button.

W

W

W

W

W

W

W

W

W

W

W

W

2

1

DVD

DVD

Select OSD Language

Select Angle Mark On or Off

o

Summary of Contents for Avidea 610

Page 1: ...SETUP AND U SETUP AND USE GUIDE DVD VCD CD SURROUND SYSTEM DVD RECEIVER 2 0 INSTRUCTION MANUAL Volume Phones Volume English US ...

Page 2: ...torms or when unused for long periods of time 13 Refer all servicing to qualified service personnel Servicing is required when the apparatus has been dam aged in any way such as if the power supply cord or plug is damaged liquid has been spilled or objects have fallen into the apparatus the apparatus has been exposed to rain or moisture does not operate normally or has been dropped 14 Maintain a m...

Page 3: ...age Code List 25 Setting Up SURROUND Mode 26 What are SURROUND Modes 26 3 ENGLISH Introduction Contents Preparation Operations Let s Play Some Sound 31 Basic Use Method 31 Assigning the Digital Optical In 31 Selecting Surround Sound Mode 32 Receiving Broadcast Stations 33 Storing the Broadcast Stations one by one presetting 34 Playback of Disc 35 Basic Play 35 Disc Playback Features 36 On Screen D...

Page 4: ...ur unit was shipped to you directly notify the shipping company without delay Only the consignee the person or company receiving the unit can file a claim against the carrier for shipping damage We recommend that you retain the original carton and packing materials for use should you transport or ship the unit in the future Keep this manual handy for future reference Accessories packed with the DV...

Page 5: ... used in accordance with the instructions may cause harmful interference to radio communications However there is no guarantee that interference will not occur in a particular installation If this equipment does cause harmful interference to radio or television reception which can be determined by turning the equipment off and on the user is encouraged to try to correct the interference by one or ...

Page 6: ...o not use discs which are not round because they may cause malfunctions In Regard to Contact Cleaner Do not use contact cleaners because it could cause a malfunction Be specially careful not to use contact cleaners containing oil for they may deform the plastic component Caution on Condensation Condensation of dew may occur inside the unit when there is a great difference in temperature between th...

Page 7: ...n Scan In the example on the left the 16 9 video can be converted into letter box video Number of angles provided by the angle function The number in the icon indicates the number of angles Max 9 angles Number of voice languages recorded with the audio function The number in the icon indicates the number of voice languages Max 8 languages Number of subtitle languages recorded with the subtitle fun...

Page 8: ...carries the corresponding code to the region code of the player shown in the table above a marking containing the region code of the player or the ALL marking shown below Even when a DVD VIDEO disc does not carry any indication of the region code it may sometimes unable to be played on this player due to certain restrictions Restrictions Due to Difference Between Discs Some DVD and VCD discs can b...

Page 9: ...d TV do not match the played video may be black and white or become as shown below Top and bottom edges are not displayed Top and bottom areas are dark Picture turbulence due to sync unmatching Checking the Video Format Preparation for Set Up Check the video format of the TV to be used 16 For Europe and Australia This unit has a function for changing the video format according to the TV type The i...

Page 10: ...adiation onto the top of the unit Leave a space around the unit from the largest outside dimension including projection equal or greater than shown below Top panel 19 7 50 cm Side panel 3 95 10 cm Back panel 3 95 10 cm Malfunction of Microcomputer If operation is not possible or erroneous display appears even though all connections have been made properly reset the micro computer referring to In c...

Page 11: ...h provides the best reception The accessory indoor antenna is for temporary indoor use only For stable signal reception we recommend using an outdoor antenna Lead the 75Ω coaxial cable connected to the FM outdoor antenna into the room and connect it to the FM 75Ω terminal Connect to the antenna terminal Locate the position providing good reception Fix the antenna FM Indoor Antenna Connection AM Lo...

Page 12: ...ce CRT LCD DLP LCOS projectors and the HDTV ready TVs can take advantage of the high definition source this unit can provide These devices may require Progressive Scan Activate Progressive Scan While the unit is in standby press and hold the OPEN CLOSE button and PLAY PAUSE button at the same time to toggle progressive scan on and off Note Composite Video Cable OR S Video Cable Switching NTSC PAL ...

Page 13: ...inputs you will need to assign them to the CBL SAT VCR PVR or VIDEO sources When selected these connections override the standard audio video connections Assign the Component Input Important note for assigning the Component Input Select the DVD input on the Remote Control and press the AUDIO SETUP button The display will show the current setting Toggle through the list using the right or left curs...

Page 14: ...RANDOM indicator PCM indicator ST STEREO indicator DSP indicator TITLE indicator TRACK indicator CHP CHAPTER indicator SLEEP indicator ST STEREO indicator TUNED indicator AUTO indicator REPEAT indicator A B indicator FOLDER indicator IN OUT status indicator L Left speaker C Center speaker R Right speaker LS Left surround speaker LFE Low frequency effect RS Right surround speaker Memory indicator D...

Page 15: ...control buttons succes sively press the buttons securely by leaving an interval of 1 sec ond or more between pressing of buttons 1 The provided batteries are intended for use in operation checking and their service life may be short 2 When the remote controllable distance becomes short replace both of the batteries with new ones 3 If direct sunlight or the light of a high frequency fluorescent lam...

Page 16: ...ped for the hearing impaired but it is also a very effective system for learning foreign languages When your TV is compatible with closed caption and you select ON you can use the CLOSED CAPTION function On Off Screen Saver This switches the screen saver ON or OFF When SCR SAVER is ON the screen saver function will operate after approx 3 minutes have passed with a still picture display of BOSTON O...

Page 17: ... this setting if you want the movie to fill the entire screen of your 4 3 TV You won t see part of the picture particularly the right and left edge Some discs produced in a wide screen format can not be cropped in this fashion which means the black bars would appear at the top and the bottom of the screen NORMAL LB Letter Box Choose this setting if you would prefer to see movies in their original ...

Page 18: ... press the cursor right button to access the sub features Press cursor up down buttons on the remote to select TV DISPLAY type then press the ENTER button Press cursor left button on the remote to return to previous menu Press cursor up down buttons on the remote to select EXIT SETUP then press the ENTER button Please refer to pages 16 and 17 for setup W W W W W W W W W W During stop mode press th...

Page 19: ...u Press cursor up down buttons on the remote to select EXIT SETUP then press the ENTER button W W W W W W W W During stop mode press the MENU button on the remote Press cursor up down buttons on the remote to select GENERAL SETUP then press the ENTER button to access the sub features Press cursor up down buttons on the remote to select OSD LANG then press the cursor right button to access the sub ...

Page 20: ... SETUP then press the ENTER button W W W W CD VCD DVD W W W W W W Select Screen Saver On or Off 3 2 1 Select Captions On or Off NTSC only Please refer to pages 16 and 17 for setup During stop mode press the MENU button on the remote Press cursor up down buttons on the remote to select GENERAL SETUP then press the ENTER button to access the sub features Press cursor up down buttons on the remote to...

Page 21: ... sub features Press cursor up down buttons on the remote to select COMPRESSION then press the cursor right button to access the sub features Press cursor up down buttons on the remote to select specific dynamic range then press the ENTER button Press cursor left button on the remote to return to the previous menu Press cursor up down buttons on the remote to select EXIT SETUP then press the ENTER ...

Page 22: ...wn buttons on the remote to select AUDIO then press the cursor right button to access the sub features Press cursor up down buttons on the remote to select a specific language then press the ENTER button Press cursor up down buttons on the remote to select EXIT SETUP then press the ENTER button W W Press cursor left button on the remote to return to the previous menu Press cursor up down buttons o...

Page 23: ...item Change Password when the password is to be changed Press cursor left button on the remote to return to the previous menu Press cursor up down buttons on the remote to select MAIN PAGE then press the ENTER button During stop mode press MENU button on the remote Press cursor up down buttons on the remote to select PREFERENCE then press the ENTER button to access the sub features Press cursor up...

Page 24: ...ew password and the new password again to confirm then press the ENTER button The password set at the time of shipping from the factory is 0000 Press cursor up down buttons on the remote to select EXIT SETUP then press the ENTER button W During stop mode press MENU button on the remote Press cursor up down buttons on the remote to select PREFERENCE then press the ENTER button to access the sub fea...

Page 25: ...anguage Code List 1239 1245 1248 1253 1254 1257 1261 1269 1283 1287 1297 1298 1299 1300 1301 1305 1307 1311 1313 1326 1327 1332 1334 1345 1347 1349 1350 1352 1352 1353 1356 1357 1358 1363 1365 1369 1376 1379 1393 1403 1408 1417 1428 1435 1436 1463 1481 Interlingue Inupiak Indonesian Icelandic Italian Hebrew Japanese Yiddish Javanese Georgian Kazakh Greenlandic Cambodian Kannada Korean Kashmiri Kur...

Page 26: ...uts 2 channel signals from a Dolby Surround encoded source and reproduces 5 channel signals in which the surround channel is divided into inde pendent channels for the left and right Dolby Pro Logic II has the MOVIE mode and MUSIC mode DTS DTS has five full frequency channels that create effects nearly identical to those in a theater Sounds seem to zoom from one place to another or entirely surrou...

Page 27: ...nt steps if the surround effect is too strong or to one of the Back steps if it is too weak To change the Dimension press SETUP button twice at the time of Dolby Pro Logic II Music mode Display the DIMEN 0 or other value then press the LEVEL buttons to select F 2 F 3 R 2 or R 3 Center Width The center channel signal can be divided and distributed to the Front L R channels The adjustment for distri...

Page 28: ...eft Front channel L 0 dB Center channel C 0 dB Right Front channel R 0 dB Right Surround channel RS 0 dB Left Surround channel LS 0 dB Subwoofer SUB W 0 dB Reset as follows to match your listening environment Speaker Test Tone and Level Setting Press the AUDIO SETUP button for more than 3 seconds Press the LEVEL buttons to control the speaker level As the subwoofer SUB W has a special playback ban...

Page 29: ... setting for the front speakers A longer distance than for the front speakers can not be set Delay time setting sets the delay time converted to the distance from the speaker to the listening position Feet indication Meter indication The original display returns when no operation is performed for about 5 seconds The process advances to center speaker adjustment when the SETUP button is pressed Rep...

Page 30: ...aker SUB W Subwoofer Speaker Setting Level Setting Using a Music Source A music source can be used for speaker level setting and subwoofer level setting Play a disc Select the speaker button Press the LEVEL button to set the speaker level Speaker level adjustment can be performed by pressing the buttons FRONT CENTER REAR and SUB W The speaker level can be changed in the range from 10dB to 10dB 1 2...

Page 31: ... of the buttons on the left is pressed while in STANDBY mode the power will be switched on automatically and the input will be selected The power will be switched on and the respective oper ation will be performed also when the EJECT button the PLAY PAUSE button or the SOURCE button on the main unit is pressed during STANDBY mode When a disc is set in the disc tray and the DVD button is pressed di...

Page 32: ...P3 file etc Assign the Digital Input Press the appropriate Input Selector button CBL SAT VCR PVR or Video Press the SETUP button TWICE The display will show the current setting Toggle through using the right or left cursor buttons DIN OFF DIN VIDEO DIN VCR or DIN CABLE Each press switches the mode At the time of music CD Let s Play Some Sound 1 2 DOLBY PL II MOVIE DOLBY PL II MUSIC STEREO 3 REMOTE...

Page 33: ... be made automatically when a stereo broadcast with suffi cient signal strength is received MONO mode manual tuning AUTO mode auto tuning Select a Station PRESET Select a Tuning Mode Select the Broadcast Band Each time a button is pressed the frequency is changed by one step When a button is pressed continuously the frequency changes continuously Use the manual tuning mode when reception is noisy ...

Page 34: ...d recall with a single touch of the button Repeat steps to to preset other stations In case of input with the number buttons a preset number will be decided simply by input of a 2 digit number without pressing the MEM button Please perform the next operation while the indicator is blinking Blinks Presetting can be done with a mixing of FM and AM stations Example 01 FM 90 00 02 AM 531 03 FM 88 00 1...

Page 35: ...uttons RESUME playback only DVD When the Q Stop button has been pressed once during playback to stop the playback and then playback is started again play will start from the point where the playback had been stopped This is called the RESUME function When the Q Stop button is pressed again during stop the RESUME function is cancelled Volume Phones Volume W 1 2 1 2 Note After the power is switched ...

Page 36: ...r or track in the direction of the button pressed is skipped and the selected chapter or track will be played from the beginning When the button is pressed once during playback the chapter or track being played will be played from the beginning FF 2 X or FR 2 X FF 4 X or FR 4 X FF 8 X or FR 8 X FF 16 X or FR 16 X Normal playback W W W W search backward search forward W W W W W W W W W W W W W W W ...

Page 37: ...ime of the disc being played TOTAL REMAIN Remaining time of the disc being played OFF Items marked by are not displayed in PBC on mode of VCD PBC on mode of VCD the Selecting a Track function may not work Select the desired track No CD VCD or title No DVD Press the numeric as shown below Example To select track No 23 Press the ENTER button Press to resume normal playback During playback press SLOW...

Page 38: ...ck only the right or the left channel of audio recorded on the disc or you can select stereo playback During VCD playback press the AUDIO button on the remote Each press of the button switches the mode The subtitle feature only works if the disc was created with multiple subtitle tracks The subtitle menu of the disc appears in some discs The language is switched each time the SUBTITLE button is pr...

Page 39: ...ith a VCD in PBC ON mode the PBC mode will become OFF Each press of the button switches the mode During random playback press the REPEAT button on the remote To Repeat Random Play Press the stop Q button to stop playback Press the RANDOM button to cancel random playback To Cancel Random Play MP3 WMA JPEG Random play The menu is switched off when no operation is performed for about 2 seconds Each t...

Page 40: ...T and TRACK blinks REPEAT ALL Display lit REPEAT REPEAT OFF To cancel repeat playback press the REPEAT button and select REPEAT OFF The menu is switched off when no operation is performed for about 2 seconds MP3 WMA JPEG Repeat play PBC on mode of VCD the Repeat play function does not work The A B repeat function lets you mark a segment to repeat between the beginning A and the end B of the segmen...

Page 41: ... for one disc When the ENTER button is pressed at a previously marked bookmark that mark will be changed to the new point Recalling a Bookmarked Scene Press the cursor right button on the remote to recall a bookmark number Press the cursor up down button on the remote to select the bookmark number you want to activate then press ENTER button If all 14 bookmarks are in use you can still mark new sc...

Page 42: ...mote Each press of the button switches the mode MP3 WMA JPEG discs can not be programmed with this program mode MP3 WMA JPEG program playback The unit stops when the STOP Q button is pressed To restart program play press the MEM button display the program screen select the PLAY icon and press the ENTER button Program edit screen appears ADD icon Add value onto PROGRAM LIST DELETE icon Delete value...

Page 43: ...column Delete Program During stop mode press the MEM button on the remote Move the cursor with the cursor right button to the PROGRAM LIST and select the column to be deleted with the cursor up down buttons The color of the column where the cursor is located will change Press the cursor left button use the cursor up down buttons to move the cursor to the DELETE icon and press the ENTER button Sele...

Page 44: ... When an item is selected on the menu screen with the ENTER Select button or the numeric buttons advance is made to the next lower menu level When the advance destination is the scene to be played the contents will be played To move to a higher level press return When several menus scenes can be selected in each level screen switching is possible with the buttons NEXT and PREV Examples of Operatio...

Page 45: ...properly Confirming Media and Files Check to ascertain that MP3 and WMA files can be played back correctly on the personal computer in use prior to saving them onto the media Check to ensure that the saved file can be played back normally Confirm that the WMA and MP3 files can be played on a PC prior to saving to the media When Saving Files onto Media Ensure that the session is closed or finalized...

Page 46: ...ipping to outside the folder being played is not possible Skip backward Skip forward During playback press the or button The SMART MENU screen will be displayed when an MP3 WMA or JPEG disc is set Searching only for MP3 WMA files Press REPEAT button on the remote to select play mode Each press switches the searching speed FF 2 X button or FR 2 X button FF 4 X button or FR 4 X button FF 6 X button ...

Page 47: ...o rotate a picture During JPEG file playback press the cursor buttons on the remote Display examples For selection of a number refer to the file numbers on the SMART NAVI screen The file numbers shown on the display of the main unit differ from the file numbers entered directly with the numeric buttons as the numbers for each folder are displayed Switching as shown is done when the cursor buttons ...

Page 48: ...e remote Select a file in the folder to be played press the play pause button and start random playback Press the stop button to stop playback Press the RANDOM button to cancel random playback Cancel Random Play Random Repeat Play During stop mode press the RANDOM button then press the REPEAT button on the remote In case of RANDOM REP mode all files in the folder will be played back repeatedly It ...

Page 49: ...and the program has been confirmed the program no longer can be changed Press the MEM button Press PLAY button to start program playback During program edit mode press the cursor up down buttons in the program window select the file to be deleted and press the CLEAR button During stop mode press the ON SCREEN button on the track you desire Program Edit Delete Program After the Q Stop button has be...

Page 50: ...set stations again Check the speaker connection If this does not help contact your dealer for service Select Surround with the SURROUND button In Case of Difficulty If your unit should not perform as expected consult the table below to see if the problem can be corrected before seeking help from your dealer or service representative The microprocessor may malfunction impossi ble to operate erroneo...

Page 51: ...ile for the disc to start playing The tray opens automatically The top and bottom of the screen cannot be seen or the screen becomes black and white Subtitles are not displayed The voice or subtitle language can not be changed The viewing angle cannot be changed Load a disc and press the button Turn the disc over and properly place it on the disc tray Turn on the TV Properly reconnect the connecti...

Page 52: ...tton on the remote or set the DVD mode with the Source button on the main unit Hold the STOP button on the main unit and press the MENU button on the remote Press Power off on the main unit A viewing restriction PARENTAL has been set for the disc Check the viewing restriction level PARENTAL setting THE PLAYER IS LOCKED is displayed on the TV screen the mark on the main unit display is lit and disk...

Page 53: ...107 9 MHz AM Tuner section Tuning frequency range 530 kHz 1610 kHz DVD CD AUDIO VIDEO CD MP3 player section Laser Semiconductor laser Wow Flutter Less than unmeasurable limit Video output format NTSC PAL VIDEO OUTPUT Composite video output level impedance 1 Vp p 75Ω S video output Component Output Interlaced Progressive Switchable Y output level impedance 1 Vp p 75Ω C output level impedance NTSC 0...

Page 54: ...ntrolled product turns off This indicates you have found the correct code If one of the CBL SAT VCR PVR or TV buttons is not pressed or the DEVICE button is not pressed this function will be canceled 3 When your device turns off press and release the DEVICE power button to lock in the code for your device Code Number Check You can check what code was set for each device 1 Press and hold the Input ...

Page 55: ...Admiral 027 021 Adventura 023 Aiwa 005 023 Akai 026 Asha 000 Audiovox 005 Beaumark 000 Bell Howell 017 Brocksonic 021 Broksonic 020 018 021 001 CCE 015 025 Canon 004 Carver 016 Citizen 005 025 Craig 005 012 000 015 024 Curtis Mathes013 004 026 028 Cybernex 000 Daewoo 010 025 Denon 008 Dynatech 023 Electrohome 005 Electrophonic 005 Emerson 005 020 023 018 009 021 001 025 Fisher 012 017 Fuji 004 003...

Page 56: ...019 Fujitsu 026 Funai 027 026 023 Futuretech 027 GE 007 008 030 041 029 025 004 015 038 040 Gibralter 002 005 000 Goldstar 005 025 000 011 Gradiente 009 011 Hallmark 025 Harley Davidson 026 Harman Kardon 010 Havard 027 Hitachi 016 011 018 Infinity 010 Inteq 002 JBL 010 JCB 050 JVC 009 046 KEC 027 KTV 027 005 006 Kenwood 005 000 LG 011 LXI 007 010 019 020 025 Luxman 011 MGA 017 005 025 000 MTC 012 ...

Page 57: ...57 ENGLISH Wards 010 021 005 025 004 000 026 011 001 White Westinghouse031034 035 Yamaha 005 000 Zenith 002 031 001 014 ...

Page 58: ...58 ENGLISH ...

Page 59: ...59 ENGLISH ...

Page 60: ...LISH Boston Boston Acoustics and the Boston Logo are registered trademarks of Boston Acoustics Inc 2004 Boston Acoustics Inc 300 Jubilee Drive Peabody MA 01960 978 538 5000 bostonacoustics com 042 002142 0 ...

Reviews: