background image


11

Example:  

A.  To access a computer attached to Port 6 of the fifth Bank, you can 

press the hot keys as below:  

Scroll lock + Scroll lock + “5” + “0” “6” 

B.  To access a computer attached from Bank 3 to Bank 4, you can 

press the hot keys as below: 

Scroll lock + Scroll lock + Page Down


NOTE1:  

You also could press “up arrow key” or “down arrow key” for a 

period of time to speed up selecting the destination port


NOTE2: 

The default Beeper function is ON and beeper control is only 

available for Scan Mode


NOTE3: 

To get out of Auto Scan Mode, press any key or SPACE bar


NOTE4:


Password not included 

NOTE5: 

Search for PC name starting from 1

st

 PC port) 

NOTE6: 

Bank no. and Port no. selection must be made using the numeric keys 

on the keyboard. Numeric keys on the keypad are not available as a 

hot key command.


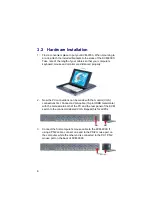
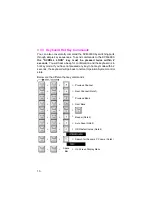
3.4  Daisy Chain Connection Diagram 

Please use the attached 3-foot 3-in-one daisy chain cable kit for the 
KVM-9000. 
A.  Connect keyboard, mouse and monitor to the console port (white 

color block) of bank 1 KVM-9000. 

B.  Use one end of 3-in-one cable kit to connect the daisy chain port of 

bank 1 while the other end for the console port (white color block) 
of bank2 KVM-9000. 

C.  Please repeat item B to daisy chain more banks as you want. But, 

the maximum daisy chain bank is eight. 

D.  Before chaining the slave bank up to six banks, you need a VGA 

extender between the fifth bank and the sixth bank to enhance the 
VGA signal. 

Summary of Contents for KVM-9000

Page 1: ...KVM 9000 19 1U High Full size Rackmount Chassis 19 1U Height Full size Rackmount Chassis 8 port KVM Switch LCD Keyboard Touchpad...

Page 2: ...hole or partly is prohibited unless granted permission by BOSER Technology Co Ltd BOSER Technology Co Ltd reserves the right to change or improve the contents of this document without due notice BOSER...

Page 3: ...he Delivery Package 5 2 2 Inspection 5 Chapter 3 Hardware Installation 7 3 1 Connector Diagrams 7 3 2 Hardware Installation 8 3 3 Usage 9 3 3 1 Power Supply 9 3 3 2 7 segment LED Indication 9 3 3 3 Ke...

Page 4: ...could ruin sensitive components Make sure the KVM 9000 is properly grounded 4 The brightness of the flat panel display decreases with usage However hours of use vary depending on the application envi...

Page 5: ...s of the following regulations EN 55 022 CLASS B FCC FCC Compliance This equipment has been tested and found to comply with Part 15 of the FCC Rules Operation is subject to the following conditions 1...

Page 6: ......

Page 7: ...e KVM 9000 is loaded with such features as 19 rackmount size daisy chain up to eight units On Screen Display menu password security PC server name search hot key control front panel push button and au...

Page 8: ...search for PC server name Auto scan mode for monitoring PCs and flexible scan time is 5 99 sec Keyboard status restored when switching PCs LED display for easy status monitoring Buzzer sound for swit...

Page 9: ...0 C Humidity 0 90 non condensing Size 19 1U high rackmount Dimensions cm 44 24 x 4 4 x 55 0 1 3 System Requirements Specifications Console Built in VGA monitor Built in PS 2 keyboard Built in PS 2 tou...

Page 10: ...4 This page intentionally left blank...

Page 11: ...out of their sockets during shipment Examine all integrated circuits particularly the BIOS processor memory modules ROM Disk and keyboard controller chip to ensure that they are firmly seated The KVM...

Page 12: ...6 This page intentionally left blank...

Page 13: ...of peripherals and computers have been turned off 3 1 Connector Diagrams PS 2 Keyboard Cable Male to Male PS 2 Mouse Cable Male to Male VGA Cable Male to Male AT to PS 2 KB adapter optional 5 pin Male...

Page 14: ...y 2 Now the PC connections can be made with the monitor VGA connections first Connect a VGA cable 15 pin HDDB male male with the male side to both of the PC and the rear panel of the KVM switch to the...

Page 15: ...acle Now you will see the LED for Port 1 light up and you will hear a beep 3 3 Usage 3 3 1 Power Supply When you power on the KVM 9000 it will ask you for the password the default password is eight ze...

Page 16: ...u will hear a beep for confirmation and the keyboard is in hot key mode If you have not pressed any key in hot key mode within 2 seconds the keyboard will go back to normal Operation System control st...

Page 17: ...starting from 1st PC port NOTE6 Bank no and Port no selection must be made using the numeric keys on the keyboard Numeric keys on the keypad are not available as a hot key command 3 4 Daisy Chain Con...

Page 18: ...as long as it is not the Daisy chain port or does not pass through port b You may unplug the mouse or the keyboard from the console port and plug it back in at any time NOTE Some O S Operation Systems...

Page 19: ...of 8 characters The factory default names for all ports are SYSTEM 01 to SYSTEM 08 Besides the sun symbol near the PC name represents the PC system that is powered on To use up arrow key or down arrow...

Page 20: ...PC port The default SCAN time is 10 sec and the maximum scan time is 99 sec C The CHANGE PASSWORD is for user to avoid all PC systems to be intruded by the other person The default password is 8 digit...

Page 21: ...p of PC name and exiting the OSD setting mode you will find the PC name is showed on the top left corner of the monitor Now you can use ESC key to clear the message right away if you don t need it F I...

Page 22: ...16 This page intentionally left blank...

Page 23: ...board to err or not to be detected by PC 4 The booting of computer is fine but keyboard doesn t work meaning that you have to Make sure the keyboard port works on the computer Try an independent keybo...

Page 24: ...18 This page intentionally left blank...

Reviews: