background image

8 - English

Setting up the System

Connecting the system to power

Before you set up the system on your network, connect the system 

to power.

1. 

Insert the small end of the AC power cord into the 

AC Power 

connector.

2. 

Plug the power cord into an AC (mains) power outlet.

Adding the system to your Wi-Fi

®

 network

After you connect the system to power, you must download  

and install the SoundTouch

 app onto a smartphone or tablet  

that is connected to your network. The app guides you through 

connecting the system to your network.

Note: 

 If you do not have a smartphone or tablet, you can use a 

computer for setup. See page 25.

To add a system to an existing SoundTouch

 account

If you have already set up SoundTouch

 for another system, you do 

not need to download the SoundTouch

 app again.

1. 

On your smartphone or tablet, select the SoundTouch

 icon 

to launch the app.

2. 

Select 

EXPLORE > SETTINGS > Systems > ADD SYSTEM 

to 

add another system.
The app guides you through setup.

Download and install the SoundTouch™ app

If this is your first time setting up a SoundTouch

 system, you must 

install the app. On your smartphone or tablet, download the  

SoundTouch

 controller app

.

Bose SoundTouch

TM

 controller app

•  iOS users: download from the App Store
•  Android

 users: download on the Google Play

 store

•  Amazon Kindle Fire users: download from Amazon App store for 

Android

Connect the system to your Wi-Fi

®

 network

After you install the app, add the system to your network:

1. 

On your smartphone or tablet, select

 to launch the app.

The app guides you through connecting the system to your  

Wi-Fi network.

2. 

Follow the instructions in the app to complete setup,  

including creating a SoundTouch

 account, adding a  music 

library and music services.

Note: 

To use 

Bluetooth

®

 technology, you must complete 

setup. To connect your 

Bluetooth 

enabled devices,  

see page 13.

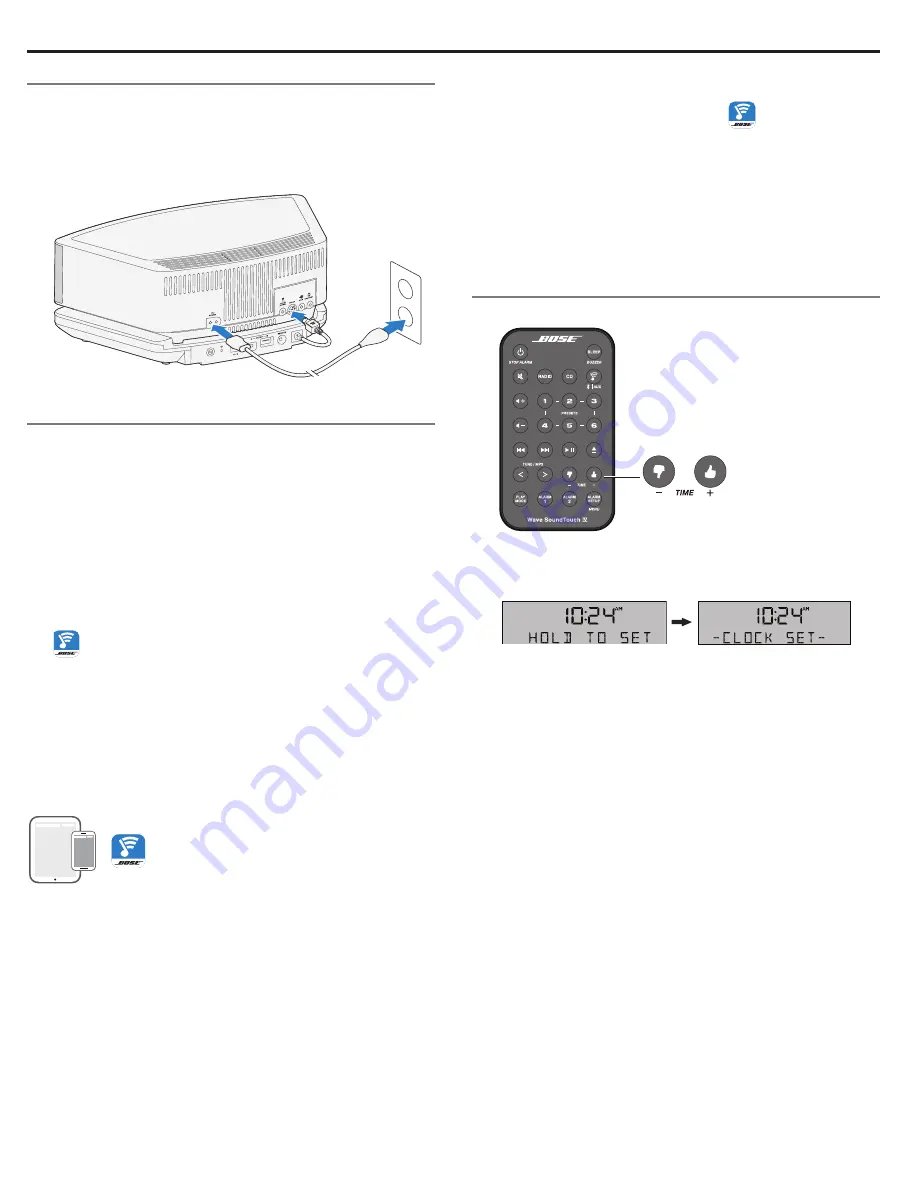
Setting the clock

1. 

Press and hold either 

Time –

 or 

Time +

 for about one second.

Initially, 

HOLD TO SET

 appears on the display and then 

quickly changes to 

– CLOCK SET –

 as the button is  

depressed.

2. 

Release the selected

 Time

 button.

3. 

Press 

Time –

 to adjust the displayed time backward or press 

Time +

 to adjust the displayed time forward until it matches 

the current time. You can also press and hold for rapid  

adjustment.

4. 

Wait five seconds for the system to exit the clock setup mode.

Notes:


•  To change the clock display from 12-hour (AM/PM)  

time to 24-hour time, see “The setup menu” on page 21.

•  If the system loses power due to a power outage or if you unplug 

the system, all system settings are permanently retained. How-

ever, the clock time is temporarily stored in backup memory for 

up to 48 hours.

Summary of Contents for Wave SoundToch IV

Page 1: ...Owner s Guide Gu a del propietario Notice d utilisation...

Page 2: ...perly following local regulations Do not incinerate This symbol means the product must not be discarded as household waste and should be delivered to an appropriate collection facility for recycling P...

Page 3: ...ference that may cause un desired operation For the SoundTouch pedestal This equipment should be installed and operated with a minimum distance of 8 in 20 cm between this device and your body CAN ICES...

Page 4: ...rk of Apple Inc Amazon Kindle and Fire are trademarks of Amazon com Inc or its affiliates Android and Google Play are trademarks of Google Inc The Bluetooth word mark and logos are registered trademar...

Page 5: ...device 12 Connecting to a paired Bluetooth enabled device 12 Using the button 12 Using the Bluetooth feature on the paired device 12 Clearing the system s Bluetooth pairing list 12 Listening to Other...

Page 6: ...vers precise radio reception CD drive provides access to even more music Remote control for point and click control from up to 20 feet away Thumbs up Thumbs down buttons on remote control for customiz...

Page 7: ...two feet of a wall and avoid placing directly in a corner Place the system on a flat stable surface CAUTIONS Do not place the system on a metal surface It could interfere with AM reception Do not plac...

Page 8: ...from the App Store Android users download on the Google Play store Amazon Kindle Fire users download from Amazon App store for Android Connect the system to your Wi Fi network After you install the ap...

Page 9: ...t shuffle and repeat options for CDs page 16 Radio Toggles between radio on and FM AM selection Playback controls Alarm Setup Menu Alarm settings page 16 and setup menu page 21 Toggles between SoundTo...

Page 10: ...inutes If the system is connected to your network when switching to standby the connection is maintained while in standby Controlling the volume Press and hold or to adjust the volume level VOLUME 0 s...

Page 11: ...smartphone tablet or computer Using the app your smart device acts as a rich remote for the SoundTouch source The app enables you to manage your SoundTouch settings add music services explore local an...

Page 12: ...ctor Playing a Preset Once you personalize your Presets using the app press on the remote SOUNDTOUCH appears on the display until content being streamed through the SoundTouch pedestal is available No...

Page 13: ...ubleshooting on page 23 for more information Connecting to a paired Bluetooth enabled device You can stream audio from a Bluetooth enabled device to the system If there are multiple devices stored in...

Page 14: ...MP3 to manually tune to a higher frequency Press and hold Tune MP3 to rapidly lower the frequency Press and hold Tune MP3 to rapidly increase the frequency Note If AM reception is weak rotate the sys...

Page 15: ...ty to eject them Playing MP3 CDs The system can play MP3 music files recorded on CD R and CD RW discs You can easily navigate through your music files using the Tune MP3 and Seek Track remote control...

Page 16: ...UFF RPT CD Repeats all tracks on a disc in a random order that changes each time the disc is repeated REPEAT FOLDR Repeats all tracks in a folder in order MP3 only Note The play mode returns to NORMAL...

Page 17: ...ress to enter the Alarm 2 setup mode Repeat Steps 2 4 to set up Alarm 2 6 Press again to exit the Alarm Setup mode The alarm you set is turned on and the alarm time appears on the display Alarm number...

Page 18: ...i network Solid white dim System off and connected to Wi Fi network Solid white bright System on and connected to Wi Fi network Blinking amber Disconnected from Wi Fi network Solid amber System is in...

Page 19: ...omer service or visit a local electronics store Refer to the quick start guide in the carton for contact information Using a cable to connect an audio device 1 Using a cable connect your audio device...

Page 20: ...to adjust the volume of your headphones Using an external antenna The system s power cord is used as an antenna for FM radio If after adjusting the position of the power cord you still experience poo...

Page 21: ...T LO 4 1 8 Sets the display brightness level when the unit detects low ambient light conditions Room Code Not applicable when using the SoundTouch pedestal ROOM B _ _ _ B _ _ _ C _ _ _ D _ _ E _ _ _ F...

Page 22: ...r your saved network credentials Resetting the SoundTouch pedestal Reset the SoundTouch pedestal to clear all SoundTouch source information and network credentials from the system and return it to ori...

Page 23: ...eadphones mutes the speakers Move system away from possible interference microwaves cordless phones etc Stop other audio or video streaming applications Move your mobile device closer to the speaker a...

Page 24: ...sassemble heat above 212 F 100 C or incinerate Replace only with an agency approved ex UL CR2032 or DL2032 3 volt lithium battery Dispose of used batteries promptly Cleaning Clean the surface of the s...

Page 25: ...desktop computer for setup If you are using a desktop computer move the system near the computer to set it up You must temporarily connect the USB cable from the computer to the system Then you can m...

Page 26: ...2015 Bose Corporation The Mountain Framingham MA 01701 9168 USA AM743461 Rev 00...

Reviews: