background image

Commissioning

25

Condens 7000 F – 6720871560 (2019/11)

7.3

Recording gas parameters

Ask your gas supplier to advise you of the gas parameters (Wobbe index 
and calorific value) and record these in the commissioning report 
(

 Chapter 17.6, page 63).

If the boiler is to be replaced in existing systems:

▶ Consult gas suppliers to ensure that the nominal gas pressure 

according to table  10, page  28 is adhered to.

7.4

Checking device equipment

The burner is supplied ready for operation and is adapted to the locally 
available gas type (natural gas E/LL) using the supplied gas flow restrictors.

▶ Check with the relevant gas supplier which gas group or sub-group 

(gas type) is supplied.

▶ Determine, based on the gas parameters requested from the gas 

supplier and the information in the table  8 and  9, which gas flow 
restrictor is required.

▶ Check whether the required gas flow restrictor is installed.
▶ If required, replace the gas flow restrictor during commissioning 

(

Chapter 7.5).

7.5

Converting the boiler to a different gas type 

7.5.1

Converting to another type of natural gas

The boiler is converted to a different gas type by replacing the installed 
gas flow restrictor. The air/gas ratio does not need to be adjusted, 
the air/gas ratio control valve is adjusted and sealed.

▶ Switch off the heating system via the ON/OFF switch at 

the control unit (

Technical documentation for control unit).

▶ Close gas isolator.
▶ Remove upper boiler front panel and left side panel 

(

Chapter 11.1, page 31).

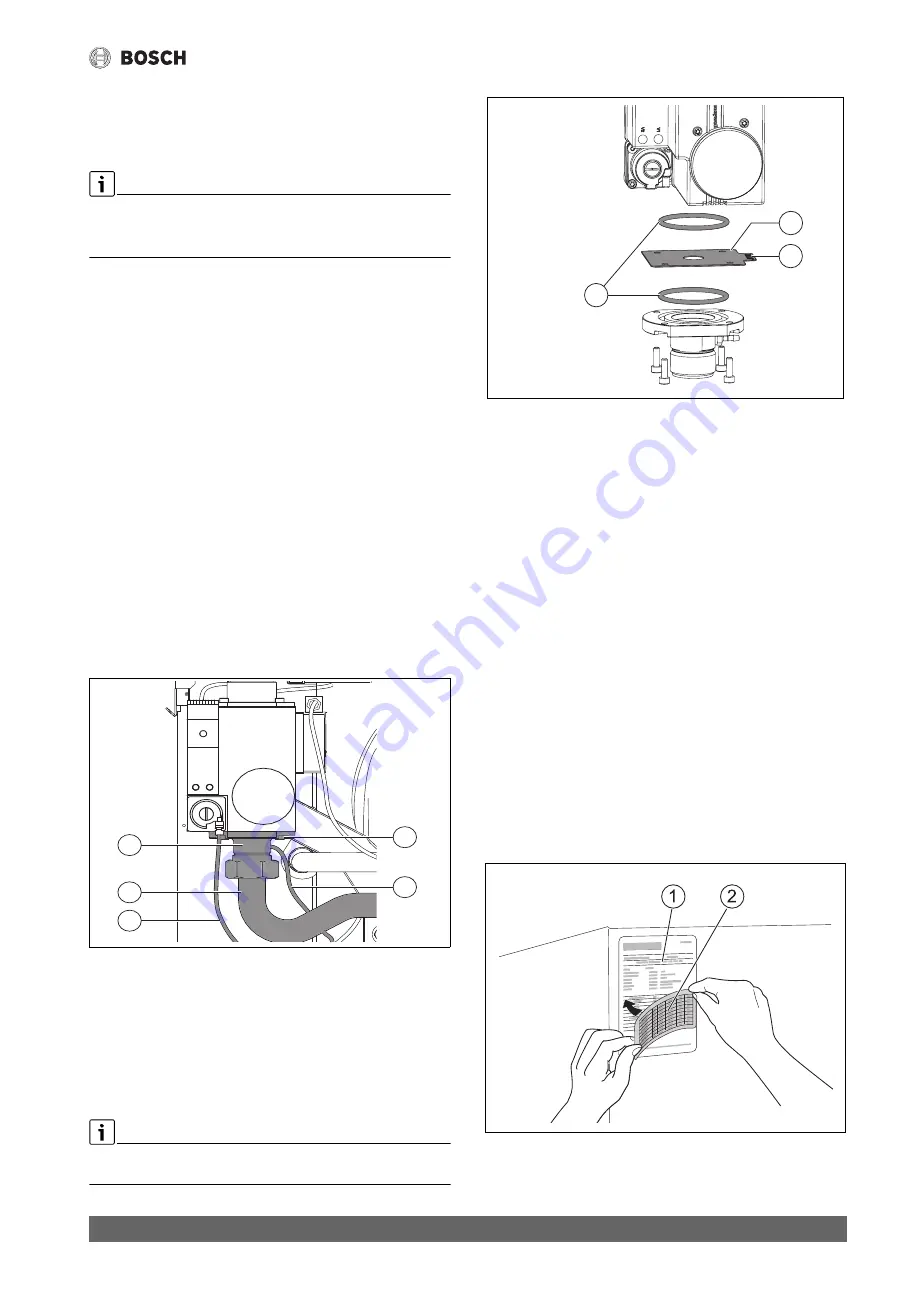
Fig. 25 Removing the gas flow restrictor

[1]

Compensation line 

[2]

Gas pipe

[3]

Connection flange

[4]

Allen screws (4x)

[5]

Test line for gas outlet pressure

▶ Remove the four Allen screws [4] at the connection flange [3] and 

carefully move the flange away from the valve. In doing so, avoid 
damaging and/or buckling the gas pipe [2].

If the connection is subject to mechanical stress, the gas pipe can be 
removed to make disassembly easier.

Fig. 26 Replacing the gas flow restrictor

[1]

O-ring (2x)

[2]

Gas flow restrictor

[3]

Labelling

▶ Remove the gas flow restrictor [2] and replace with the 

corresponding gas flow restrictor for the supplied gas type 
(

Tab. 8).

▶ Check whether the required flow restrictor is used, compare the 

diameter indicated on the flow restrictor with the corresponding 
value in Tab.  8.

▶ Check O-rings [1] for damage and replace if necessary.
▶ Place the O-rings in the grooves provided. Make sure they are seated 

correctly.

▶ Insert the gas flow restrictor with the label [3] facing upwards and 

tab pointing to the right.

▶ Mount the connection flange and gas flow restrictor including all 

O-rings with the 4 Allen screws (for torques and replacement interval 

Chapter 11.11, page 41).

▶ Make sure the test cables for compensation [1] and gas outlet 

pressure [5] are correctly seated (

Fig. 25 and  17.4.3, page 61). 

▶ Carry out all commissioning work and complete the commissioning 

report (

Chapter 17.6, page 63).

▶ Affix the label provided for the supplied gas type, according to the 

gas flow restrictor, over the corresponding area on the existing boiler 
data plate (

Fig. 27, [1]) (

Fig. 27, [2]).

▶ Store the restrictor that has been taken out in a safe place.

Fig. 27 Updating the data plate

[1]

Boiler data plate 

[2]

Label 

0010014080-001

4

3

5

1

2

0010014176-002

1

2

3

0010012477-002

Summary of Contents for Condens 7000 F

Page 1: ...6720871560 2019 11 GB IE Installation and maintenance instructions for the contractor Gas fired condensing boiler Condens 7000 F GC7000F 75 300 ...

Page 2: ...g the cables 23 7 Commissioning 24 7 1 Checking the operating pressure 24 7 2 Checking for leaks 24 7 3 Recording gas parameters 25 7 4 Checking device equipment 25 7 5 Converting the boiler to a different gas type 25 7 5 1 Converting to another type of natural gas 25 7 5 2 LPG conversion 26 7 6 Purging the gas line 26 7 7 Supply air and flue gas connection 27 7 7 1 Check supply and extract ventil...

Page 3: ...ccording to the service life 42 11 12 Refitting detached parts 43 11 12 1 Fitting the gas line to the gas valve 43 11 12 2 Refit the combustion air connector 43 11 13 Check for leaks during operation 43 11 14 Checking the ionisation current 43 11 15 Completing inspection and maintenance 43 11 15 1 Removing measuring devices 43 11 15 2 Installing casing parts 43 11 15 3 Checking the gas air ratio 4...

Page 4: ...ate combustion air supply Ensure that there is an adequate combustion air supply Do not cover or reduce the size of ventilation apertures in doors windows and walls Ensure that there is an adequate combustion air supply including for any devices installed at a later date e g extractor fans kitchen fans or air conditioning units that discharge air to the outside Never operate the device if there is...

Page 5: ...h industrial com 2 3 Product data for energy consumption The product data on energy consumption can be found in the operating instructions for the user 2 4 Scope of delivery The Condens 7000 F is delivered with a control unit which is assigned when ordering in 2 packaging units Upon receipt check that all packaging is in perfect condition Check the scope of delivery for completeness Dispose of pac...

Page 6: ... Switching the heating system on off Setting the DHW temperature and the maximum boiler temperature in heating mode Status display This floor standing boiler can be operating via the CC 8313 or MX25 control unit Many additional functions that enhance control and operating convenience as well as information on the heating system settings are describedinthecorrespondingTechnicaldocumentationoftheins...

Page 7: ...urner rod 4 Control unit CC 8313 optional 5 MX25 control unit optional 6 Boiler block with thermal insulation 7 Boiler casing 8 Condensation catch pan and siphon 9 Bottom panel 10 Burner control unit The right hand versions of the boiler are shown Inthiscase thecleaning cover and the flow and return are located on the right In the left hand version the cleaning cover and flow and return are locate...

Page 8: ... F Fig 3 Dimensions and connections for Condens 7000 F 75 100 kW right and left hand version dimensions in mm 0010014185 002 BGR HK B HMX25 H8313 LK L 139 478 AB A HVSL HVK HAA HRLU HEL DAA EL HGas AVSL A2 AGAS HRK HAKO AKO RK AA VK HVSL HVK HAA HRLU HEL DAA EL HGas AVSL A2 AGAS HRK HAKO A1 A3 AAA AKO RK AA VK ARLU A4 A4 ARLU AAA A3 A1 ...

Page 9: ...ft hand version dimensions in mm 0010014186 002 BGR HK HVSL LK L 139 478 HVK HAA HRLU HEL DAA EL HGas AVSL A2 AGAS HRK HAKO AB A B HMX25 AKO RK AA VK H8313 HVSL HVK HAA HRLU HAKO DAA AKO AKO AKO HGas AVSL A2 AGAS HRK HEL EL RK AA VK HAS 153 A1 A4 A3 AAA ARLU A3 ARLU A1 AAA A4 DN200 min 80 DN160 min 50 max 7 Ø 160 0 8 Ø 200 0 8 X X ...

Page 10: ...imension A2 mm 150 520 150 520 135 534 135 534 135 534 135 534 Dimension A3 mm 155 515 155 515 183 520 126 520 126 520 126 520 Dimension A4 mm 214 223 214 223 201 215 201 215 201 215 201 215 Dimension AAA mm 330 340 330 340 330 340 330 339 330 339 330 339 Dimension AB mm 480 480 480 480 695 695 977 977 977 977 977 977 Dimension AGAS mm 576 576 576 576 569 569 569 569 569 569 569 569 Dimension ARLU...

Page 11: ...system 3 3 Validity of regulations Modified regulations or supplements are also valid at the time of installation and must be observed 3 4 Notes on installation and operation Use only genuine spare parts from the manufacturer The manufacturer canassumenoliabilityfordamagecausedbysparepartsnotsuppliedby the manufacturer When installing and operating the heating system observe the following requirem...

Page 12: ... using a heat exchanger 3 8 Combustion air quality To avoid corrosion keep the supply of combustion air free of corrosive substances e g halogenated hydrocarbons that contain chlorine or fluorine compounds Keep the combustion air supply free of dust or use the air filter accessory set 3 9 Combustion air flue gas connection air vents The installation location must be connected to the open air via t...

Page 13: ...forklift truck or transport rollers NOTICE Boiler damage through impact The standard delivery of the boiler includes components that are susceptible to impact damage During handling protect all components against impact Observe the transport markings on the packaging The boiler maybetransportedtotheplaceofinstallationbycrane hoist forklift truck or pallet truck Where possible transport the boiler ...

Page 14: ...ample for illustration purposes 1 Fixing bar on the flue gas side 2 Fixing strips on the burner side 4 3 Transporting the boiler on rollers If the path to the boiler room is level the boiler can also be rolled Use at least 5 pipe sections of approx 700 mm length Diameter R 1 as rollers Position the pipes approx 400 mm apart on the floor Lift the boiler onto the pipe sections and carefully transpor...

Page 15: ...TICE Frost damage Install the heating system in a frost free room 5 2 Preventing noise disturbance for end users Where the boiler surroundings are sensitive to noise e g residential units use the silencer options offered by the manufacturer flue gas silencer expansion joints 5 3 Wall clearances When determining the installation location take the clearances for the flue gas routing and the connecti...

Page 16: ...es pipes Carefully drain the condensate created inside the boiler and flue route the flue with a slope towards the boiler Drainthe condensate intothe publicsewerage systeminaccordance with the requirements in your country Observe regional regulations Install condensate neutraliser accessory if necessary Fit the condensate hose to the siphon connector using a hose clip Guide the condensate hose thr...

Page 17: ...the casing on the factory installed flue gas connection and install the flue mechanically uncompressed With boiler rating 150 300 kW Remove factory installed 90 flue bend Plug the straight pipe section accessory onto the connector on the condensation catch pan and install the flue mechanically uncompressed The flue system is to be carried out either in accordance with pressure classification EN 14...

Page 18: ...oth air intake and flue terminal positions must be installed on the same side of the building to prevent wind effects Mountadapter Fig 14 6 ontheintakeconnectoroftheburner and secure with hinged pipe clip Push elbow 3 onto the combustion air pipe 1 Mount the combustion air pipe 1 with supplied pipe clips 2 2x on the frame Screw the combustion air hose 5 onto the adapter 6 Push the combustion air h...

Page 19: ...e intake side of the pump Fig 16 Disassembly of the drain valve the boiler shown has a flanged connection right hand version 1 Drain valve Connecting the drain fill valve on site Observe the accessories installation instructions Topping up of the fill water must be done via a WRAS approved method Install drain valve in the return outside the boiler itself 5 8 3 Installing the safety assembly on th...

Page 20: ...ure sensor Connection of safety set 4 6 bar Seal the pressure relief valve at the threaded connection of the heating flow using suitable sealants or supplied gaskets Fig 19 Fit the discharge pipe to the respective pressure relief valve according to local regulations Fig 19 Safety set 4 to 6 bar illustration shows right hand boiler setup 1 Pressure relief valve 4 6 bar 2 Manifold with taps and flan...

Page 21: ...the operator slog has been maintained Observe the details regarding water quality in the operator s log If necessary treat heating and fill water Provide system separation by means of heat exchangers when using oxygen permeable pipework e g underfloor heating system NOTICE NOTICE material damage due to positive pressure during leak testing Pressure control and safety equipment may be damaged throu...

Page 22: ...t free of stress Secure the gas line with pipe clips so that the gas connection is free from any stresses Close gas isolator Gas filters must always be installed to prevent ingress of dirt into the gas line of the floor standing boiler Fig 22 Gas connection 1 Expansion joint 2 Gas isolator here with thermally activated shut off device 3 Pipe clip For higher gas supply pressures than shown in table...

Page 23: ...er To install the control unit observe the corresponding technical documentation When making the electrical connections refer to the connection diagrams for the individual devices and components Chapter 17 4 page 59 6 2 Establishing the power supply connection and installing the cables Establish a permanent connection to the power supply in accordance with the locally applicable regulations Toconn...

Page 24: ...as been maintained Observe the details regarding water quality in the operator s log If necessary treat heating and fill water Provide system separation by means of heat exchangers when using oxygen permeable pipework e g underfloor heating system Set the red needle 1 of the pressure gauge to the required operating pressure of at least 1 bar Fig 24 Pressure gauge for sealed systems 1 Red needle 2 ...

Page 25: ... restrictor 1 Compensation line 2 Gas pipe 3 Connection flange 4 Allen screws 4x 5 Test line for gas outlet pressure Remove the four Allen screws 4 at the connection flange 3 and carefully move the flange away from the valve In doing so avoid damaging and or buckling the gas pipe 2 If the connection is subject to mechanical stress the gas pipe can be removed to make disassembly easier Fig 26 Repla...

Page 26: ...r Fig 28 Purging the gas line 1 Test nipple for measuring the gas supply pressure and for purging Gas type H1 E Es 2 1 Natural gas group H in accordance with DVGW Code of Practice G 260 falls within natural gas group E in accordance with DIN EN 437 2 Es and Ei are sub groups of gas group E LL L3 Ei 2 3 Natural gas group L in accordance with DVGW Code of Practice G 260 falls within natural gas grou...

Page 27: ...ding domestic fuse circuit breaker 7 9 Commissioning the control unit and burner 7 9 1 Switching on the boiler at the control unit To commission the control unit observe the technical documentation for the specific control unit Toavoidfrequentcyclingoftheburnerandtoensureefficientoperation the heating curve should generally be set as low as possible 7 9 2 Carrying out a flue gas test To set up and...

Page 28: ...s designed as an annular gap around the flue check the CO2 value in the combustion air at the on site measurement port Values above 0 indicate faults or leaks in the flue gas routing Identify and eliminate the fault 7 11 2 Checking the CO2 setting under partial load Adjust the flue gas test function via the control unit technical documentation of control unit Read off load at the control unit or v...

Page 29: ...kW 1 Test point on the connector 7 14 1 Flue resistance The required flue resistance for the installed flue gas air supply system must not exceed 150 Pa 1 5 mbar DANGER Danger to life through toxic flue gases escaping Only operate the boiler with a chimney or flue system Table 17 1 page 56 7 14 2 CO value CO values in an air free state must be below 100 ppm or 0 01 vol Valuesabove100 ppmindicatean...

Page 30: ...ocuments WARNING Danger to life due to poisoning Risk of poisoning due to escaping flue gases when the air supply is inadequate Make sure that a supply of air is available in every operating mode through corresponding openings to the open air Make the user aware of the need for and function of the ventilation and combustion air apertures Make the user familiar with the heating system and the boile...

Page 31: ...llection systems 11 Inspection and maintenance NOTICE Boiler damage through a lack of or unsatisfactory cleaning and inspection or maintenance Have the heating system inspected at least once a year and have any necessary maintenance or cleaning work carried out Clean the boiler at least every 2 years We recommend annual cleaning Check and clean the condensate pipes and siphon annually Carry out an...

Page 32: ...ion catch pan 14 Differential pressure switch p1 blue gas line p2 white gas line 15 Burner control unit 16 EMC butterfly valve 17 Compensation line blue 18 Gas pipe 19 Offset setting sealed 20 Air gas ratio control valve 21 Valve check system 22 Ignition transformer 23 Gas pipe Fig 35 Detailed overview position of sensor 1 Flow temperature sensor 2 Flue gas temperature limiter optional mandatory a...

Page 33: ...el shut off valve Calculate using value for volume of air gas ratio control valve Table 11 Table 11 Volume of air gas ratio control valve Determine the pipe volume Vpipe using table 12 and table 13 Calculate the test volume Vtest using the equation Vtest Vtot Vpipe Vair gas ratio control valve Table 12 Pipework volume Vpipe in litres subject to pipe length and diameter Table 13 Pipework volume Vpi...

Page 34: ...form a test as described in the following x Test volume in litres y Pressure drop in mbar within one minute Read off example test volume Vtest 5 litres and pressure drop 4 mbar min range 3 valve leaking valve may not be used carry out test as described below Ifyoudetect a steep pressuredrop of 10 mbar minute ata test volume of Vtest of 1 litre increase the test volume Vtest For this include the pi...

Page 35: ...regulationsandstandardsregardingthe prevention of drinking water contamination Water should be topped up via WRAS approved filling method Vent the heating system via the radiator air vent valves Check the operating pressure again The operating pressure can also be checked at the control unit via the Info menu e g display P1 4 corresponds to 1 4 bar Enter the amount of top up water in the Water Qua...

Page 36: ... damage and leaks due to power transmission When removing and installing the gas pipe counterhold to avoid subjecting other components to stress Fig 41 Union nut with gas pipe 1 Union nut 2 Gas pipe With room sealed operation Release the hinged pipe clip 2 on the supply air hose 3 Pull off supply air hose together with the connector from the ventilation air collector 1 Chapter 5 7 page 18 Fig 42 A...

Page 37: ...ly removed Fig 43 1 Fig 44 Burner in the service position right hand installation 1 Fixing nuts 2 Factory installed screws Fig 45 Burner in service position left hand installation With boiler ratings 200 300 kW Burners in boilers with ratings 200 300 kW are secured with a burner holder 2 and a retaining cable 3 To be able to remove the burner completely the retaining cable must be detached from th...

Page 38: ...els and corresponding side panels Place the tundish that collects dirt and condensate residues under the condensation catch pan Pull the siphon 1 off the drainage connection of the condensation catch pan 2 and out of the drain pipe Turn slightly sideways in doing so Fig 47 Removing the siphon 1 Siphon 2 Condensation catch pan outlet Unscrew the screws on the cover of the condensation catch pan wit...

Page 39: ...ove the cleaning covers Fig 52 Removing the cleaning covers 1 Cleaning cover CAUTION Risk of injury from sharp edges of cleaning blade Toavoidinjury wear protectivegloveswhencleaningtheboilerusing cleaning blades accessories Clean the heat exchanger hot gas flues horizontally and diagonally using the cleaning blade Fig 53 Cleaning the heat exchanger horizontally 1 Cleaning blade available as acces...

Page 40: ...siphon is sufficiently filled with water Screw on the cover of the condensation catch pan with boiler size 150 300 kW Fit the cap on the cleaning pipe socket with boiler size 75 100 kW 11 9 Inspecting the burner electrodes NOTICE Malfunction of boiler If the woven filaments of the burner rod surface come into contact with the electrodes this can cause a fault shutdown Make sure that no woven threa...

Page 41: ...air gas ratio control valve Fig 57 Undo the air gas ratio control valve connections 150 300 kW 1 Compensation test cable 2 Gas supply pipe union nut 3 Flange 4 Plug for solenoid valves 5 Screws 4 x top and bottom 6 Test cable for gas outlet pressure Fig 58 Undo the air gas ratio control valve connections 75 100 kW 1 Compensation test cable 2 Gas supply pipe union nut 3 Flange 4 Plug for solenoid v...

Page 42: ...afterexpiryofthespecified service life Table 14 Replacement according to service life Document replacement of components in the maintenance protocol DANGER Danger to life through escaping gases Always replace the electrode block gasket when replacing electrodes Generally replace damaged gaskets or ones that appear aged We recommend replacing the electrode block as part of annual maintenance 001001...

Page 43: ...t connections During commissioning make sure that the fan is not covered 11 12 1 Fitting the gas line to the gas valve Insert a new O ring into the gas valve flange Secure the flange of the gas connection again to the gas valve using 4 screws 11 12 2 Refit the combustion air connector With room sealed operation plug the combustion air hose onto the adapterandsecurewiththehingedpipeclip Chapter 5 7...

Page 44: ...ICE System damage due to frost The heating system can freeze up if it has been switched off through a fault shutdown Rectify the fault immediately and restart the heating system Where that is not possible drain the heating and DHW pipework at the lowest point Depending on which control unit is installed or the user interface used faults may be displayed differently The fault history is also called...

Page 45: ...tion pump Check the surface temperature of the cast section which is fitted with the safety temperature sensor using a temperature measuring instrument Check if cast section is blocked with dirt OH The device is on standby no heat energy demand present The floor standing boiler is on standby and there is no heat requirement from the heating circuit OL Air gas ratio control valve opening OP Waiting...

Page 46: ...eck plug assignment of 1st 2nd solenoid valve H07 1017 Water pressure too low The water pressure is not correct The pressure sensor is defective Check water pressure Add water if necessary and vent the heating system Replace pressure sensor H08 1018 Service time expired The maintenance date set has been reached Carry out maintenance Type1 Error code Sub code Cause Description Test procedure Cause ...

Page 47: ...tinguish after a controlled shutdown V 4A 700 Factory supplied condition Boiler is locked out Reset the boiler with Reset Chapter 13 1 page 44 V 4U 521 Sensordifferential on the boiler temperature sensor between temperature sensors 1 and 2 is too high Temperature differential between temperature sensors 1 and 2 is too high deviation 5 K 2s Check whether the reset button on the burner control unit ...

Page 48: ...sent at the terminals of the Mains combustion automatic cut out Check whether the connecting leads BUS and power cable between the burner control unit and the control unit are damaged Check whether the reset button on the burner control unit lights up green Disconnect the BUS cable between the burner control unit and the control unit and check whether the boiler enters emergency operation runs up ...

Page 49: ...r If pressure too low inform gas company Establish good electrical contact Replace cables if necessary Align burner rod or electrode Replace defective electrode Clean or replace ignition monitoring electrode Replace ignition transformer Replace burner control unit V 6A 578 Noflamedetected within the safety time No flame signal was detected during the safety time Flue gas and or supply air route bl...

Page 50: ...ition spark check ignition cable contact Blow out burner rod against the flow direction When using the air filter accessory set check the filter for contamination To do so pull off the PWM plug on the fan and when the fan is running check whether the yellow warning is visible at the fill level indicator If it is replace the filter Test the differential pressure switch Chapter 16 page 54 Replace th...

Page 51: ...Cylinder primary pump incorrectly connected or faulty Check the sensor port and sensor lead Check that the sensor is correctly mounted Check resistance values of temperature sensor against table Check that the cylinder primary pumpisworking e g bycarryingout a function check Repair any leaks Eliminate fault in sensor port and sensor lead Replace the temperature sensor if necessary If necessary rep...

Page 52: ...place the connecting lead if necessary Check the electrical connection of the connecting lead at the burner control unit and the flow temperature sensor Eliminate the contact problem if necessary Check resistance values of temperature sensor against table Replace the temperature sensor if necessary Burner control unit defective If the connecting lead contacts and resistance values are all OK repla...

Page 53: ...nsor if there are discrepancies Burner control unit defective If the connecting lead contacts and resistance values are all OK replace the burner control unit V LL 571 Too many restarts despite resetting 15 restarts have occurred in direct succession This means that the same problem persisted after the resets Please note this fault can only be reset via the reset button on the burner control unit ...

Page 54: ...switch If the service code 8L 534 is continuously displayed the differential pressure switch Fig 34 page 32 must be tested as follows to make sure it is working correctly 16 1 Testthecontinuityofthedifferentialpressureswitch at negative pressure Thedifferentialpressureswitchisclosedduringoperation Thecontacts are closed The fan must be switched on in order to simulate an operating condition with n...

Page 55: ... 41 page 36 Pull off electrical connections at the differential pressure switch and measure the resistance across the contacts Fig 70 If no value or a resistance of 1 ohm is displayed the differential pressure switch is ok If the value measured is 1 ohm or signal tone depending on measuring device Fig 71 the differential pressure switch is ok Fig 70 Test the continuity of the differential pressure...

Page 56: ...ing on installed control unit C 95 85 95 85 95 85 95 85 95 85 95 85 Safety limit high limit safety cut out Tmax 1 C 110 110 110 110 110 110 Maximum operating pressure PMS 1 bar 6 6 6 6 6 6 Maximum differential between flow and return temperatures Full Load K 50 50 50 50 50 50 Partial load K 59 59 59 59 59 59 Maximum permitted flow rate through the boiler3 l h 8060 10750 16120 21500 26860 32230 Flu...

Page 57: ...tions IP rating IPX0D IPX0D IPX0D IPX0D IPX0D IPX0D Supply voltage frequency V Hz 230 50 230 50 230 50 230 50 230 50 230 50 Electric power consumption P el Full Load W 83 156 250 234 298 336 Partial load W 28 28 40 42 41 48 Protection against electrocution Protection class 1 Maximum permissible unit fuse protection with CC 8313 A 10 10 10 10 10 10 Maximum permissible unit fuse protection with MX25...

Page 58: ...4 23 3 22 9 7 4 250 25 2 29 3 29 2 28 6 9 2 300 30 2 35 2 35 1 34 4 11 0 Country Boiler rating Gas category Gas family gas group and reference gas set on delivery Set to rated gas pressure on delivery in mbar 1 1 The gas supplier must ensure the minimum and maximum pressures in accordance with national regulations for public gas supply DE 75 300 I2ELL 2E G20 20 DE 75 100 II2ELL3P 2E G20 20 AT BG B...

Page 59: ...umentation and the connection diagram for the specific control unit DANGER Danger to life from electric current Never use the earth conductor green yellow as a control cable NOTICE System damage with incorrect installation Provide a permanent power supply not a safety plug Ensure that the power supply is connected to the correct phases Select the installation fuse circuit breaker rating ON OFF swi...

Page 60: ...emperature sensor 9 Boiler water temperature sensor 10 Temperature switch 11 Valve check system closed during operation 12 Differential pressure switch closed during operation 13 Flue gas pressure limiter always closed 14 Control unit 15 Burner control unit With the boiler ratings 75 150 kW an interference suppression coil is connected in series between the power supply of the burner control unit ...

Page 61: ...al pressure switch closed during operation 2 Plug in connector for compensation ionisation line 3 Valve check system 4 Burner control unit 5 Gas burner 6 Flue gas pressure limiter must be manually unlocked p1 Compensation line connection blue p2 Test cable connection for gas outlet pressure white pkomp Pressure compensation line pGAS Gas outlet pressure pA Pressure in flue system A Flue gas GAS GA...

Page 62: ...ult O2 4 9 vol O2 20 95 CO2max CO2 CO2max O2 20 95 12 9 2 12 4 9 Nominal CO2 max for the distributed gas vol 11 4 11 5 11 6 11 7 11 8 11 9 12 12 1 12 2 12 3 CO2 default value for the burner setting vol O2 value vol O2 value vol O2 value vol O2 value vol O2 value vol O2 value vol O2 value vol O2 value vol O2 value vol O2 value vol 8 2 5 9 6 0 6 1 6 3 6 4 6 5 6 6 6 8 6 9 7 0 8 3 5 7 5 8 6 0 6 1 6 2 ...

Page 63: ...ngs and flue gas connection 27 Check flue gas damper 27 8 Check device equipment 25 9 Convert to a different gas type if necessary 28 10 Starting up the control unit and the burner 27 11 Recording measurements 29 Full Load Partial load Discharge pressure _________ Pa _________ Pa Gross flue gas temperature tA _________ C _________ C Air temperature tL _________ C _________ C Net flue gas temperatu...

Page 64: ...e additives in the heating water observe the manufacturer s instructions and the details in the operator s log Concentration ________ Concentration _________ 4 Check the heating system water pressure 24 Pre charge pressure of the expansion vessel expansion vessel installation instructions Operating pressure 24 5 Check the burner and heat exchanger for contamination shut down the heating system for...

Page 65: ...as temperature tA tL ________ C ________ C ________ C ________ C Carbon dioxide content CO2 or oxygen content O2 _________ _________ _________ _________ CO content air free _______ppm _______ppm _______ppm _____ppm 13 Carry out function checks 29 Check ionisation current ________μA ________μA _______μA ______μA Test the differential pressure switch 54 14 Check for leaks during operation 30 15 If n...

Page 66: ..._______Pa ________Pa ________Pa ________ C ________ C ________ C ________ C ________ C ________ C ________ C ________ C ________ C ________ C ________ C ________ C ________ C ________ C ________ C ________ C ________ C ________ C ________ C ________ C ________ C ________ C ________ C ________ C ________ _________ _________ _______ ________ _________ _________ _________ _______ppm _______ppm ______...

Page 67: ...ctrode block 40 5 Clean the siphon 38 6 Clean the condensation catch pan 38 7 Replace the mixture manifold gasket O ring 38 8 Carry out a function check Confirmation that maintenance has been correctly carried out Company stamp signature Date ____________________ Date ____________________ Date ____________________ Date ____________________ Date ____________________ 1 2 3 4 5 6 7 8 Company stamp si...

Page 68: ...Bosch Thermotechnik GmbH Sophienstrasse 30 32 D 35576 Wetzlar www bosch industrial com ...

Reviews: