background image

AutoDome 100 Series Fixed Camera

 Positioning the Camera | en

5

Bosch Security Systems, Inc.

User Manual

F.01U.216.346 | 1.0 | 2011.04

2

Positioning the Camera

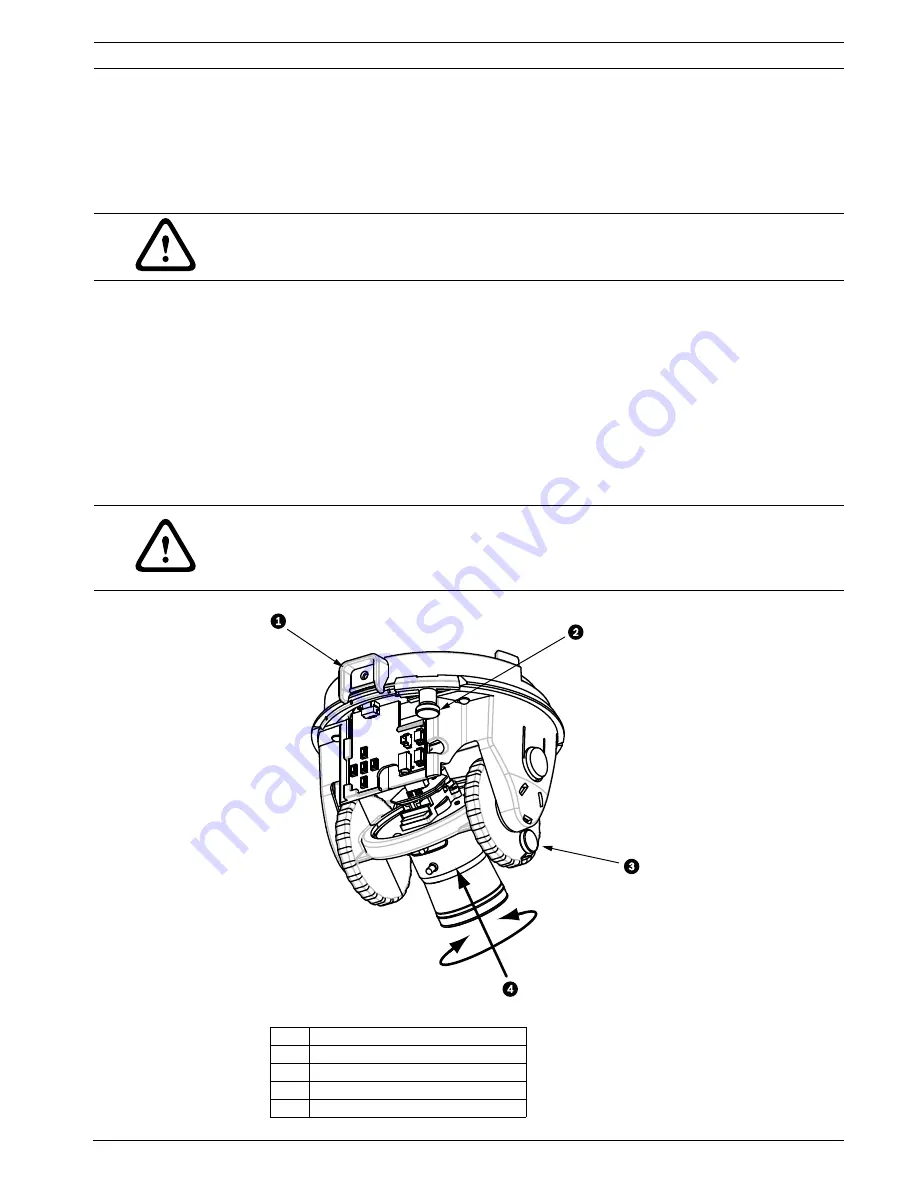
The camera module position can be adjusted along the horizontal, vertical, and diagonal (for 

azimuth) axes. When adjusting the position, ensure that the picture displayed on the monitor 

is level. After the covert liner is removed, position the camera by performing the following 

steps:

1.

For horizontal (pan) adjustment, loosen the thumbscrew at the platform base and rotate 

the camera (left or right) to the desired position. The camera can be rotated up to 360º 

between stops. If it hits the stop before achieving the desired position, rotate it in the 

opposite direction. Retighten the thumbscrew to secure the camera.

2.

For vertical adjustment (tilt), loosen the thumbscrew at the tilt wheel and position the 

camera (up or down) to the desired position. The camera can be tilted up to 110º 

between stops. Retighten the thumbscrew to secure the camera. 

3.

To compensate for angled ceilings or sidewall mounts, push the camera inward toward 

its base and rotate it until the image on the monitor is horizontal. The camera can be 

rotated up to 300º between stops.

Figure 2.1

Camera Position Adjustments

WARNING! 

To prevent damage to the camera module do not rotate the camera past its stops.

CAUTION! 

The CCD image sensors are highly sensitive and require special care for proper performance 

and extended lifetime. Do not expose it to direct sunlight or bright spotlights in operating and 

non-operation conditions. Avoid bright lights in the field of view of the camera.

Ref

Description

1

Camera Module Lock Tab

2

Horizontal (pan) Thumbscrew

3

Tilt Wheel Thumbscrew

4

Diagonal Adj.

Summary of Contents for AutoDome 100 Series

Page 1: ...AutoDome 100 Series Fixed Camera VG5 100 Series en User Manual ...

Page 2: ......

Page 3: ... and Focus 6 4 Advanced Setup 7 4 1 Accessing and Navigating Menus 7 4 2 Main Menu Function 8 4 2 1 Main Menu 9 4 2 2 ALC Submenu 9 4 2 3 ALC SHUTGAIN Submenu 9 4 2 4 ALC SHUTGAIN DAY NIGHT Submenu 10 4 2 5 ENHANCED Submenu 11 4 2 6 COLOR Submenu 11 4 2 7 Back Light Compensation BLC Submenu 12 4 3 Install Menu Functions 12 4 3 1 Install Menu 13 4 3 2 CAMERA ID Submenu 13 5 Troubleshooting Guide 14...

Page 4: ...he monitor jack provides a composite video signal with synchronization An optional cable part number S1460 is available for making this connection To access the monitor jack remove the bubble and covert liner 1 Insert a small screw driver through the keyway in the Pendant trim ring rotate the dome bubble counterclockwise and remove the dome bubble For In Ceiling AutoDomes you must loosen the small...

Page 5: ...e camera 2 For vertical adjustment tilt loosen the thumbscrew at the tilt wheel and position the camera up or down to the desired position The camera can be tilted up to 110º between stops Retighten the thumbscrew to secure the camera 3 To compensate for angled ceilings or sidewall mounts push the camera inward toward its base and rotate it until the image on the monitor is horizontal The camera c...

Page 6: ...ngth loosen the focal zoom lock screw and rotate the lens mechanism WIDE or TELE until you achieve the desired field of view Item 1 in the figure below 3 To focus the image on the monitor loosen the focus lock screw and turn the lens mechanism NEAR or FAR until the image is in focus 4 Repeat both these adjustments until the desired view is in focus 5 Tighten both adjustment screws 6 Exit the Insta...

Page 7: ...d Navigating Menus There are five 5 keys used for navigating through the various menus To access the setup menus press the center Select key to open and display the Main menu Use the four directional keys to navigate through the menus Figure 4 1 Menu Keyboard and Monitor Jack Use the menu keys to perform the following To access the Main menu or to select a sub menu item press the center Menu Selec...

Page 8: ... available when White Balance is set to Manual mode NOTICE To restore a selected menu item to its factory default quickly press the Menu Select key twice To exit the OSD menus from any menu item hold down the Menu Select key until the OSD disappears NOTICE To prevent unauthorized changes to the camera settings the camera menu buttons can be disabled using Bilinx communication through the CTFID sof...

Page 9: ...AES FL FIXED AES Auto Electronic Shutter The camera automatically sets the optimum shutter speed FL Flickerless Avoids interference from light sources FIXED Allows the user to define the shutter speed DEFSHUT 1 60 1 50 1 100 1 120 1 250 1 500 1 1000 1 2000 1 5000 1 10K The camera tries to maintain the selected shutter speed as long as the light level of the scene permits Only available if SHUTTER ...

Page 10: ...ption DAY NIGHT AUTO COLOR MONO AUTO Switches the filter between COLOR and MONO depending on the scene illumination level COLOR Use for normal daylight conditions MONO Removes the IR filter providing full IR sensitivity SWITCH LEVEL 15 to 15 Sets the video leveling threshold when the camera switches to monochrome operation PRIORITY COLOR MOTION in AUTO mode COLOR Displays a color image as long as ...

Page 11: ...AIN menu Function Selections Description WHITE BALANCE ATW AWB HOLD MANUAL ATW Automatic White Balance Allows the camera to constantly adjust for optimal color reproduction AWB HOLD Puts the ATW on hold and saves the color settings MANUAL Allows the red green and blue gain to be set manually to a desired position WB SPEED Slow Medium Fast Adjusts the speed of the white balance control loop when in...

Page 12: ... BLC AREA Selects submenu Accesses the Back Light Compensation area menu To size the BLC area Select the AREA option from the BLC menu The monitor displays the current area with the upper left corner flashing Move the flashing corner of the image by using the Up Down Left and Right keys to change the size and shape of the area Press the center Menu Select key to move the flashing cursor to the opp...

Page 13: ...eir default EXIT Exits this menu NOTICE When using Bilinx control the COMM ON OFF menu selection is not active This function can be accessed only through the camera menu keys when the CTFID software is not actively running Function Selections Description CAMERA ID Selects submenu To enter up to a 17 character camera name Press the Menu Select key to enter the Camera ID string Enter up to a 17 char...

Page 14: ...upply Box Check that Green LED in Power Supply Box is on This LED indicates mains power through the transformer If the Green LED is off then Turn off the Power Check the FX101 fuse for mains power to the Power Supply Box If O K then Check the FX102 fuse for 24 V power to the AutoDome Pendant If O K then If using a non Bosch power supply Check that the mains power to the power supply box is on If O...

Page 15: ...camera lens cover is removed If O K then Check that the maximum coax distance has not been exceeded See the VG5 AutoDome Installation Manual If O K then Restore all camera settings ON 40 ENTER Colors are not correct Reset the White Balance to the appropriate selection ON 30 ENTER If O K then Check that the maximum coax distance has not been exceeded See the VG5 AutoDome Installation Manual If O K ...

Page 16: ...ule If O K then Check all wiring and connector pins to the heater module Low Voltage flashing on monitor display If using a non Bosch power supply confirm that it meets the Bosch AutoDome power ratings See the AutoDome Datasheet for specifications If O K then Check the mains input line voltage If O K then Check that the maximum wire length from the power supply has not been exceeded See the VG5 Au...

Page 17: ......

Page 18: ......

Page 19: ......

Page 20: ...Bosch Security Systems Inc 850 Greenfield Road Lancaster PA 17601 U S A www boschsecurity com Bosch Security Systems Inc 2011 ...

Reviews: