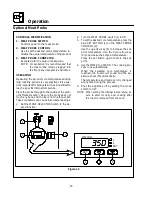
Installation
12
Adjustments
BEFORE SWITCHING THE APPLIANCE ON
Before applying power to the unit for the first time,
check for the following conditions:
j
All electrical safety provisions have been ad-
hered to and the electrical connections are
correct.
j
The circulation fan turns counter-clockwise.
Check rotation from inside the oven cavity.
j
Water is connected, turned on and all of the
connections are water tight.
j
The grease filter and holder are in their proper
positions.
j
The pan holders on models COS-6 and
COS-101 are inserted into the oven cavity.
Stationary rack guides are provided with the
COS-101S.
WARNING!!
If the fan turns in the wrong direction, the
appliance will not function properly and
can be damaged.
NOTE: When the unit is turned on, or after it has
been OFF for 5 hours and then turned on,
the steam generator automatically flushes
for 75 seconds. The steam generator then
fills to the proper water level. The unit is
now ready for operation.
DOOR ADJUSTMENT
The door latch may be adjusted in two directions,
in and out, and up and down, using the following
procedure:
1. Adjust up and down by loosening the two
bolts holding the latch to the face of the unit
(A).
2. Make adjustments so that the leading face of
the latch is centered in the opening of the han-
dle assembly.
3. Tighten the bolts so that there is no further
movement.
4. Adjust in and out by loosening the bolt on top
of the latch (B).
5. The adjustment face is stepped so that move-
ment is limited with the bolt tightened proper-
ly.
6. The adjustment is correct when the door
closes firmly and no steam leaks from the gas-
ket.
The hinges can also be adjusted as follows:
1. Be certain the latch is adjusted properly.
2. Adjust hinges so that the door back and the
unit face are parallel (C).
3. The adjustment is correct when no steam
leaks through the gasket.
A
B
C
Oven
Door
Figure 10


