background image

52

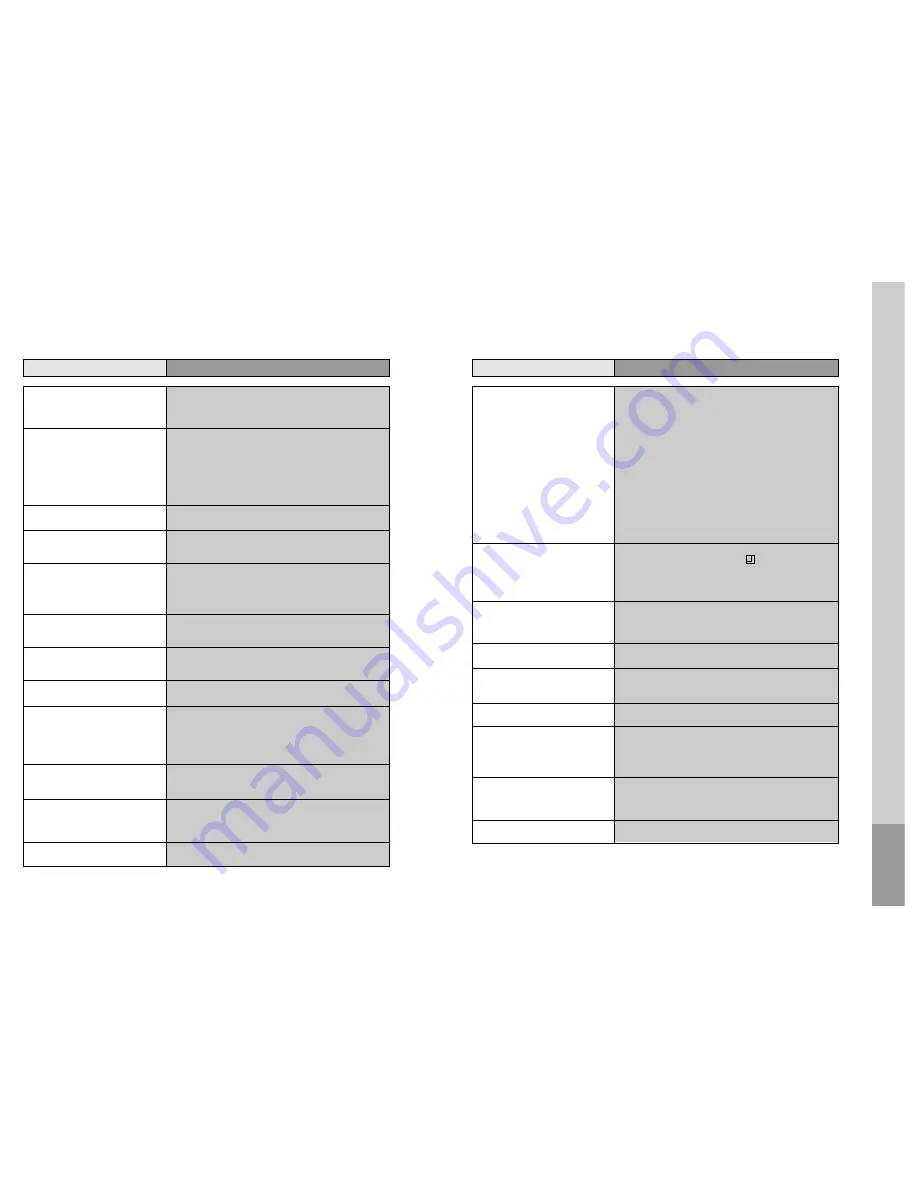
Before doubting about troubles (VCR)

“Power On” does not work.

It does not work even in “Power On”.

A videotape is not inputted in.

On inputting a videotape, the tape is
re-ejected.

A videotape is not ejected.

A channel on video and a play screen
does not appear.

Noise (screen noise) appears on
screen.

Noise appears on screen after
recording.

While in playing, noise appears.

Sound and screen are irregular.

Sound comes out but screen does not
appear.

Screen is irregular and stripes appears.

"Screen Error" message is displayed
in a screen.

While recording and playing, waves
appear on the top of screen.

A screen is not clear.

A screen at pause is trembling or
slow screen is not clear.

Checks

Symptom

Please check whether a power plug is inserted in an electric outlet.

Please check whether a videotape is inserted in.

Try to insert a plug again.

Please check whether a power plug is inserted in an electric outlet.

Please check whether a videotape is in.

Please check whether a videotape is inserted in a right direction (a
side of transparent window should be on the upside)

Have you inputted a videotape again just after the tape was ejected?
Please try it again after fully ejecting it.

When a videotape forces to be ejected, the tape may not be inputted. In
the case, please pull out an outlet, and then push the tape smoothly.

That’s why a safe mode to protect a videotape is operated
automatically. Please pull out the tape and input it again.

In case the product is used for a long time, a videotape may not be
ejected for a film inside may be stretched. In the case, please pull out
a power plug for about 10mins and then press “EJECT” button.

Please check your antenna’s connection.

TV channel should be fixed on video channel.

Please check your antenna’s signal whether it may be weak. In case of its
weakness, please use a frequency amplifier connected with the device.

Press “TV/VCR” and then let “VCR” is displayed on the display panel.

While in no use of VCR, was it turned on?

While in recording a program, do you watch another channel?

Select TV by pressing [TV/VCR] button on remote control.

While in playing a videotape, there may happen some noise or blot
in the part of the beginning of a videotape or resuming “PAUSE”,
which are not breakdown.

Please press “TRACKING” for better screen. Videotape may be
poor. Try to change it to another one.

Please use a head-cleaner to clean VCR heads. VCR heads may be
contaminated.

Since VCR Play signals are not stable like a TV signals, screen may
be unstable or curved while in playing. To fix the problem, please
horizontal adjustment.

In case videotape is the one recorded by other products or old one,
stripe may appear on the screen.

Try to adjust the screen by [T/-] button

Try to use a head-cleaner.

Try to use a head-cleaner.

Try to adjust the screen by [T/-] button.

53

Before doubting about troubles (VCR)

Recording a TV program is
impossible.

Once pressing “REC”, a videotape is
ejected automatically.

Timer recording of Cable TV does
not work.

In spite of pressing “CHANNEL”, a
channel can not be set.

While duplicating, screen is not
clean and distorted.

remote control does not work.

Buttons on remote control do not
work.

VISS index search does not work.

Cable broadcasting can not be
selected.

Checks

Symptom

For recording, you should use videotape with a tab.

Please check whether a channel is fixed on video. If not, you have to
turn it into “TV” by pressing “INPUT” button.

Please check whether the timer recording info is right.

Are RF cables inputted antenna connection terminal correctly?

Does a CH number selected in display section appear?

Please check a tab on a tape whether it is broken or not. (If it was
broken, please scotch-tape it)

Check whether a tape attached with a recording tap is inserted.

Check whether the screen is displayed in VCR Only  Channel. Press
[INPUT] button in this remote controller to adjust in "General
Broadcast" condition.

Is the rounded line (RF cable) connected in "ANT.IN" terminal?

Is the selected channel number shown in Display?

Is a tab of cassette  tape broken? (Please cover a  tab hole with
cellophane adhesive tape (Scotch tape).)

Please check whether the clock is right.

Does the display on your video show “

” (Ready to timer

recording)? Please make it out.

Please check whether the timer recording info is right.

Please check a tab on a tape whether it is broke or not. (If it was
broken, please scotch-tape it)

Was a cable data output code connected correctly?

Were a converter manufacturer setup and output channel right?

Did you enter a password? (Please cancel it.)

Did you turn off your player? (Please turn it on.)

You may not memorize channels.

Please check your channel setting or press a number button.

Some tapes or discs distributed in the  market for lending is set to
prevent copy  in  manufacturing. These tapes cannot be duplicated in
a good condition.

Battery may be weak or exhausted.

A receiver of remote control may be different with a sender.

In case a videotape is positioned in the beginning, “VISS REW” and
“REW” do not work.

In case a videotape is positioned in the end, “FF”, “VISS FF”, “PLAY”
and “REC” do not work.

Please check whether another button is pressed.

Are you playing a tape that is not recorded in this recorder?  (Try to
record it with the recorder.)

You may start recording it in “REC-PAUSE”. Please start recording it
from stop condition.

Please select  “CABLE” not “NETWORK” from the “CHANNEL
SETTING”.

The

o

thers

Summary of Contents for BLD-DVC6500

Page 1: ...g the product please wait for a while then use it If Prohibition mark continues to be displayed in pressing a button after that it means the button does not function in the currently played disc Press...

Page 2: ...N OFF 18 Output Select 19 DVD Playback 20 VCR Playback 21 Recording 22 VCR Operation Tuning in New Stations 25 Timer Recording 28 More Functions 30 Connections and Assembling 33 DVD Operation Playing...

Page 3: ...the plug still fails to fit contact your electrician to replace your obsolete outlet To prevent electric shock do not use this polarized plug with an extension cord receptacle or other outlet unless...

Page 4: ...ask the service technician to perform safety checks recommended by the manufacturer to determine that the unit is in safe operating condition 23 WALL OR CEILING MOUNTING The product should be mounted...

Page 5: ...tape or disc as listed below Damage of video head or cut coiling of tape may cause failure Tape with mould Tape or disc stained with juice or attachments Tape having breakage connection Disassembled t...

Page 6: ...SUBTITLE SETUP CLEAR 3D ENTER OK VCR DVD 6 1 2 3 4 5 7 8 9 0 Q q W w E e R DVD MENU button POWER button DVD TITLE PBC button PBC means PlayBack Control menu DVD OPEN CLOSE button VCR EJECT button LEF...

Page 7: ...r panel of TV Connect the cable to ANT jack in rear panel of DVD Video Connect TV to DVD Video Connect TV jack in DVD Video with ANT IN jack in TV with RF cable INPUT 1 ANT IN INPUT 2 ANT IN ANT OUT R...

Page 8: ...order Connect AUDIO VIDEO OUT jack in Camcorder or playback video to AUDIO VIDEO IN jack in rear panel or front panel of DVD Video with connecting cable Connect ANT IN jack in TV to TV jack in DVD Vid...

Page 9: ...rnal Input connected with DVD Video Playback DVD disc or Hi Fi videotape you can hear sound in speaker of stereo unit ConnectingtoatelevisionwithComponentjackandaDolbyDigitalAmp How to Connect NOT SUP...

Page 10: ...new player outputs a signal via the RF lead on transmission channel 36 Search for the menu picture with the channel tuning function of your TV set see its user manual Some televisions allow you to key...

Page 11: ...n Screen Display ON mode before shipping and you can change it to OFF mode VCR SETUP CLOCK SET LANGUAGE SET RF OUTPUT SET OSD ON OFF PR SELECT OK CONFIRM SETUP END OSD ON OFF ON OFF PR SELECT OK CONFI...

Page 12: ...If you want to playback it press PLAY PAUSE button When the operational status is flickering or poor adjust it with TRACKING button 1 2 3 To stop it press button For pause press PLAY PAUSE button in...

Page 13: ...cording is released automatically 6 To exit recording press STOP button 7 REPEAT OPEN CLOSE DISPLAY TITLE PBC MENU PR PR INPUT PREV REC PROGRAM CLK CNT TV VCR TRACKING ANGLE SPEED SEARCH SYSTEM PLAY P...

Page 14: ...o s SETUP choose PR PRESET 1 Select MANUAL SET 2 Choose any unused location number or P xx It s simplest to use the same location number on both the TV and video and confirm 3 Set the station you want...

Page 15: ...RCH CH__ FINE TUNING NAME O___ Sorting programme locations If the location numbers used for programmes stored in your TV and player are different you can change them on the player To do this move the...

Page 16: ...o sufficient free space for the recording on the cassette the video switches automatically to LP for double recording capacity The recorder will eject cassettes which have the safety tab removed PR SE...

Page 17: ...yed and no station is received for more than 5 minutes Searching a recorded program with index When you record a program the VCR places an index mark at the start of the recording To search fo an inde...

Page 18: ...GHT Hi Fi OFF More Functions VCR Operation 33 Connections and Assembling To the TV via antenna cable if you are not using a RCA cable If you are using a RCA cable select the AV input on the TV to see...

Page 19: ...NEXT button The current chapter or track moves to the next chapter or track Press PREV button The current scene moves to the previous chapter or track or first scene of current chapter or track Direct...

Page 20: ...OFF CD TRACK DISC RANDOM OFF MP3 TRACK FOLDER RANDOM OFF Repeating a defined period from A to B You may repeat a defined period from A to B A MP3 disc may not be repeated from A to B At the point whe...

Page 21: ...current disc mode If you want to change the mode select the item with up down cursor and enter the new settings with number or button In completing entering press ENTER button To exit from Display mo...

Page 22: ...c may not support audio select or subtitle select Selecting 3D Audio If you want to adjust Sound Fields press 3D button Every time the user presses 3D button a 3D sound changes 3D ON 3D OFF 3D ON one...

Page 23: ...DVD player Press the DVD open OPEN CLOSE button the disc tray opens Put a disc containing MP3 JPEG files on the disc tray with the label side up Press the DVD open OPEN CLOSE button the disc tray clos...

Page 24: ...In case of the file that is recorded with the variable bit rate VBR in one file Example 54 256kbps occurrence of the sound breaking may happen during the playback File names should be named using 8 or...

Page 25: ...D means On Screen Display Setup 47 Audio Setup Select a Digital Output Every time the user presses ENTER button DIGITAL OUT changes BITSTREAM LPCM BITSTREAM one by one 2 Select a Dynamic Range Every t...

Page 26: ...0 CD Possible PCM or dts CD G Possible Only Audio playback CD ROM Possible MP3 File CD R Possible Video CD CD CD ROM MP3 File CD RW Possible Video CD CD CD ROM MP3 File DVD R Possible DVD Video DVD R...

Page 27: ...b it from center toward outside with clean clothes Do not use any type of solvent such as thinner benzol benzene commercial cleaning goods or antistatic sprays The others 51 How to use a head cleaner...

Page 28: ...e one recorded by other products or old one stripe may appear on the screen Try to adjust the screen by TRACKING button Try to use a head cleaner Try to use a head cleaner Try to adjust the screen by...

Page 29: ...tains multi angle scenes Also a user can confirm the support with the ANGLE mark on screen Please check the degree of remote control distance or any interruption Please check a battery in remote contr...

Page 30: ...P N 97P95600D0...

Reviews: