


22
TERMINAL ELIMINATOR PLUS
3.3 Tying Signal Ground to Frame Ground (Optional)
Figure 3-1 shows the location of jumper position W1 on the Terminal
Eliminator Plus’s motherboard. This position is left open at the factory;
close it if you want to tie signal ground to frame ground. To do this, we
recommend that you solder a 100-
Ω
, 0.5-W resistor in location W1. You can
use a wire jumper instead of a resistor, but be careful that ground circulating
currents are limited to acceptable levels.
3.4 Inserting the Memory-Expansion Chip (Optional)
Follow the procedure described in this section to insert the 32K Memory
Expansion integrated circuit (IC) chip (part number TL484).
CAUTION!
If this procedure is not performed correctly, the TEP might not work
right. Please note that the IC is susceptible to static discharge and can
be permanently damaged if not handled properly. Do not remove the IC
from its packing container until you are ready to use it. Discharge any
static electricity from yourself before you begin the upgrade procedure.
(If you are performing this upgrade on a previously installed and operated
Terminal Eliminator Plus, rather than at initial installation time, unplug the
TEP and remove its cover as described in
Section 3.1
.)
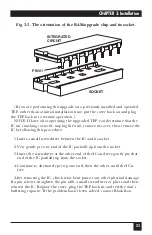
First, locate the empty chip socket labeled “U6” on the motherboard. This
socket is not shown in Figure 3-1, but it is directly behind the front-panel
LEDs. Position the IC so that its notch is lined up with the notch in the
socket, as shown in Figure 3-3 on the next page. Place the IC on top of the
socket, making sure all of the pins are lined up with their respective
receptacle holes.
(Occasionally, the distance between one row of pins and the other row on
the new IC may be wider than the distance between the rows in the socket. If
this is the case, lay the IC on its side, on top of a flat surface, with the pins
facing toward you. Gently press down on the IC, bending all of the pins
slightly inward. This will decrease the distance between the rows of pins and
allow the IC to be inserted in the socket.)
Now gently press the IC into the socket. Continue to press downward on
the IC until is is fully seated. The IC is now installed and will provide 28K of
additional buffer RAM (32K minus 4K used by the TEP).


