23
CHAPTER 3: Installation
3.3.2 T
HE
J
UMPER
-S
ETTING
P
ROCEDURE
CAUTION!
Disconnect the unit from the power line before removing it from its
housing.
WARNING: HIGH VOLTAGE!
Any adjustment, mainten-ance, and repair of the open instrument under
voltage should be avoided as much as possible, and, when inevitable,
should be carried out only by a skilled person who is aware of the hazard
involved. Capacitors inside the instrument may still be charged even
after the instrument has been dis-connected from the power source.
To change the settings of any jumpers, perform the following steps:
• Disconnect the AC power cord from the AC mains outlet.
• Unscrew the two rear-panel screws until the rear panel becomes loose.
This releases the unit’s “drawer” mechanism; now you can pull the screws
as if they were the knobs on a drawer and expose or remove the unit’s
circuit board.
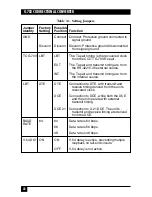
• Identify the jumpers(s) (refer to Figure 3-1 on page 21).
• Move the jumper(s) to your desired position(s).
• Replace the circuit board and screw the rear-panel screws back in.
3.4 Installation in 19-inch Racks
3.4.1 O
VERVIEW
The G.703 Codirectional Converter can be installed in 19-inch racks. It is 1U
(1.75", 4.4 cm) high and is slightly less than half as wide as the available
mounting area. Two rack-adapter kits are available: One kit provides the
hardware necessary to install a single unit, and the other provides the
hardware necessary to install two units side by side.
Sections 3.4.2
and
3.4.3
provide step-by-step instructions for installation of single or dual units.
CAUTION!
Disconnect the units from AC power while performing the following
procedures.

