7
ENGLISH
•
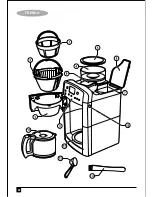
Connect the coffee maker to the mains
supply and switch the socket on. The
backlight will illuminate blue and the display
will start to flash.
•
Press the ‘HOUR’ button (23) until the
correct hour is displayed. The time is set in
24 hour format.
•
Press the ‘MIN’ button (24) until the correct
minutes are displayed.
•
The clock is now set.
Adding coffee beans
•
Lift the bean container lid and fill with coffee
beans.
•
Replace the bean container lid
Setting the grinder fineness
(Fig. B)
•
Select the fineness setting by turning the
bean container (4) until the white triangle
(28) matches up with one of the five dots in
front of the bean container. The largest dot to
the right indicates the coarsest grind setting,
the smallest dot on the left indicates the
finenest grind setting.
•
For first time use, use the coarsest setting –
the largest dot.
•
For dark oily beans use the coarsest setting
– the largest dot.
Note! Never fill the bean container with frozen
or coated beans.
Setting the quantity of coffee to
grind
•
Press the number of cups button (21) until the
required number of cups is displayed. The
grinder can grind the correct amount of coffee
for 2, 4, 6, 8 or 10 cups of coffee.
Note! If you are making 2 or 4 cups of coffee,
press the brew strength button (20) to turn the
low volume brew strength feature on. This
feature will slow down the brewing process so
that your coffee will have the same strength as
coffee from a full carafe.
Adding pre-ground coffee
•
Press the filter release button (10).
•
Place the filter (1) in the filter insert (2).
•
Place the filter insert (2) in the filter holder (3).
•
Add the required amount of ground coffee.
(Follow the instructions on the packet of your
brand of coffee)
•
Close the filter holder fully.
Adding water
•
Open the water tank lid (8).
•
Using the glass carafe (11), fill the water tank
(7) with the desired quantity of cold water.
Note! Do not fill with more than 10 cups of water
from the glass carafe.
•
Close the water tank lid (8) and place the
empty carafe (11), with the lid closed, on the
hot plate.
Warning! Do not open the water tank lid (8)
whilst the coffee maker is on. Hot water may be
ejected.
Summary of Contents for PRCM500
Page 1: ...PRCM500 www blackanddecker ae 10 8 6 4 ...
Page 2: ...ENGLISH 2 14 ...
Page 12: ...12 ARABIC 14 ...
Page 22: ...22 FRENCH 14 ...


