background image

11

ENGLISH

Guarantee

Black & Decker is confident of the quality of its 
products and offers an outstanding guarantee.
This guarantee statement is in addition to and in 
no way prejudices your statutory rights.
The guarantee is valid within the territories of the 
Member States of the European Union and the 
European Free Trade Area.
If a Black & Decker product becomes defective 
due to faulty materials, workmanship or lack of 
conformity, within 24 months from the date of 
purchase, Black & Decker guarantees to replace 
defective parts, repair products subjected to fair 
wear and tear or replace such products to ensure 
minimum inconvenience to the customer unless:
 

The product has been used for trade, 
professional or hire purposes; 


The product has been subjected to misuse 
or neglect;


The product has sustained damage 
through foreign objects, substances or 
accidents;


Repairs have been attempted by persons 
other than authorised repair agents or 
Black & Decker service staff.

To claim on the guarantee, you will need to 
submit proof of purchase to the seller or an 
authorised repair agent. You can check the 
location of your nearest authorised repair agent 
by contacting your local Black & Decker office at 
the address indicated in this manual.
Alternatively, a list of authorised Black & Decker 
repair agents and full details of our after-sales 
service and contacts are available on the Internet 
at: www.2helpU.com.

Technical data

Protecting the environment


Separate collection. This product must not 
be disposed of with normal household 
waste.

Should you find one day that your Black & 
Decker product needs replacement, or if it is of 
no further use to you, do not dispose of it with 
other household waste. Make this product 
available for separate collection.

  Black & Decker provides a facility for 

recycling Black & Decker products once they 
have reached the end of their working life. 
This service is provided free of charge. To 
take advantage of this service please return 
your product to any authorised repair agent 
who will collect them on our behalf.

  You can check the location of your nearest 

authorised repair agent by contacting your 
local Black & Decker office at the address 
indicated in this manual. Alternatively, a list of 
authorized Black & Decker repair agents and 
full details of our after-sales service and 
contact are available on the Internet at: 
www.2helpU.com.

Voltage 

220 - 240 Volts ~ 50/60Hz

Power 1000W
Weight 2.2kg

Summary of Contents for PRCM500

Page 1: ...PRCM500 www blackanddecker ae 10 8 6 4 ...

Page 2: ...ENGLISH 2 14 ...

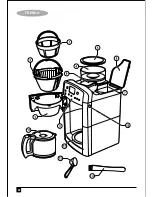
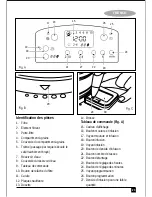
Page 3: ...elease button 11 Carafe 12 Hot plate 13 Scoop 14 Brush Control Panel Fig A 15 Display window 16 Grind and brew button 17 Grind and brew indicator 18 Brew button 19 Brew indicator 20 Brew strength button 21 Number of cups button 22 Clean button 23 Hour button 24 Minute button 25 Timer indicator 26 Timer button 27 Low volume brew strength 15 17 19 20 21 27 22 23 24 28 29 30 25 26 18 16 ...

Page 4: ...barefoot Guide the power supply cord neatly so it does not hang over the edge of a worktop and cannot be caught accidentally or tripped over Never pull the power supply cord to disconnect the plug from the socket Keep the power supply cord away from heat oil and sharp edges If the power supply cord is damaged during use disconnect the appliance from the power supply immediately Do not touch the po...

Page 5: ...specified in this manual Electrical safety Before use check that the mains voltage corresponds to the voltage on the rating plate This product must be earthed Always check that the mains voltage corresponds to the voltage on the rating plate Appliance plugs must match the outlet Never modify the plug in any way Do not use any adapter plugs with earthed Class 1 appliances Unmodified plugs and match...

Page 6: ...ter Rinse and dry thoroughly with a soft cloth Do not use harsh abrasive cleaners or place any part of the appliance in the dishwasher Warning Never immerse the main body of the appliance cord set or plug in water or any other liquid We recommend that you first familiarise yourself with all parts of the appliance before using it for the first time Do not fill with water or connect to the mains sup...

Page 7: ...d beans Setting the quantity of coffee to grind Press the number of cups button 21 until the required number of cups is displayed The grinder can grind the correct amount of coffee for 2 4 6 8 or 10 cups of coffee Note If you are making 2 or 4 cups of coffee press the brew strength button 20 to turn the low volume brew strength feature on This feature will slow down the brewing process so that you...

Page 8: ...will flash in the display window and will go out once the hot plate switches off Brewing pre ground coffee now Fill the filter with the required quantity of pre ground coffee Fill the water tank with the required quantity of water Place the empty carafe with the lid down onto the hot plate Set the quantity of coffee to make 2 4 6 8 or 10 cups Note If you are making 2 or 4 cups of coffee press the ...

Page 9: ...dicator will flash in the display window and will go out once the hot plate switches off Brewing pre ground coffee later The coffee maker has a timer function which allows you to set an automatic time for the brewing process to begin Fill the filter with the required quantity of pre ground coffee Fill the water tank with the required quantity of water Place the empty carafe with the lid down onto ...

Page 10: ...and remove the plug from the socket Using the handles remove the filter 1 and the filter insert 2 from the filter holder 3 Remove the used coffee grounds from the filter Wash the carafe 11 the filter 2 and the filter insert 3 in hot soapy water Dry all parts and refit them Wipe the outside of the appliance with a damp cloth Cleaning the feeder channel Fig C Periodically check the feeder channel fo...

Page 11: ...n of your nearest authorised repair agent by contacting your local Black Decker office at the address indicated in this manual Alternatively a list of authorised Black Decker repair agents and full details of our after sales service and contacts are available on the Internet at www 2helpU com Technical data Protecting the environment Separate collection This product must not be disposed of with no...

Page 12: ...12 ARABIC 14 ...

Page 13: ...áMƒd 9 í TôŸG a QR 10 jôHEG 11 Éî S 12 áaô e 13 IÉ Tôa 14 Fig A ºµëàdG áMƒd Vô dG á TÉ T 15 Iƒ dG OGóYEGh øë dG QR 16 OGóYE Gh øë dG öTDƒe 17 OGóYE G QR 18 OGóYE G öTDƒe 19 OGóYE G Iƒb QR 20 ÜGƒcC G OóY QR 21 æàdG QR 22 áYÉ ùdG QR 23 FÉbódG QR 24 âbDƒŸG öTDƒe 25 âbDƒŸG QR 26 á ùH á ªc OGóYEG Iƒb 27 15 17 19 20 21 27 22 23 24 28 29 30 25 26 18 16 ...

Page 14: ...G ñƒJ õæŸG êQÉN áæ cÉŸG Ωóîà ùJ ƒµJ ÉeóæY h Úà àÑe Gójh áæ cÉŸG π ûJ Úeó dG ÉM ƒa àj å ëH ábóH FÉHô µdG QÉ àdG S OôaG hCG Ì àdG ºàj å ëHh Ió æŸG hCG πª dG í S GƒM ICÉéa H πbô àdG π üØd FÉHô µdG QÉ àdG S ó T kÉ e hÉ FÉHô µdG QÉ àdG ùH ßØàMG ùÑ ŸG øY ùHÉ dG IOÉ G Gƒ Gh âjõdGh IQGô G øY kGó H ΩGóîà S G AÉæKCG FÉHô µdG QÉ àdG S J ádÉM FÉHô µdG QÉ àdG Qó üe øY áæ cÉŸG QƒØdG Y π üaG üa πÑb FÉHô µdG QÉ à...

Page 15: ...æ cÉŸG ΩGóîà SG πÑb æ üàdG áMƒd Y IOóëŸG á dƒØdG e ù FôdG ócCÉàdG Ωõ jh èàæŸG Gòg jQCÉJ Ωõ j ù FôdG òNCÉŸG á dƒa aGƒJ øe kɪFGO æ üàdG áMƒd Y IOóëŸG á dƒØdG e ÖæŒ e òNCÉŸG e áæ cÉŸG ùHÉb aGƒàj CG Ú àjh ΩGóîà SG ΩóY Ωõ jh ɵ TC G øe πµ T CÉH ùHÉ dG πjó J jQCÉJ ùH á UƒŸG Iõ LC G e ùHGƒ d ÅjÉ e CG e á aGƒàeh ádó e ÒZ ùHGƒb ΩGóîà SG π jh 1 áÄØdG á FÉHô c äÉeó üd Vô àdG ôWÉfl øe òNCÉŸG 1 áÄØdG äÉéàæeh ó...

Page 16: ... Ø ØŒh É Ø ûH ºb ºK øeh ƒHÉ Uh ájCG ΩGóîà SG ΩóY Öéjh áªYÉf Tɪb á b ΩGóîà SÉH áæ cÉŸG AGõLCG øe CG π ùZ hCG á TÉc ájƒb äÉØ æe ÉÑWC G ádÉ ùZ AÉŸG ùHÉ dG hCG ùdG hCG áæ cÉŸG º ùL ôª J ôjò ôNBG πFÉ S CG hCG πÑb áæ cÉŸG AGõLCG Y kGó L ô àdÉH k hCG Uƒf áæ cÉŸG áÄÑ J ΩóY IÉYGôe e hC G Iôª d É eGóîà SG òg ù FôdG QÉ àdG òNCÉÃ É UƒJ hCG AÉŸÉH AÉæKC G á ªY øe á dÉY ƒµJ ób ÉjÉ H ájCG øe ü îàdG á H äɪ àdG Ö...

Page 17: ...ûN ÌcC G Iƒ dG ܃ÑëH Iƒ dG ájhÉM Aπà kÉ e º J á MÓe IÉ ŸG hCG IóªéŸG É æëW ºàj àdG Iƒ dG QGó e ójó OóY Ñ V ºàj CG EG 21 ÜGƒcC G OóY QR VG øëW áæë ª d øµÁh ÉgOGóYEG ܃ZôŸG ÜGƒcC G á fɪK hCG áà S hCG á HQCG hCG ÚHƒµd áÑ SÉæŸG Iƒ dG á ªc Iƒ dG øe ÜGƒcCG IöûY hCG Lôj ÜGƒcCG á HQCG hCG ÚHƒc OGóYEG ádÉM á MÓe OGóYEG Iƒb á UÉN π ûàd 20 OGóYE G Iƒb QR Y dG OGóYE G á ªY AÉ HEG Y á UÉÿG òg πª Jh á ùH á ªc ...

Page 18: ...G á TÉ T Y Iƒ dG ܃c öTDƒe A j ƒ Sh Iƒ dG Éî ùdG π ûJ É jEG óæY ÅØ æjh Vô dG kÉ Ñ ùe áfƒë ŸG Iƒ dG OGóYEG kÉ Ñ ùe áfƒë ŸG Iƒ dG QGó à ájhÉ G áÄÑ àH ºb ΩRÓdG áeRÓdG É ŸG á ªµH É ŸG GõN áÄÑ àH ºb Éî ùdG Y áëàØdG ÓZEG e ÆQÉØdG jôHE G V hCG á HQCG hCG ÉHƒc ÉgOGóYEG OGôŸG Iƒ dG á ªc Ñ VG ÜGƒcCG IöûY hCG á fɪK hCG áà S Lôj ÜGƒcCG á HQCG hCG ÚHƒc OGóYEG ádÉM á MÓe π ûàd 27 á ùH á ªc OGóYEG Iƒb QR Y dG á...

Page 19: ...h á UÉN π ûJ áæ cÉŸG á TÉ T Y Iƒ dG ܃c öTDƒe A j ƒ Sh Iƒ dG Éî ùdG π ûJ É jEG óæY ÅØ æjh Vô dG kÉ Ñ ùe áfƒë ŸG Iƒ d MÓdG OGóYE G í àJ àdGh âbDƒŸG á UÉN Iƒ dG OGóYEG áæ cÉe øª àJ Iƒ dG OGóYEG á ªY AóÑd FÉ àdG âbDƒŸG Ñ V áfƒë ŸG Iƒ dG á ªµH ÜƒÑ G ájhÉM áÄÑ àH ºb áeRÓdG áeRÓdG É ŸG á ªµH É ŸG GõN áÄÑ àH ºb Éî ùdG Y áëàØdG ÓZEG e ÆQÉØdG jôHE G V eƒj ƒ Sh Úà fÉK IóŸ 26 âbDƒŸG QR VG 25 âbDƒŸG öTDƒe áYÉ...

Page 20: ...h 1 í TôŸG a HÉ ŸG Ωóîà SG Iƒ dG Ö SGhQ ádGREÉH ºbh 3 í TôŸG πeÉM øe 2 TôŸG øe 3 í TôŸG IóYÉbh 2 í TôŸGh 11 jôHE G π ùZG ºb ºK øeh ƒHÉ üdGh ÅaGódG AÉŸG ΩGóîà SÉH É Ñ côJ IOÉYEGh dG ªL ØéàH á b ΩGóîà SÉH áæ cÉŸG øe LQÉÿG Aõ G í ùeG á Ñe Tɪb ê πµ ûdG ájò àdG ܃ÑfCG æJ äɪcGôJ øe ü îà d kÉjQhO ájò àdG áHƒÑfCG üëa Ñæj CG iôJ fCG ÉŸÉWh ájò àdG ܃ÑfCG Iƒ dGh äƒjõdG Ωõ j ájò àdG áHƒÑfCG IòaÉf øe á SÓ ùH...

Page 21: ...àdG Gƒæ dG ëŸG ôµjO ófBG ÓH Öàµe Y É üJ G π dódG Gòg í VƒŸG øjóªà ŸG áfÉ üdG AÓcƒH áªFÉb óLƒJ dP øe k óHh äÉeóÿ á eɵdG π UÉØàdGh ôµjO ófBG ÓH ácöûd Ú HÉàdG âfÎfE G Y ÉæH á UÉÿG É üJ G πFÉ Shh ÑdG ó H Ée www 2helpU com ÊhεdE G bƒŸG Y á æØdG äÉfÉ ÑdG áÄ ÑdG ájɪM Gòg øe ü îàdG ΩóY Ωõ j π üØæŸG ª G ájOÉ dG á dõæŸG áeɪ dG e èàæŸG ôµjO ófBG ÓH èàæe GóÑà SG ΩÉjC G øe Ωƒj Ωõd GPEG e æe ü îàJ Óa eóîà ù...

Page 22: ...22 FRENCH 14 ...

Page 23: ... du filtre 11 Carafe 12 Plaque chauffante 13 Dosette 14 Brosse Tableau de commande Fig A 15 Cadran d affichage 16 Bouton mouture et infusion 17 Voyant mouture et infusion 18 Bouton infusion 19 Voyant infusion 20 Bouton de densité d infusion 21 Bouton nombre de tasses 22 Bouton détartrage 23 Bouton de réglage des heures 24 Bouton de réglage des minutes 25 Voyant programmation 26 Bouton programmatio...

Page 24: ...eil si vous êtes pieds nus Placez soigneusement le cordon d alimentation et veillez à ce qu il ne pende pas du plan de travail pour éviter de le prendre ou de trébucher dessus par mégarde Ne jamais tirer sur le cordon d alimentation pour débrancher la fiche de la prise Le cordon d alimentation ne doit jamais être à proximité d une source de chaleur de graisse ou d angles vifs Si le cordon d alimen...

Page 25: ...anuel Sécurité électrique Avant son utilisation vérifiez que la tension électrique correspond à celle indiquée sur l étiquette signalétique Ce produit doit être mis à la terre Toujours vérifier que la tension électrique correspond à celle indiquée sur l étiquette signalétique La fiche de l appareil doit correspondre à la prise Ne jamais modifier la fiche de quelque façon que ce soit Ne pas utilise...

Page 26: ...e l appareil à l eau chaude savonneuse Rincer et essuyer soigneusement avec un chiffon doux Ne pas utiliser de produits nettoyants durs abrasifs ou placer toute partie de l appareil dans le lave vaisselle Avertissement Ne jamais immerger le corps principal de l appareil le cordon ou la fiche dans de l eau ou tout autre liquide Nous vous recommandons de vous familiariser avec toutes les parties de ...

Page 27: ...ains congelés ou recouverts d un glaçage Régler la quantité de café à moudre Presser le bouton nombre de tasses 21 jusqu à l affichage du nombre de tasses voulu Le moulin va broyer la quantité exacte de café pour 2 4 6 8 ou 10 tasses de café Remarque Si vous faites 2 ou 4 tasses de café pressez le bouton de densité d infusion 20 pour activer la fonction de densité d infusion pour une faible quanti...

Page 28: ...noter dans le cadran d affichage et disparait quand la plaque chauffante s éteint Infusion immédiate du café moulu Remplir le filtre avec la quantité voulue de café moulu Remplir le réservoir d eau de la quantité d eau voul Placer la carafe vide fermée avec son couvercle sur la plaque chauffante Régler la quantité de café à infuser 2 4 6 8 ou 10 tasses Remarque Si vous faites 2 ou 4 tasses de café...

Page 29: ...se met à clignoter dans le cadran d affichage et disparait quand la plaque chauffante s éteint Infusion différée du café moulu La cafetière possède une fonction de programmation qui vous permet de programmer une heure d infusion avec lancement automatique Remplir le filtre avec la quantité voulue de café moulu Remplir le réservoir d eau de la quantité d eau voulue Placer la carafe vide fermée avec...

Page 30: ...irer la fiche de la prise de courant A l aide des poignées retirer le filtre 1 et l élément filtrant 2 du porte filtre 3 Enlever le marc de café du filtre Laver la carafe 11 le filtre 2 et l élément filtrant 3 dans de l eau chaude savonneuse Sécher toutes les pièces et les remettre en place Essuyer l extérieur de l appareil avec un chiffon humi Nettoyage de la trémie Fig C Vérifier périodiquement ...

Page 31: ...eur ou à un réparateur agréé Pour connaître l adresse du réparateur agréé le plus proche de chez vous contactez le bureau Black Decker à l adresse indiquée dans ce manuel Vous pourrez aussi trouver une liste des réparateurs agréés de Black Decker et de plus amples détails sur notre service après vente sur le site Internet à l adresse suivante www 2helpU com Caractéristiques techniques Protection d...

Page 32: ... 234 8057445477 234 7028053630 Fax 234 1 4610018 OMAN Oman Marketing Service Co Omasco P O Box 2734 Behind Honda Showroom Wattayah Oman Tel 00968 24560232 24560255 Fax 00968 24560993 Oman Marketing Service Co Omasco Al Ohi Sohar Oman Tel 00968 26846379 Fax 00968 26846379 Oman Marketing Service Co Omasco Sanaya Salalah Oman Tel 00968 23212290 Fax 00968 23210936 PAKISTAN Ammar Service Spares 60 Bank...

Page 33: ...WARRANTY REGISTRATION CARD YOUR NAME YOUR ADDRESS POSTCODE DATE OF PURCHASE DEALER S NAME ADDRESS PRODUCT MODEL NO PRCM500 ù ß r F M u Ê d e d b Í U a A d ß r Ë M u Ê U z l ...

Reviews: