background image

6

ENGLISH

The charger is intended for indoor use only.

Read this entire manual carefully before using the  

appliance.

Electrical safety

Your charger is double insulated; therefore no 

earth wire is required. Always check that the mains 

voltage corresponds to the voltage on the rating 

plate. Never attempt to replace the charger unit with a 

regular mains plug.

•  If the supply cord is damaged, it must be replaced by the 

manufacturer or an authorised Black & Decker Service 

Centre in order to avoid a hazard. 

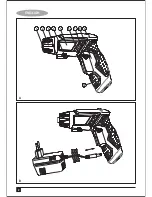
Product Features

1.  Keyless chuck

2.  Gear box

3.  LED

4.  LED switch

5.  Housing

6.  Switch

7.  Reverse-rotation lever

8.  Handle casing

9.  Pivot release button

10. Charging hole

Charging the Battery

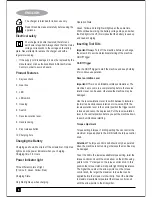
Charging as shown, Must turn off the screwdriver. Only Red 

lights up on the power indicator when you charging. 

Charging time: 3-5 Hours.

Power indicator light

Three different colors of light

(From Left : Green. Yellow. Red) 

Charging State: 

Only Red lights up when charging.

Operation State:

Green. Yellow and red light will light up at the same time, 

With continued working, the battery voltage drops, and when 

the Red light turns off, this implies that the battery is used up 

and needs charging.

Inserting Tool Bits

Important!

 Always Turn off the machine before you change 

the screw bit to avoid unintentional starting of the machine. 

On/Off Trigger. 

On/Off Trigger

Use the On/Off trigger to start the machine and keep holding 

it for continuous operation.

Reverse-rotation Lever

Important!

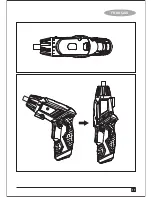
 This is a can foldable cordless screwdriver. The 

machine has to come to a complete stop before the reverse 

rotation lever can be used, otherwise the machine may be 

damaged.

Use the reverse-rotation lever to switch between clockwise 

(normal) and anticlockwise rotation or vice-versa, With the 

reverse-rotation lever in the central position the trigger switch 

is locked and cannot be depressed. Put the reverse-rotation 

lever in the central position before you put the machine down, 

to avoid unintentional starting.

Torque adjustment

Torque setting 8 1 drilling setting You can control the 

maximum torque applied to the drill bit with the torque control 

knob.

Attention!

 The torque control knob should only be operated 

when the machine is not running; otherwise the machine may 

be damaged.

To set the drill to the lowest available torque setting, twist the 

torque control knob until the small arrow on the drill-housing 

points to the “1” stamped on the torque control knob. In this 

position the torque clutch will slip with light drilling resistance. 

The higher the number the arrow points to on the torque 

control knob, the larger the maximum torque that can be 

applied before the torque clutch will slip. To set the machine 

to maximum available torque twist the torque control knob 

until the arrow points to the drill symbol.

Summary of Contents for KC4815

Page 1: ...KC4815 www blackanddecker ae ...

Page 2: ...ENGLISH 2 B 2 1 3 4 5 6 7 8 9 10 A ...

Page 3: ...3 ENGLISH ...

Page 4: ...d suitable for outdoor use reduces the risk of electric shock f If operating a power tool in a damp location is unavoidable use a residual current device RCD protected supply Use of an RCD reduces the risk of electric shock 3 Personal safety a Stay alert watch what you are doing and use common sense when operating a power tool Do not use a power tool while you are tired or under the influence of dr...

Page 5: ...ct If contact accidentally occurs flush with water If liquid contacts eyes additionally seek medical help Liquid ejected from the battery may cause irritation or burns 6 Service a Have your power tool serviced by a qualified repair person using only identical replacement parts This will ensure that the safety of the power tool is maintained Special Safety Advice for Screwdriver Hold power tool by in...

Page 6: ... of the machine On Off Trigger On Off Trigger Use the On Off trigger to start the machine and keep holding it for continuous operation Reverse rotation Lever Important This is a can foldable cordless screwdriver The machine has to come to a complete stop before the reverse rotation lever can be used otherwise the machine may be damaged Use the reverse rotation lever to switch between clockwise nor...

Page 7: ...tain chemical substances which may cause damage to the plastic parts of the machine Therefore do not use any strong or inflammable cleaners such as petrol paint thinner turpentine or similar cleaning agents Always keep air ventilation holes free of dust deposits to prevent overheating Servicing For more information on KC4815 and other products please visit us Batteries Black Decker batteries can be...

Page 8: ...ISH Technical data Rated Voltage V 4 8 No load speed min 1 200rpm Weight kg 0 4 Battery cell V 1 2v Ni cd 600mAh Charger HY 06 Rated Voltage V 220 240 Output Voltage DC6V 300 mA Charging Time 3 5 hours KC4815 ...

Page 9: ... product has been subjected to misuse or neglect The product has sustained damage through foreign objects substances or accidents Repairs have been attempted by persons other than authorised repair agents or Black Decker service staff To claim on the guarantee you will need to submit proof of purchase to the seller or an authorised repair agent You can check the location of your nearest authorised...

Page 10: ...10 FRANÇAIS B 2 1 3 4 5 6 7 8 9 10 A ...

Page 11: ...11 FRANÇAIS ...

Page 12: ... humide La pénétration de l eau à l intérieur d une machine outil accroît le risque de décharge électrique d Ne pas maltraiter le cordon Ne jamais utiliser le cordon pour porter la machine outil la tirer ou la débrancher Tenir le cordon à l écart de la chaleur des graisses des bords coupants ou des parties mobiles Les cordons endommagés ou emmêlés augmentent le risque de décharge électrique e En a...

Page 13: ...ient pour un type de batterie peut poser un risque d incendie quand il est utilisé avec un autre type de batterie b N utilisez les outils électriques qu avec les batteries spécialement conçues pour ceux ci En utilisant d autres batteries vous pouvez causer des blessures et il y a un risque d incendie c Quand la batterie n est pas utilisée il faut la garder éloignée des objets métalliques tels que ...

Page 14: ...me sur l indicateur de mise sous tension quand vous mettez à charger Temps de chargement 3 à 5 heures Témoins lumineux de mise sous tension Trois couleurs différentes A partir de la gauche Vert Jaune Rouge Chargement Seulement le témoin rouge s allume quand la batterie est en charge Fonctionnement Les témoins vert jaune et rouge s allument en même temps Au bout d un fonctionnement continu la tensi...

Page 15: ...ée Appuyez l embout contre la vis avec une pression constante tout en dévissant la vis Entretien et nettoyage Attention Enlevez toujours la batterie avant de faire tout travail d entretien sur la machine Pour nettoyer utilisez toujours un chiffon sec ou humide mais pas mouillé De nombreux produits de nettoyage contiennent des substances chimiques qui peuvent détériorer les pièces de la machine qui...

Page 16: ...nique Tension nominale V 4 8 Vitesse à vide min 1 200rpm Poids kg 0 4 Élément de la batterie V 1 2v Ni cd 600mAh Chargeur HY 06 Tension nominale V 220 240 Tension de sortie DC6V 300 mA Temps de chargement 3 à 5 heures KC4815 ...

Page 17: ...e product has been subjected to misuse or neglect The product has sustained damage through foreign objects substances or accidents Repairs have been attempted by persons other than authorised repair agents or Black Decker service staff To claim on the guarantee you will need to submit proof of purchase to the seller or an authorised repair agent You can check the location of your nearest authorise...

Page 18: ...îà SG èàæŸG ΩGóîà SG IAÉ SEG hCG ɪgEG çOGƒ G hCG á HôZ VGôZCG hCG OGƒe ÖÑ ùH àd èàæŸG Vô J øjôNB G UÉî TC G πÑb øe ìÓ UE G äÉ ªY AGôLEG ádhÉfi ÓÑd HÉàdG áeóÿG jôa hCG º H ìöüŸG ìÓ UE G AÓch ÓîH ôµjO ófBG ÑdG π ch hCG FÉÑ d AGöûdG äÉÑKEG Ëó J Öéj ɪ dÉH áÑdÉ ª d Öàµe á LGôà óªà e ìÓ UEG π ch ÜôbCG ɵe áaô e æµÁh óªà ŸG ôaƒàJ ɪc π dódG dEG QÉ ûŸG Gƒæ dG ëŸG ôµjO ófBG ÓH äÉeóN äÉfÉ Hh ôµjO ófBG ÓH ...

Page 19: ... π ch CG EG èàæŸG IOÉYEG Lôj áeóÿG ÉæY áHÉ f äÉéàæŸG ªéàH ôµjO ófBG ÓH Öàµe á LGôà óªà e ìÓ UEG π ch ÜôbCG ɵe áaô e æµÁ ìÓ UE G AÓcƒH áªFÉb ôaƒàJ ɪc π dódG dEG QÉ ûŸG Gƒæ dG ëŸG Y É üJ Gh ÑdG ó H Ée äÉeóN äÉfÉ Hh ôµjO ófBG ÓH iód øjóªà ŸG www 2helpU com ÊhεdE G bƒŸG áeóÿG äÉeƒ e ácƒ ªŸGh Ióªà ŸG áeóÿG õcGôe øe á eÉc áµÑ T ôµjO ófBG ÓH ôaƒJ ÓÑd á HÉàdG áeóÿG õcGôe ªL πª jh É SBG AÉLQCG ªL ácöû d...

Page 20: ...ƒ dG ZÈdG HQ 2 πNOCG áYÉ ùdG ÜQÉ Y ÉŒG GQhódG Y ÜÉ ãŸG GQhO ÉŒG OóM ZGÈdG ᪠d âÑK ZÈdG SCGQ IOƒLƒŸG áëàØdG ZGÈdG ᪠d SCGQ àJ hCG ZÈdG àj ó a EGh ZÈdG SCGQ Y OƒªY πµ ûH HQ AÉæKCG ôªà ùŸG dG e ZÈdG Y ZGÈdG ᪠H VG ZÈdG ìÉàØe QôMhkGó L RÉ G ùeG kÉeÉ ZÈdG HQ ɪàcG óæY ZÈdG h ZÈdG SCGQ àJ hCG ZÈdG àj ó a EGh π ûàdG É jEG π ûàdG Ωõ dG ODƒj ó a kGQƒa π ûàdG É jEG π ûàdG ìÉàØe ôjô ΩóY ádÉM ÜÉ ãŸG hCG ZG...

Page 21: ...G πeÉM 1 GQhódG ΩõY ºµëàdG Ñ e 2 O EG EG ìÉÑ üe 3 O EG EG ìÉÑ üe ìÉàØe 4 ôëŸG AÉ Z 5 AÉHô µdG öTDƒe áÑŸ 6 RɵJQ G Qƒfi ôjô QR 7 ìÉàØe 8 ùµ dG GQhódG GQP 9 QGhódG Ñ ŸG AÉ Z 10 øë ûdG áëàa 11 ájQÉ ÑdG øë T øë ûdG óæY ZGÈdG Øe π ûJ É jEG Ú àjh Vƒe ƒg ɪc øë ûdÉH ºb äÉYÉ S 5 EG 3 øë ûdG øeR AÉHô µdG öTDƒe a AGôª G áѪ dG A J AÉHô µdG öTDƒe áÑŸ äÉѪ dG øe áØ àfl GƒdCG áKÓK Éæg AGôªM AGôØ U AGö N QÉ ù d...

Page 22: ...iôNC G IÒ üdG á fó ŸG AÉ TC G hCG ZGÈdG hCG ÒeÉ ùŸG IôFGódG öüb ODƒj ób ôNBG EG ôW øe É üJG çhóM EG ODƒJ hCG hôëH áHÉ UE G ôWÉfl EG kÉ e ájQÉ ÑdG GôWC á FÉHô µdG jô G ôWÉfl á ùeÓe ÖæŒ ájQÉ ÑdG øe πFÉ S êôîj ób á Ø ù àdG hô dG 4 òdG Aõ G TG áaó üdÉH πFÉ ùdG Gòg á ùeÓe ádÉM πFÉ ùdG Gòg Ö WG Úæ d πFÉ ùdG á ùeÓe ádÉM h ôjõ dG AÉŸÉH πFÉ ùdG ùe EG ájQÉ ÑdG øe ÜöùàŸG πFÉ ùdG ODƒj ób kÉ jCG á Ñ dG IóYÉ ùŸ...

Page 23: ... ß ª b  N U Ø N d w Æ b R œ Í v Å U U î D O d ß ª b  F b _ U Ê b Ë Æ O U K F O M O s œ z L U ß ª b  F b _ U Ê q I M U Ÿ L C U œ K G U Ë c _ U Ê L U l K e K o Ë ª u Ë D U _ Ê b s ª U d b Ë À ù Å U U œ e Ÿ Í H p Ë H U Õ d w Æ q b A G O q π N U c Í F L q U D U Æ W Ë u œ H U Õ d w w π e b Ë s π N U M b A G O q Æ b º V w Å U U ª B O W Á ô L b Æ U p B q v U Ø s F b o Æ b O p U O s Ë º L p u U w Ø q _...

Page 24: ...24 ARABIC ...

Page 25: ...25 ARABIC B 2 1 3 4 5 6 7 8 9 10 A ...

Page 26: ...ustriala Area P O Box 9756 Doha Tel 974 4600230 4600525 Fax 974 4601338 Teyseer Industrial Supplies Services Co WLL 55 Al Wakalat St Between St 18 19 Salwa Industrial Area P O Box 40523 Doha Qatar Tel 974 4581536 Fax 974 4682024 SAUDI ARABIA Al Bahr Mohamed Ahmed Bin Afif Est P O Box 530 Yanbu Al Bahr Tel 966 4 3222626 3228867 Fax 966 4 3222210 Al Khobar Fawaz Ebrahim Al Zayani Trading Est P O Box ...

Page 27: ......

Page 28: ...WARRANTY REGISTRATION CARD YOUR NAME YOUR ADDRESS POSTCODE DATE OF PURCHASE DEALER S NAME ADDRESS PRODUCT MODEL NO KC4815 ù ß r F M u Ê d e d b Í U a A d ß r Ë M u Ê U z l ...

Reviews: