9
E N G L I S H
Tool does not start
◆
Check that the power cables are properly
connected.
◆
Check the mains fuses.
Tool vibrates strongly
◆
Carefully clean the line retainer.
◆
Check that the line retainer is firmly attached
and that it is not damaged. Have it repaired or
replaced if necessary.
◆
Check that the cutting line is present and
properly fitted.
◆
Check the cutting line for damage. Replace if
necessary.
PROTECTING THE ENVIRONMENT
Black & Decker provides a facility for
recycling Black & Decker products once
they have reached the end of their
working life. This service is provided free
of charge. To take advantage of this
service please return your product to any
authorised repair agent who will collect
them on our behalf.
You can check the location of your nearest
authorised repair agent by contacting your local
Black & Decker office at the address indicated in
this manual. Alternatively, a list of authorised
Black & Decker repair agents and full details of our
after-sales service and contacts are available on
the Internet at:
www.2helpU.com
.
GUARANTEE
Black & Decker is confident of the quality of its
products and offers an outstanding guarantee.
This guarantee statement is in addition to and in
no way prejudices your statutory rights.
The guarantee is valid within the territories of the
Member States of the European Union and the
European Free Trade Area.
◆
To switch the tool off, release the the
on/off switch.
Never attempt to lock a switch in the on
position.
Hints for optimum use
◆
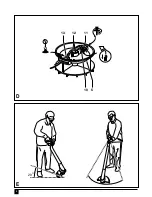
Hold the tool as shown in fig. E.
◆
Gently swing the trimmer from side to side as
shown in fig. E.
◆
When cutting long grass, work in stages from
the top.
◆
Keep the tool away from hard objects and
delicate plants.
◆
If the tool starts running slowly, reduce the load.
◆
In order to achieve optimum cutting results,
only cut dry grass.
◆
Replace the cutting line when worn.
MAINTENANCE
Your Black & Decker tool has been designed to
operate over a long period of time with a minimum of
maintenance. Continuous satisfactory operation
depends upon proper tool care and regular cleaning.
◆
Before performing any maintenance,
switch off and unplug the tool.
◆
Do not use any abrasive or solvent-
based cleaner.
◆
Regularly clean the ventilation slots in your tool
using a soft brush or dry cloth.
◆
Regularly clean the cutting line and line
retainer using a soft brush or dry cloth.
◆
Regularly use a blunt scraper to remove grass
and dirt from the underneath of the guard.
◆
Regularly check the cutting line for wear.
TROUBLESHOOTING
If your tool seems not to operate properly, follow
the instructions below. If this does not solve the
problem, please contact your local Black & Decker
repair agent.
Before proceeding, unplug the tool.
Summary of Contents for GL20
Page 1: ...1 GS1400 GL20 ...
Page 3: ...3 3 A B C 1 4 3 6 5 2 7 4 9 8 ...
Page 4: ...4 D E 20 11 13 12 10 5 ...
Page 56: ...55 ...
Page 57: ...56 ...
Page 58: ...57 ...

