8
Using an extension cable
Always use an approved extension cable suitable
for the power input of this appliance (see rating
plate). The extension cable must be suitable for
outdoor use.
◆
Before use, inspect the cable for signs of
damage, wear and ageing. Replace the
extension cable if damaged or defective.
◆
When using a cable reel, always unwind the
cable completely.
◆
Take care to keep the cable away from the
cutting line. Always be aware of the position of
the cable.
CARTON CONTENTS
The carton contains:
1 Grass trimmer
1 Guard with mounting screw
1 Pack with pieces of cutting line
1 Instruction manual
◆
Carefully unpack all parts.
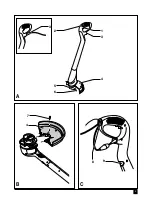
OVERVIEW (fig. A)
1. On/off switch
2. Handle
3. Power inlet (not for UK)
3. Mains cable (UK)
4. Guard
5. Line retainer
6. Cutting line
ASSEMBLY
Before assembly, make sure that the tool
is switched off and unplugged.
Fitting the guard (fig. B)
◆
Unplug the tool.
◆
Remove the screw (7) from the guard (4).
◆
Place the guard (4) onto the tool as shown.
◆
Firmly press the guard until it snaps into place.
◆
Secure the guard with the screw (7).
Never use the tool unless the guard is
properly fitted.
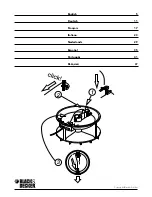
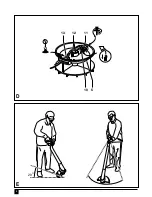
Fitting a new piece of cutting line (fig. C & D)
Replacement packs containing pieces of pre-cut
cutting line are available from your Black & Decker
dealer (cat. no. A5995). Alternatively, you can
purchase a pack containing 25 or 40 m of cutting
line (A6170/A6171) and cut the line into pieces of
177 mm each. The tool is equipped with a storage
compartment (9) for pieces of cutting line (fig. C).
◆
Unplug the tool.
◆
Remove any remaining cutting line from the
line retainer.
◆
Remove any dirt and grass from the line retainer.
1. Insert one end of a new piece of cutting line
into the hole (10).
2. Guide the line under the retaining clip (11) and
pull the line until it clicks into place.
3. Guide the line into the two slots (12) as shown
and thread the line through the exit hole (13).
◆
Make sure the line is securely fitted.
Only use 1.5 mm diameter Black & Decker
cutting line.
Connecting the tool to the mains (fig. A & C)
Unless the tool is fitted with a mains cable, you will
need to connect an extension cable to the power
inlet (3).
◆
Connect the female socket of a suitable
extension cable to the power inlet (3).
◆
Loop the cable through the cable restraint (8)
as shown to prevent the extension cable from
becoming detached during use.
◆
Insert the mains plug into a mains outlet.
The extension cable must be suitable for
outdoor use.
USE
Let the tool work at its own pace.
Do not overload.
Switching on and off (fig. A)
◆
To switch the tool on, push the on/off switch (1).
E N G L I S H
Summary of Contents for GL20
Page 1: ...1 GS1400 GL20 ...
Page 3: ...3 3 A B C 1 4 3 6 5 2 7 4 9 8 ...
Page 4: ...4 D E 20 11 13 12 10 5 ...
Page 56: ...55 ...
Page 57: ...56 ...
Page 58: ...57 ...

