background image

Page 4

HANDLING ALKALINE BATTERIES

1.  Should fluid from the battery accidentally get into your eyes, there is a threat 

of loss of eyesight, do not rub them. Immediately rinse your eyes with clean tap 
water and then consult a physician immediately.

2.  Do not put the battery in a fire, expose it to heat, dismantle or modify it. If the 

insulation or safety valve is damaged, the battery may leak fluid, overheat or 
explode.

3.  Do not insert the battery with the poles reversed. Doing so may cause some 

abnormality or a short and the battery may leak fluid, overheat or explode.

4.  Keep the battery out of the reach of children. If the battery is swallowed, contact 

a physician immediately.

5.  If the alkali fluid gets in your mouth, rinse your mouth with water and contact a 

physician immediately.

6.  If the alkali fluid gets on your skin or clothes, it may burn your skin, thoroughly 

rinse the affected area with tap water.

7.  Do not mix new and old batteries or other makes of batteries. The different 

attributes may cause the battery to leak fluid, overheat or explode.

8.  This battery was not made to be recharged. Recharging this battery may damage 

the insulation or internal structure and may cause the battery to leak fluid, 
overheat or explode.

9.  Do not damage or remove the label on the exterior of the battery. Doing so may 

cause the battery to short, leak fluid, overheat or explode.

10.  Do not drop, throw or expose the battery to extreme impact. Doing so may cause 

the battery to leak fluid, overheat or explode.

11.  Do not alter the shape of the battery. If the insulation or safety valve is damaged, 

the battery may leak fluid, overheat or explode.

12.  Immediately remove batteries when they have lost all power. Leaving the 

batteries in the unit for a long time may cause the batteries to leak fluid, overheat 
or explode due to gas that is generated by the batteries.

13.  Remove the batteries from the unit when not using the unit for an extended 

period of time. The batteries may leak fluid, overheat or explode due to gas that is 
generated by the batteries.

14.  Do not apply solder directly to the batteries. The heat may cause the batteries to 

leak fluid, overheat or explode. 

15.  Do not get the batteries wet. Doing so may cause the batteries to overheat
16.  Store batteries someplace out of direct sunlight where the temperature and 

humidity are not high. Not doing so may cause the batteries to leak fluid, 
overheat or explode. Also, it may cause the life and performance of the batteries 
to decline.

17.  Follow the regulations of the local government when disposing of these batteries.
18.  NEVER mix alkaline, standard (carbon-zinc), rechargeable (nickel-cadmium) 

batteries with this product.

SAVE THESE INSTRUCTIONS 

HOUSEHOLD USE ONLY

    WARNING

When handling alkaline batteries, basic safety precautions

should be followed, including the following

SAFETY INFORMATION

Summary of Contents for BP05PWA

Page 1: ...xperience a problem with your BLACK DECKER purchase go to www blackanddecker com instantanswers If you can t find the answer or do not have access to the Internet call 844 299 0879 from 10 30 a m to 6 30 p m EST Mon Fri to speak with an agent Please have the catalog number available when you call SAVE THIS MANUAL FOR FUTURE REFERENCE CATALOG NUMBER BP05PWA BP06PWA ...

Page 2: ...rchase PRODUCT REGISTRATION CONTENTS SAFETY INFORMATION Important Safety Instructions 3 4 Grounding Instructions 5 LCDI Power Cord and Plug 6 Safety Guidelines 7 8 SET UP USE Parts Features 9 Specifications 10 Installation Guide 10 Window Slider Kit Installation 11 Exhaust Hose Installation 12 Control Panel 13 Operating from the Control Panel 13 14 Operating from the Remote Control 15 19 Water Dra...

Page 3: ...ea where the atmosphere contains combustible gases or where the atmosphere is oily or sulphurous Avoid any chemical coming in contact with your air conditioner 9 Do not place any object on the top of the unit 10 Never operate the air conditioner without filters in place 11 Do not use the air conditioner near a bathtub shower or wash basin 12 This appliance is not intended for use by persons includ...

Page 4: ... the battery to short leak fluid overheat or explode 10 Do not drop throw or expose the battery to extreme impact Doing so may cause the battery to leak fluid overheat or explode 11 Do not alter the shape of the battery If the insulation or safety valve is damaged the battery may leak fluid overheat or explode 12 Immediately remove batteries when they have lost all power Leaving the batteries in t...

Page 5: ... or without yellow stripes is the equipment grounding conductor If repair or replacement of the cord or plug is necessary do not connect the equipment grounding conductor to a live terminal Check with a qualified electrician or service person if the grounding instructions are not completely understood or if in doubt as to whether the appliance is properly grounded Do not modify the plug connected t...

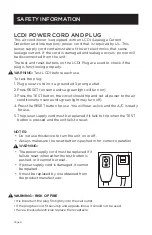
Page 6: ... all power to the air conditioner on some units green light may turn off 4 Press the RESET button for use You will hear a click and the A C is ready for use 5 The power supply cord must be replaced if it fails to trip when the TEST button is pressed and the unit fails to reset NOTES Do not use this device to turn the unit on or off Always make sure the reset button is pushed in for correct operati...

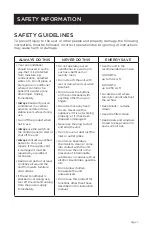
Page 7: ... air conditioner is knocked over during use turn off the unit and unplug from the power supply immediately Do not operate your air conditioner in a wet room such as a bathroom or laundry room Do not touch the unit with wet or damp hands or when barefoot Do not press the buttons on the control panel with anything other than your fingers Do not remove any fixed covers Never use this appliance if it ...

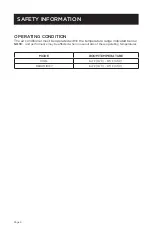
Page 8: ...he air conditioner must be operated within the temperature range indicated below NOTE Unit performance may be affected when in use outside of these operating temperatures MODE ROOM TEMPERATURE COOL 64 F 18 C 95 F 35 C DEHUMIDIFY 64 F 18 C 95 F 35 C ...

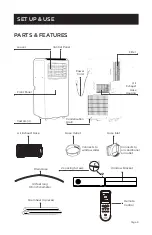
Page 9: ...Locking Screws Page 9 Foam Seal 3 pieces Louver Control Panel Castors 4 Power Cord Condensation Drain Hose Inlet Connects to air conditioner air outlet Hose Outlet Connects to window slider Front Panel Air Exhaust Hose Housing Filter Drain Hose 3 3 feet long 0 6 inch diameter ...

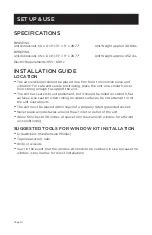
Page 10: ...ters to aid placement but it should be rolled on smooth flat surfaces Use caution when rolling on carpet surfaces Do not attempt to roll the unit over objects The unit must be placed within reach of a properly rated grounded socket Never place any obstacles around the air inlet or outlet of the unit Allow 12 inches to 36 inches of space from the wall with window for efficient air conditioning SUGG...

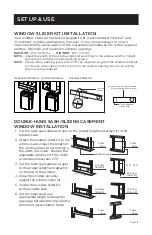
Page 11: ...LATION 1 Cut the foam seal adhesive type to the proper length and attach it to the window sash 2 Attach the window slider kit to the window sash Adjust the length of the window slider kit according to the width of window Shorten the adjustable window kit if the width of window is less than 27 5 3 Cut the foam seal adhesive type to the proper length and attach it on the top of the window 4 Close th...

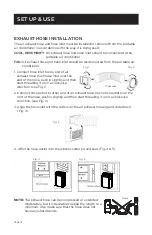
Page 12: ...he hose push in slightly and then start threading it on in a clockwise direction see Fig 1 2 Connect hose outlet to other end of air exhaust hose Push hose outlet over the end of the hose push in slightly and then start threading it on in a clockwise direction see Fig 2 3 Align the hose inlet with the slots over the air exhaust housing and slide down Fig 3 4 Affix the hose outlet into the window s...

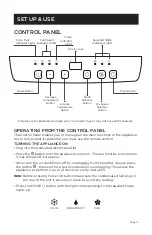
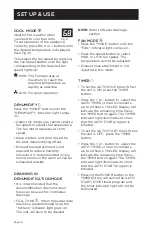
Page 13: ...ditioner off by unplugging from the outlet Always press the button then wait for a few minutes before unplugging This allows the appliance to perform a cycle of checks to verify operation Note Before pressing Power On button make sure the condensate drain plug in the rear of the unit is securely in place to avoid any leaking Press the MODE button until the light corresponding to the required Mode ...

Page 14: ...hen the water level reaches a predetermined level the full tank indicator light goes on The unit will have to be drained NOTE Refer to Water Drainage section FAN MODE Press the MODE button until the FAN indicator light comes on Press the speed button to select HIGH or LOW fan speed The temperature cannot be adjusted Exhaust hose attachment is not required in this mode TIMER To set the AUTO STOP ti...

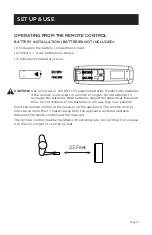
Page 15: ...t used for a month or longer Do not attempt to recharge the batteries Both batteries should be replaced at the same time Do not dispose of the batteries in a fire as they man explode Point the remote control at the receiver on the appliance The remote control must be no more than 7 meters away from the appliance without obstacle between the remote control and the receiver The remote control must b...

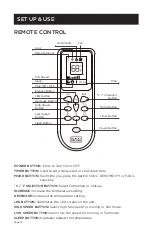
Page 16: ... DECREASE Decrease the temperature setting LED BUTTON Illuminates the LED screen on the unit HIGH SPEED BUTTON Select high fan speed for Cooling or Fan mode LOW SPEED BUTTON Select low fan speed for Cooling or Fan mode SLEEP BUTTON Gradually adjusts the temperature Fan Fan Speed LED Button F C Selector Button High Speed Button Mode Button Time Timer Button Power Button Low Speed Button Sleep Dehum...

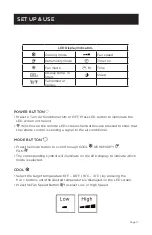
Page 17: ...de button to scroll through COOL DEHUMIDIFY FAN The corresponding symbol will illuminate on the LED display to indicate which mode is selected COOL Select the target temperature 61 F 88 F 16 C 31 C by pressing the or buttons until the desired temperature is displayed on the LED screen Press the Fan Speed Button to select Low or High Speed LED Display Indicators Cooling mode Fan speed Dehumidify mo...

Page 18: ...Draining in Dehumidify mode It is recommended that the dehumidification drain and drain hose be used for continuous drainage FULL TANK When the water level reaches a predetermined level the full tank indicator light goes on The unit will have to be drained NOTE Refer to Water Drainage section In this mode fan speed is selected automatically by the appliance and can not be set manually FAN Press th...

Page 19: ...ME by 1 hour increments up to 24 hours The Remote LCD Display will indicate the selected time Press the TIMER button again to set the selected time There will be a steady TIME ON OFF symbol on the remote LCD display and the TIMER indicator light will be illuminated on the control panel of the unit to show that the AUTO START program is initiated Pressing the POWER button or the TIMER button will c...

Page 20: ... over your basement floor or drip pan not included Remove the bottom drain cap Let the water drain away and replace the drain cap Restart the machine until the error codes E2 or E4 disappears If the error repeats call for service NOTE Be sure to reinstall the bottom drain plug before using the unit Continuous Draining Unplug the unit from the power source Remove the bottom drain cap While doing th...

Page 21: ...your air conditioner working efficiently you should clean the evaporator filter every week of operation The filter is housed in the intake grill Use a vacuum cleaner to remove dust accumulations from the filter If it is very dirty immerse in warm water and rinse a number of times The water should be luke warm After washing leave the filter to dry then re insert the filter START END OF SEASON OPERA...

Page 22: ...refrigerants safely in accordance with an industry recognized assessment specification WARNING Do not use means to accelerate the defrosting process or to clean other than those recommended by the manufacturer WARNING Servicing shall only be performed as recommended by the equipment manufacturer Maintenance and repair requiring the assistance of other skilled personnel shall be carried out under t...

Page 23: ...ove the heat sources if possible C Connect the duct and make sure it can function properly D Decrease the set temperature E Clean the air filter F A mircoprocessor control delays the compressor from operating until 3 mins have passed Noisy or vibration A The surface is not level or not flat enough A Place the unit on a flat level surface if possible Unit does not run and water full indicator light...

Page 24: ...lls to repair or replace the house fuse reset the circuit breaker or correct the wiring in the house REPAIR OR REPLACEMENT AS PROVIDED UNDER THIS WARRANTY IS THE EXCLUSIVE REMEDY OF THE CUSTOMER BLACK DECKER SHALL NOT BE LIABLE FOR ANY INCIDENTAL OR CONSEQUENTIAL DAMAGES FOR BREACH OF ANY EXPRESS OR IMPLIED WARRANTY ON THIS PRODUCT EXCEPT TO THE EXTENT PROHIBITED BY APPLICABLE LAW ANY IMPLIED WARR...

Page 25: ...a particular installation If this equipment does cause harmful interference to radio or television reception which can be determined by turning the equipment off and on the user is encouraged to try to correct the interference by one or more of the following measures a Reorient or relocate the receiving antenna b Increase the separation between the equipment and the receiver c Connect the equipmen...

Page 26: ...Page 26 ...

Page 27: ...roblème avec votre achat BLACK DECKER allez sur www blackanddecker com instantanswers Si vous ne trouvez pas la réponse ou n avez pas accès à l internet appelez au 844 299 0879 de 10 h 30 à 18 h 30 HNE du lundi au vendredi pour parler avec un agent Veuillez avoir le numéro de catalogue disponible lorsque vous appelez GARDEZ CE MANUEL POUR RÉFÉRENCE FUTURE NUMÉRO DE CATALOGUE BP05PWA BP06PWA ...

Page 28: ...IÈRES INFORMATION SUR LA SÉCURITÉ Consignes De Sécurité Importantes 29 30 Instructions De Mise À La Terre 33 Cordon d Alimentation Et Prise DICF 32 Directives De Sécurité 33 CONFIGURATION ET UTILISATION Pièces Et Caractéristiques 35 Spécifications 36 Guide d Installation 36 Installation Du Kit De Glissière De Fenêtre 37 Installation Du Tuyau d Échappement 38 Panneau De Configuration 39 Fonctionnem...

Page 29: ...one où l atmosphère contient des gaz combustibles ou est huileux ou sulfureux Évitez tout contact chimique avec votre climatiseur 9 Ne placez aucun objet sur le dessus de l unité 10 Ne jamais faire fonctionner le climatiseur sans les filtres en place 11 N utilisez pas le climatiseur à proximité d une baignoire d une douche ou d un lavabo 12 Cet appareil n est pas destiné à être utilisé par des per...

Page 30: ...it une fuite de liquide une surchauffe ou une explosion de la pile 10 N échappez pas ne jetez pas et n exposez pas la pile à des chocs extrêmes Ceci pourrait provoquer une fuite de liquide une surchauffe ou une explosion de la pile 11 Ne modifiez pas la forme de la pile Si l isolation ou la soupape de sécurité est endommagée la pile peut fuir du liquide surchauffer ou exploser 12 Enlevez immédiate...

Page 31: ...t le conducteur de mise à la terre de l équipement Si la réparation ou le remplacement du cordon ou de la fiche est nécessaire ne connectez pas le conducteur de mise à la terre de l équipement à une borne sous tension Vérifier avec un électricien ou un technicien qualifié si les instructions de mise à la terre ne sont pas entièrement comprises ou en cas de doute quant à savoir si l appareil est co...

Page 32: ...climatiseur sur certaines unités le voyant vert peut s éteindre 4 Appuyez sur la touche RESET pour l utiliser Vous entendrez un clic et le climatiseur est prêt pour utilisation 5 Le cordon d alimentation doit être remplacé s il ne se déclenche pas quand la touche TEST est enfoncé et l appareil ne se réinitialise pas REMARQUES N utilisez pas ce dispositif pour allumer ou éteindre l appareil Assurez...

Page 33: ...tiseur est renversé pendant l utilisation éteignez l appareil et débranchez de l alimentation immédiatement Ne faites pas fonctionner votre climatiseur dans une pièce humide comme une salle de bain ou buanderie Ne touchez pas l appareil avec les mains mouillées ou humides ou pieds nus N appuyez pas sur les boutons sur le panneau de commande avec autre chose que vos doigts N enlevez aucun couvercle...

Page 34: ...climatiseur doit fonctionner dans la gamme de températures indiquée ci dessous REMARQUE Les performances de l unité peuvent être affectées lorsqu elle est utilisée en dehors de ces températures de fonctionnement MODE TEMPÉRATURE AMBIANTE COOL 64 F 18 C 95 F 35 C DÉSHUMIDIFIER 64 F 18 C 95 F 35 C ...

Page 35: ...rsienne Panneau De Commande Roulettes 4 Fiche Drain De Condensation Sortie De Tuyau Se connecte à sortie d air du climatiseur Entrée De Tuyau Se connecte au curseur de fenêtre Panneau avant Boîtier De Tuyau d Échappement d Air Filtre Tuyau de drainage 3 3 pieds de long 0 5 pouce de diamètre FRANÇAIS PIÈCES ET CARACTÉRISTIQUES ...

Page 36: ...r des surfaces de tapis N essayez pas de rouler l unité par dessus des objets L appareil doit être placé à portée d une prise de courant correctement mise à la terre Ne placez jamais d obstacles autour de l entrée ou de la sortie d air de l unité Laissez 12 pouces à 36 pouces d espace du mur avec la fenêtre pour une climatisation efficace OUTILS SUGGÉRÉS POUR L INSTALLATION DU KIT DE FENÊTRE Tourn...

Page 37: ...chez le au châssis de la fenêtre 2 Fixez le kit de glissière de fenêtre au châssis de fenêtre Ajustez la longueur du kit de glissière de fenêtre selon la largeur de la fenêtre Raccourcir le kit de fenêtre réglable si la largeur de la fenêtre est inférieure à 27 5 3 Coupez le joint en mousse type adhésif à la bonne longueur et attachez le en haut de la fenêtre 4 Fermez bien la fenêtre contre le kit...

Page 38: ...urnez dans le sens horaire ou antihoraire pour sécuriser Fig 1 2 Alignez la flèche du tuyau de sortie et du tuyau Tournez dans le sens horaire ou antihoraire pour sécuriser Fig 2 3 Fixez l entrée du tuyau à l arrière de l unité Glissez dessus Fig 3 4 Fixez le tuyau de sortie dans le kit de glissière de fenêtre et le joint Fig 4 et 5 REMARQUE Le tuyau d échappement peut être comprimé ou rallongé mo...

Page 39: ...our exploiter pleinement son potentiel vous devez utiliser la télécommande ALLUMER L APPAREIL Branchez le dans la prise électrique dédiée Appuyez sur la touche jusqu à ce que l appareil s allume La dernière fonction active quand il a été désactivé apparaîtra N éteignez jamais le climatiseur en le débranchant de la prise Appuyez toujours sur la touche puis attendez quelques minutes avant de débranc...

Page 40: ...ur un drainage continu RÉSERVOIR PLEIN Lorsque le niveau d eau atteint un niveau prédéterminé le voyant réservoir plein s allume L unité devra être vidangée REMARQUE Reportez vous à la section Drainage de l eau MODE VENTILATEUR Appuyez sur le bouton MODE jusqu à ce que le voyant FAN s allume Appuyez sur le bouton de vitesse pour sélectionner la vitesse du ventilateur HIGH ou LOW La température ne ...

Page 41: ...est pas utilisée pendant un mois ou plus N essayez pas de rechargez les piles Les deux piles doivent être remplacées en même temps Ne jetez pas les piles au feu car elles peuvent exploser Pointez la télécommande vers le récepteur de l appareil La télécommande ne doit pas être à plus de 7 mètres de l appareil sans obstacle entre la télécommande et le récepteur La télécommande doit être manipulée av...

Page 42: ...rature BOUTON LED Illumine l écran LED de l unité BOUTON HAUTE VITESSE Sélectionnez la vitesse élevée du ventilateur pour le mode Refroidissement ou Ventilateur BOUTON BASSE VITESSE Sélectionnez une vitesse de ventilation basse pour le mode Refroidissement ou Ventilateur BOUTON SLEEP ajuste progressivement la température Vitesse du ventilateur Bouton LED C F Bouton haute vitesse Bouton de mode Tem...

Page 43: ...pour faire défiler COOL DÉSHUMIDIFIER VENTILATEUR Le symbole correspondant s allumera sur l affichage LED pour indiquer le mode sélectionné COOL Sélectionnez la température cible 61 F 88 F 16 C 31 C en appuyant sur boutons ou jusqu à ce que la température souhaitée s affiche sur l écran LED Appuyez sur le bouton Fan Speed pour sélectionner Low ou High Speed Indicateurs d affichage à LED Mode de re...

Page 44: ...dange en mode Déshumidification Il est recommandé d utiliser le drain de déshumidification et le tuyau de vidange pour un drainage continu RÉSERVOIR PLEIN Lorsque le niveau d eau atteint un niveau prédéterminé le témoin lumineux réservoir plein s allume L unité devra être vidangée REMARQUE Reportez vous à la section Drainage de l eau In this mode fan speed is selected automatically by the applianc...

Page 45: ...r le bouton ou pour sélectionner l HEURE AUTO par incréments d une heure jusqu à 24 heures L écran LCD à distance indiquera l heure sélectionnée Appuyez à nouveau sur le bouton TIMER pour régler l heure sélectionnée Il y aura un symbole TIME ON OFF fixe sur l écran LCD à distance et le voyant TIMER s allumera sur le panneau de commande de l unité pour indiquer que le programme AUTO START est lancé...

Page 46: ...re sous sol ou un bac de vidange non inclus Retirez le bouchon de vidange inférieur Laissez l eau s écouler et replacez le bouchon de vidange Redémarrez la machine jusqu à ce que les codes d erreur E2 ou E4 disparaît Si l erreur se répète appelez le service REMARQUE Assurez vous de réinstaller le bouchon de vidange inférieur avant d utiliser l unité Vidange Continue pour le Mode Refroidissement Dé...

Page 47: ...cacement vous devez nettoyer lle filtre de l évaporateur chaque semaine de fonctionnement Le filtre est logé dans la grille d admission Utilisez un aspirateur pour éliminer les accumulations de poussière du filtre S il est très sale plongez le dans de l eau tiède et rincez plusieurs fois L eau devrait être tiède Après le lavage laissez le filtre sécher puis réinsérez le filtre OPÉRATIONS DE DÉBUT ...

Page 48: ...ification d évaluation reconnue par l industrie AVERTISSEMENT N utilisez pas de moyens pour accélérer le processus de dégivrage ou pour nettoyer autrement que ceux recommandés par le fabricant AVERTISSEMENT L entretien ne doit être effectué que conformément aux recommandations du fabricant de l équipement La maintenance et les réparations nécessitant l assistance d autres personnes qualifiées doiv...

Page 49: ...nnectez le conduit et assurez vous qu il peut fonctionner correctement D Diminuez la température réglée E Nettoyez le filtre à air F Une commande par microprocesseur retarde le fonctionnement du compresseur jusqu à ce que 3 minutes se soient écoulées Bruyant ou vibration A La surface n est pas de niveau ou pas assez plane A Placez l appareil sur une surface plane et de niveau si possible L unité n...

Page 50: ...ice pour réparer ou remplacer le fusible de la maison réinitialiser le disjoncteur ou corriger le câblage dans la maison LA RÉPARATION OU LE REMPLACEMENT TELS QUE PRÉVUS DANS LA PRÉSENTE GARANTIE SONT LE RECOURS EXCLUSIF DU CLIENT BLACK DECKER NE SERA PAS RESPONSABLE DES DOMMAGES ACCESSOIRES OU INDIRECTS POUR LA VIOLATION DE TOUTE GARANTIE EXPRESSE OU IMPLICITE SUR CE PRODUIT SAUF DANS LA MESURE I...

Page 51: ...l numérique de classe B conformément à la partie 15 des règles FCC Ces limites sont conçues pour fournir une protection raisonnable contre les interférences nuisibles dans une installation résidentielle Cet équipement génère utilise et peut émettre de l énergie radiofréquence et s il n est pas installé et utilisé conformément aux instructions peut provoquer des interférences nuisibles aux communic...

Page 52: ...Page 52 ...

Page 53: ...gún problema con su producto de BLACK DECKER vaya a www blackanddecker com instantanswers Si no puede encontrar la respuesta a su pregunta o no tiene acceso a Internet llame al 844 299 0879 de 10 30 a 18 30 EST de lunes a viernes para hablar con un agente Por favor tenga el número de catálogo a mano cuando llame GUARDE ESTE MANUAL PARA SU REFERENCIA EN EL FUTURO NÚMERO DE CATÁLOGO BP05PWA BP06PWA ...

Page 54: ...Page 54 ...

Page 55: ...MACIÓN DE SEGURIDAD Instrucciones importantes de seguridad 56 57 Instrucciones de conexión a tierra 58 Cable de alimentación y enchufe LCDI 59 Pautas de seguridad 60 CONFIGURACIÓN Y USO Partes y características 62 Especificaciones 63 Guía de instalación 63 Instalación del kit de ventana deslizante 64 Instalación de la manguera de evacuación 65 Panel de control 66 Operación desde el panel de contro...

Page 56: ...re acondicionado en cualquier zona donde la atmósfera contenga gases combustibles o donde la atmósfera sea oleosa o sulfurosa Evite que su aire acondicionado entre en contacto con cualquier químico 9 No coloque ningún objeto sobre la unidad 10 Nunca opere el acondicionador de aire sin los filtros en su lugar 11 No use el aire acondicionado cerca de una bañera ducha o un lavabo 12 Este aparato no e...

Page 57: ...er que la batería pierda líquido se sobrecaliente o explote 10 No deje caer tire o exponga la pila a impactos extremos Hacerlo puede causar que la batería pierda líquido se sobrecaliente o explote 11 No altere la forma de la pila Si el aislamiento o la válvula de seguridad se dañan la batería puede perder líquido sobrecalentarse o explotar 12 Quite las baterías inmediatamente cuando hayan perdido ...

Page 58: ...or de puesta a tierra del equipo Si es necesario reparar o reemplazar el cable eléctrico o el enchufe no conecte el conductor de conexión a tierra del equipo a un terminal activo Consulte con un electricista calificado o personal de servicio si las instrucciones de puesta a tierra no se entienden completamente o si tiene dudas sobre si el aparato está conectado a tierra correctamente No modifique ...

Page 59: ...rse y cortar toda la energía al aire acondicionado en algunas unidades la luz verde puede apagarse 4 Presione el botón RESET para poder usar el aparato nuevamente Oirá un clic y el aire acondicionado estará listo para usarse nuevamente 5 El cable de suministro eléctrico debe reemplazarse si no se dispara cuando se presiona el botón TEST y la unidad no se reinicia NOTAS No use este dispositivo para...

Page 60: ...ante el uso apáguelo y desenchúfelo de la alimentación eléctrica inmediatamente No opere su aire acondicionado en una habitación húmeda como un baño o un cuarto de lavado No toque la unidad con las manos mojadas o húmedas o descalzo No presione los botones en el panel de control con cualquier otra cosa que no sean sus dedos No retire ninguna cubierta fija Nunca use este aparato si no está funciona...

Page 61: ...cionado debe ser operado dentro del rango de temperatura indicado a continuación NOTA El desempeño de la unidad puede verse afectado cuando se utilice fuera del rango de temperaturas de operación MODO TEMPERATURA AMBIENTE FRÍO 64 F 18 C 95 F 35 C DESHUMIDIFICAR 64 F 18 C 95 F 35 C ...

Page 62: ...Enchufe Drenaje de condensación Salida de la manguera Se conecta a salida de aire del aire acondicionado Entrada de la manguera Se conecta al control deslizante de la ventana Panel frontal Aire Cansada Manguera Alojamiento Filtro Manguera de drenaje 3 3 pies de largo 1 m 0 5 pulgadas de diámetro 12 7 mm ESPAÑOL PARTES Y CARACTERÍSTICAS CONFIGURACIÓN Y USO ...

Page 63: ...ero debe ser movido sobre superficies lisas y planas Tenga precaución al moverlo sobre superficies alfombradas No intente mover la unidad sobre objetos La unidad debe ser colocada dentro del alcance de una toma de corriente debidamente conectada a tierra y que soporte los requerimiento eléctricos Nunca coloque obstáculos alrededor de las entradas o salidas de aire de la unidad Deje un espacio de e...

Page 64: ...A ABATIBLE O PIVOTANTE INSTALACIÓN EN VENTANA 1 Corte el sello de espuma tipo adhesivo a la longitud correcta y adjúntelo a la hoja de la ventana 2 Fije el kit de ventana a la hoja de la ventana Ajuste la longitud del kit de ventana según el ancho de la ventana Acorte el kit de ventana ajustable si el ancho de la ventana es inferior a 27 5 3 Corte el sello de espuma tipo adhesivo a la longitud cor...

Page 65: ...chas de la entrada de la manguera y la manguera Gire en sentido horario o antihorario para fijarlas Fig 1 2 Alinee la flecha de la salida de la manguera y la manguera Gire en sentido horario o antihorario para fijarla Fig 2 3 Conecte la manguera de entrada a la parte posterior de la unidad Fig 3 4 Coloque la manguera de salida en el kit de ventana y selle adecuadamente Fig 4 y 5 NOTA La manguera d...

Page 66: ... su potencial debe utilizar el control remoto ENCENDER EL APARATO Enchúfelo en una toma de corriente dedicada Aparecerán dos líneas en la pantalla que indican que el aparato está en espera Presione el botón hasta que el aparato se encienda Aparecerá la última función activa antes de apagarse Nunca apague el aire acondicionado desenchufándolo de la toma de corriente Siempre presione el botón luego ...

Page 67: ... agua alcanza un nivel predeterminado se enciende la luz indicadora de tanque lleno La unidad deberá drenarse NOTA Consulte la sección Drenaje de agua MODO DE VENTILADOR Presione el botón MODE hasta que se encienda la luz indicadora FAN Presione el botón de velocidad para seleccionar la velocidad del ventilador ALTA o BAJA No se puede ajustar la temperatura No se requiere la conexión de la manguer...

Page 68: ...e las pilas si el control remoto no será usado durante un mes o más No intente recargar las baterías Ambas baterías deben ser remplazadas a la misma vez No arroje las baterías al fuego ya que podrían explotar Apunte el control remoto al receptor del aparato El control remoto debe estar a menos de 7 metros del aparato sin obstáculos entre el control remoto y el receptor El control remoto debe manip...

Page 69: ...ra BOTÓN LED Ilumina la pantalla LED de la unidad BOTÓN DE ALTA VELOCIDAD selecciona la velocidad alta del ventilador para el modo de enfriamiento o ventilador BOTÓN DE BAJA VELOCIDAD seleccione la velocidad baja del ventilador para el modo Enfriamiento o Ventilador BOTÓN SLEEP ajusta gradualmente la temperatura Ventilador Velocidad del ventilador Botón LED Boton Selector F C Botón de alta velocid...

Page 70: ...y húmedas para que el aire caliente pueda salir al exterior Drenaje en modo Deshumidificar Se recomienda que el drenaje de deshumidificación y la manguera de drenaje se utilicen para un drenaje continuo TANQUE LLENO Cuando el nivel del agua alcanza un nivel predeterminado se enciende la luz indicadora de tanque lleno La unidad deberá drenarse NOTA Consulte la sección Drenaje de agua En este modo e...

Page 71: ...d para mostrar que se inició el programa AUTO STOP Para configurar el temporizador de INICIO AUTOMÁTICO Cuando la unidad esté apagada presione el botón TIMER El símbolo de HORA ENCENDIDO APAGADO en la pantalla LCD remota parpadeará Presione el botón o para seleccionar la HORA AUTOMÁTICA en incrementos de 1 hora hasta 24 horas La pantalla LCD remota indicará la hora seleccionada Presione el botón T...

Page 72: ...le Presione el botón SLEEP para activar En el modo FRÍO la temperatura aumentará 1 F después de una hora y 2 F después de 2 horas Para cancelar este ajuste presione el botón SLEEP nuevamente C F BOTÓN SELECTOR Cuando el aparato esté encendido presione el botón C F luego puede seleccionar la unidad de temperatura entre Fahrenheit o Celsius ESPAÑOL ...

Page 73: ...ncluded Remove the bottom drain cap Let the water drain away and replace the drain cap Restart the machine until the error codes E2 or E4 disappears If the error repeats call for service NOTA Asegúrese de volver a colocar el tapón del desagüe en la parte inferior antes de usar la unidad Drenaje continuo para el modo de frío Desenchufe la unidad de la fuente de alimentación Retire la tapa inferior ...

Page 74: ...ar el filtro del evaporador cada semana mientras esté en uso El filtro está alojado en la rejilla de entrada Utilice una aspiradora para eliminar la acumulación de polvo del filtro Si está muy sucio sumérjalo en agua tibia y enjuáguelo varias veces El agua debe estar tibia Después del lavado deje que el filtro se seque al aire y vuelva a insertarlo OPERACIONS DE INICIO FIN DE TEMPORADA COMPROBACIO...

Page 75: ...ura de acuerdo con una evaluación reconocida por la industria ADVERTENCIA No utilice medios para acelerar el proceso de descongelación o para la limpieza que no sean los recomendados por el fabricante ADVERTENCIA El servicio técnico deberá ser ejecutado según lo recomendado por el fabricante del equipo El mantenimiento y la reparación que requieran la asistencia de otro personal calificado se llev...

Page 76: ... de calor de ser posible C Conecte el conducto y asegúrese de que pueda funcionar correctamente D Disminuya la temperatura configurada E Limpie el filtro de aire F Un control del microprocesador retrasa al compresor para que no funcione hasta que hayan pasado 3 minutos Ruido o vibración A La superficie no está nivelada o no es lo suficientemente plana A Coloque la unidad sobre superficie plana y n...

Page 77: ...u producto 13 Llamadas de servicio para reparar o reemplazar el fusible de la casa reiniciar el disyuntor o corregir el cableado de la casa LA REPARACIÓN O EL REMPLAZO COMO SE ESTABLECE EN ESTA GARANTÍA SON LA SOLUCIÓN EXCLUSIVA DEL CLIENTE BLACK DECKER NO SERÁ RESPONSABLE POR NINGÚN DAÑO INCIDENTAL O EN CONSECUENCIA POR INCUMPLIMIENTO DE CUALQUIER GARANTÍA EXPRESA O IMPLÍCITA DE ESTE PRODUCTO EXC...

Page 78: ...esidencial Este equipo genera usa y puede irradiar energía de radiofrecuencia y si no se instala y usa de acuerdo con las instrucciones puede causar interferencias dañinas en las comunicaciones por radio Sin embargo no hay garantía de que la interferencia no ocurra en una instalación en particular Si este equipo causa interferencia dañina en la recepción de radio o televisión lo cual puede determi...

Page 79: ......

Page 80: ...e Black Decker Corporation usados bajo licencia Todos los derechos reservados El producto en esta caja puede diferir levemente de la imagen No afecta su función No todos los accesorios que se muestran en la fotografía están incluidos en este paquete Importado por W Appliance Inc 1356 Broadway Nueva York NY 10018 Enero de 2021 Impreso en China ...

Reviews: