CB-100-1
45
4.4.1
Mounting work for through-switch cabinet
mounting
Information
In through-switch cabinet mounting, all built-in
VARIPACK fans have to be replaced with fans
of a higher enclosure class (IP54). These fans
will be delivered as through-switch cabinet
mounting kit together with the gasket and a
power connection cable fixture suitable for
through-cabinet mounting! For the replacement
of the fans, see chapter Replacing fans in the
heat sink, page 69.
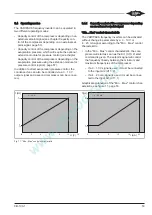
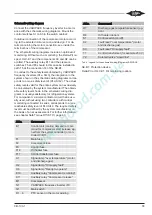
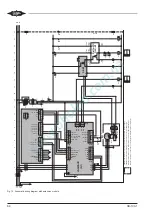
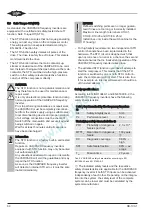
Graphical explanations, see figure 7, page 46 and see
figure 8, page 47.
• Unscrew the fixing plates (Torx screws).
• Dismount the upper (A) and lower (B) housing cover.
Dismounting the upper housing cover:
FDU+6 and FDU+12:
To allow the upper housing cover to be slid forwards
and dismounted, with these types the control device
must be dismounted (see figure 7, page 46).
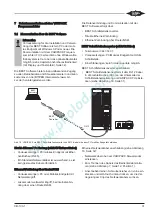
Dismounting the control module (see figure 7, page
46):
1. First pull the control panel forwards and take it off.
2. Unscrew the screw in the centre of the control mod-
ule, slide the control module cover slightly down-
wards and take it off.
3. Unscrew the captive screw and slightly lift the con-
trol module at the lower edge.
4. Slide the control module upwards as far as it will go
and then take off the frequency inverter.
• Now compress the plastic clip under the upper hous-
ing cover (A). This will open the lock.
• Slide the cover forwards and take it off.
FEU+16 .. FKU+260:
With these types, the control module does not need to
be dismounted, in order to take off the housing cover
(see figure 8, page 47).
• Introduce a screwdriver far into the slot of the upper
housing cover (A) and press the clip towards the
right. This will open the lock.
• Next, slide the housing cover downwards.
Dismounting the lower housing cover:
• Introduce the screwdriver into the slot of the lower
housing cover (B) and press it slightly towards the
left. This will open the lock.
• Next, slide the lower housing cover downwards.
• In the accessories kit: Place the delivered gasket (D)
around the frequency inverter in such a way that the
free space between the switch cabinet wall (C) and
the FI is sealed airtight.
• Mount the VARIPACK frequency inverter to the
switch cabinet wall using 4 fixing screws (E) (see fig-
ure 8, page 47).
FGU+32 .. FKU+260:
• With these types, the additional lateral fastening
clips must be fixed with screws. They are included in
the through-switch cabinet mounting kit.
Then replace upper and lower housing covers or slide
them on until the plastic clips lock.
Information
If mounting is continued directly with the electric
connection, the lower housing cover can remain
unmounted.
FDU+6 and FDU+12:
• Replace control module and slide it upwards until the
clip locks.
• Screw in captive screw.
• Place the control module cover until the clip locks
and tighten it.
Summary of Contents for VARIPACK FDU+12
Page 12: ...CB 100 1 12 1 2 3 4 Abb 7 Steuremodul abmontieren...
Page 46: ...CB 100 1 46 1 2 3 4 Fig 7 Dismounting the control module...
Page 70: ...Notes...
Page 71: ...Notes...

