11
www.bioneer.com
BQ-042-101-12
Revision : 0 (2018-07-05)
ExiPrep
™
96 Lite
3.
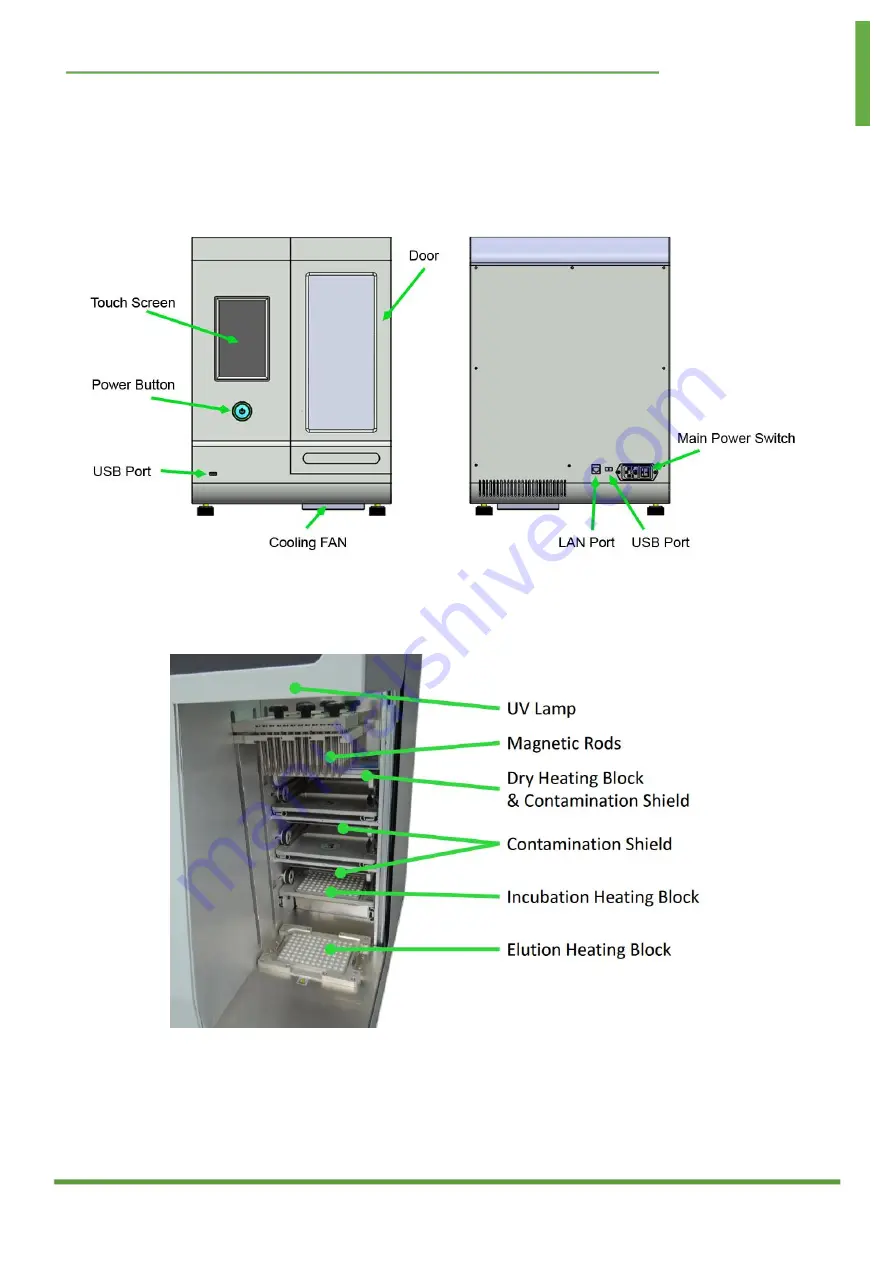
Instrument structure and name
(1)
Outside
<Outside>
(2)
Inside
<Inside 1>
Page 1: ...ExiPrep 96 Lite Automated NA Purification System 35 15 MT Promedt Consulting GmbH Altenhofstr 80 D 66386 St Ingbert Germany Tel 49 6894 58 10 20 A 5250...
Page 2: ...rep 96 Lite Automated NA Purification System User s Guide Bioneer Corporation 8 11 Munpyeongseo ro Daedeok gu Daejeon 34302 Republic of Korea Tel 82 42 930 8777 Fax 82 42 930 8688 Email order bioneer...
Page 3: ...ct It is the responsibility of the purchaser to determine the suitability of the product for its particular use Liability is conditional upon the customer providing full details of the problem to Bion...
Page 4: ...N CSA C22 2 No 61010 2 081 04 Part 2 010 Particular Requirements for Laboratory Instrument for the Heating of Materials CAN CSA C22 2 NO 61010 2 010 04 Part 2 Particular requirements for in vitro diag...
Page 5: ...lation requirement 15 VII Removing the shipping bracket and approving power source 17 1 Removing shipping bracket 17 2 Approving power source 18 3 Changes of Magnetic Rods 19 VIII Magnetic Rod Covers...
Page 6: ...s experiment time and increases elution efficiency resulting in increased sample yield The responsive 7 inch touch screen enables simple instrument operation From selecting sample optimized protocols...
Page 7: ...blessures corporelles Symbols for safe use The table below presents the symbols used in user guide Conformit Europ enne Mark In vitro diagnostic medical instrument Temperature limit Manufacturer Auth...
Page 8: ...ff position of the main power switch Indicates the standby switch status while the main power source is On Displays the ground terminal for the main protective ground of the instrument Indicates a ter...
Page 9: ...iPrep 96 Lite placed on the European market Do not dispose of ExiPrep 96 Lite as unsorted municipal waste Follow local municipal waste ordinances for proper disposal provisions to reduce the environme...
Page 10: ...age or error in the test results Be sure to operation the LCD touch screen after the operation of instrument is completed 4 Do not turn off the power or shut down the program during operation Data com...
Page 11: ...er plug and plug it securely so that the plug does not move Unstable connection may cause fire 2 The ambient temperature of the instrument shall be within 15 35 If the external temperature is too high...
Page 12: ...a strong shock It may cause malfunction and may not be covered under warranty regardless of a warranty period 11 Be sure not to allow any foreign objects into the cooling fan on the bottom If the cool...
Page 13: ...for inside and outside of the Instrument 1 Use distilled water DW 70 ethanol nucleic acid decomposition solution 5 Nitric acid 1 lox DNAzap Be careful for lox and DNAzap corrode metal Moisten lint fr...
Page 14: ...n 0 2018 07 05 ExiPrep 96 Lite V Product configuration and description 1 Product configuration Part Name Cat No Qty ExiPrep 96 Lite A 5250 1 ea 32 well Magnetic Rods 3 ea User s Guide 1 ea Power cord...
Page 15: ...H Weight 46 Kg 101 42 lbs Voltage Frequency 100 240V 50 60Hz Power 500VA Max Fuse 250V F6 3AL 2ea Operating specifications Heating block 30 90 86 194 Temperature controlled block 4 90 39 2 194 Operat...
Page 16: ...11 www bioneer com BQ 042 101 12 Revision 0 2018 07 05 ExiPrep 96 Lite 3 Instrument structure and name 1 Outside Outside 2 Inside Inside 1...
Page 17: ...12 www bioneer com BQ 042 101 12 Revision 0 2018 07 05 ExiPrep 96 Lite Inside 2 Inside 3...
Page 18: ...13 www bioneer com BQ 042 101 12 Revision 0 2018 07 05 ExiPrep 96 Lite 3 Buffer Cartridges Buffer Cartridges Layer 1 Buffer Cartridges Layer 2...
Page 19: ...14 www bioneer com BQ 042 101 12 Revision 0 2018 07 05 ExiPrep 96 Lite Buffer Cartridges Layer 3...
Page 20: ...ings must be considered in selecting the place of installation Satisfies the requirements for space and weight Satisfies environmental requirements The power outlet with the power rating of 550VA or a...
Page 21: ...red location At this time two or three persons must work e Unpack the ExiPrep 96 Lite and check that the instrument has no damages If the instrument is damaged record the damage and contact us or your...
Page 22: ...or your dealer 1 Removing shipping bracket 1 When you open the door inside the instrument you can see the bolts A B and shipping bracket C that holding the setup tray and syringe in the front The shi...
Page 23: ...will be initialized and the LCD screen will turn on automatically LED color of Power button displays current operation status Red light Displayed when a problem occurs during self diagnosis Blue light...
Page 24: ...g magnetic rods 1 After power on and initialization open the door 2 Click on the top of the Plate button Then the magnetic rod cover plate comes down to insert the magnetic rod cover and buffer cartri...
Page 25: ...ant to use and insert into the slide guide of the magnetic rods plate 6 Turn the Magnetic rods bracket to the right to fasten it You can t mix 32 well magnetic rods and 8 well magnetic rods If you use...
Page 26: ...After power on and initialization open the door 2 Click on the top of the Plate button Then the magnetic rod cover plate comes down to insert the magnetic rod cover and buffer cartridge layer 1 comes...
Page 27: ...forward to insert the cartridges 8 Color of plate is displayed to yellow 9 insert the cartridge 3 4 into the buffer cartridge layer 2 10 When buffer cartridge layer 2 comes forward click on the top of...
Page 28: ...07 05 ExiPrep 96 Lite 14 Magnetic rod covers and each cartridge finish setting plate icon color is disappears 15 Insert elution cartridge into elution heating block If click on the bottom of the Plat...
Page 29: ...vice the main screen will appear after logo screen No Icon Description 1 Assign Sample Go to the menu to enter Sample ID Standard Protocol Go to the menu to select the standard protocol User Protocol...
Page 30: ...d d If you click LOAD button SampleID will be input automatically 3 From the Standard Protocol menu select the Protocol to use for the experiment a Select the Protocol to be used in the experiment fro...
Page 31: ...col Washing Time and Elution Volume and press SAVE button f If you want to delete the selected protocol press DEL button 5 Select Protocol and return to the main screen a Confirm that the selected Pro...
Page 32: ...button 6 When the experiment is completed the completion pop up will appear with the alarm and the log for the experiment will be automatically saved Information about Log can be found in Setup Log a...
Page 33: ...will be displayed as shown below The UV operation is automatically terminated after 12 minutes If you want to stop press the Cancel button 3 Setup General 1 Update the software or display the product...
Page 34: ...xperiment the log is automatically saved Up to 100 experiments have been saved a Double click the date and order number to view the details Experiment time protocol specimen b Copy the log file to USB...
Page 35: ...Cover Down Cover up down UV Off UV On Turns UV on off 3 Cap3 In Cap3 Out Third Cap in out Plate3 In Plate3 Out Third Plate in out Heater Off Heater On Turns the heater on off 4 Cap2 In Cap2 Out Secon...
Page 36: ...pressed 1 Check if the shipping bracket for transport has been removed 2 Check if it is normally initialized when powering up 3 Check if there are foreign objects or cartridges that may hinder the op...
Page 37: ...p using the instrument 2 Contact your local dealer for repair UV Lamp does not work 1 Be sure to check if the front door is completely closed 2 Contact your local dealer for repair Cooling fan does no...
Page 38: ...areful not to leave any scratch on the screen 2 Replacing the Fuse This instrument uses two fuses Tools required for the replacement 2 fuses with the specification of 250V F6 3AL 5 20mm 1 flat head sc...
Page 39: ...e out the disconnected fuse from the fuse slot and replace it with a new fuse with the specification of 250V F6 3AL 5 20mm 5 Return the fuse slot to its original position under the power cord inlet an...
Page 40: ...source of contamination of the instrument If the bath block is contaminated by radioactive material remove the source of the contamination with a commercial decontamination agent If contaminated mate...
Page 41: ...able for five years from the initial instrument release date If a defect arises after the limited warranty period shipping and handling charges may apply to any repairs or exchanges of the product und...
Page 42: ...g Check Touch Screen operation Elution Rack Cleaning Layer cartridge rack cleaning Contamination Shield Cleaning Door Moving Check Weekly Self Test Check Plate Cleaning UV Lamp Check Exterior Check Co...
Page 43: ...bioneer com www bioneer com 155FilbertSt Suite216Oakland CA94607 USA 1 877 264 4300 Toll free 1 510 865 0350 order usa bioneer com us bioneer com KoreaBioParkBLDG B 702 700Daewangpangyo ro Bundang gu...