background image


IFU_MAL_US_V1.13_January 2021


P a g e  

20 | 44


5.2  INJECTION 


WARNING


If you are not certain that you injected your insulin, do not start or repeat your injection. 
Monitor your blood glucose as instructed by your healthcare provider. 


5.2.1. 

Check the insulin dose to inject as requested by the drug manufacturer’s requirements.


5.2.2. 

Turn the dose knob to select the number of units to inject. The dose indicator should line up 
with the dose to inject.


5.2.3. 

Press  on  the  injection  knob  with  your  thumb  until  you  return  to  ZERO  (complete  dose 
injection)


5.2.4. 

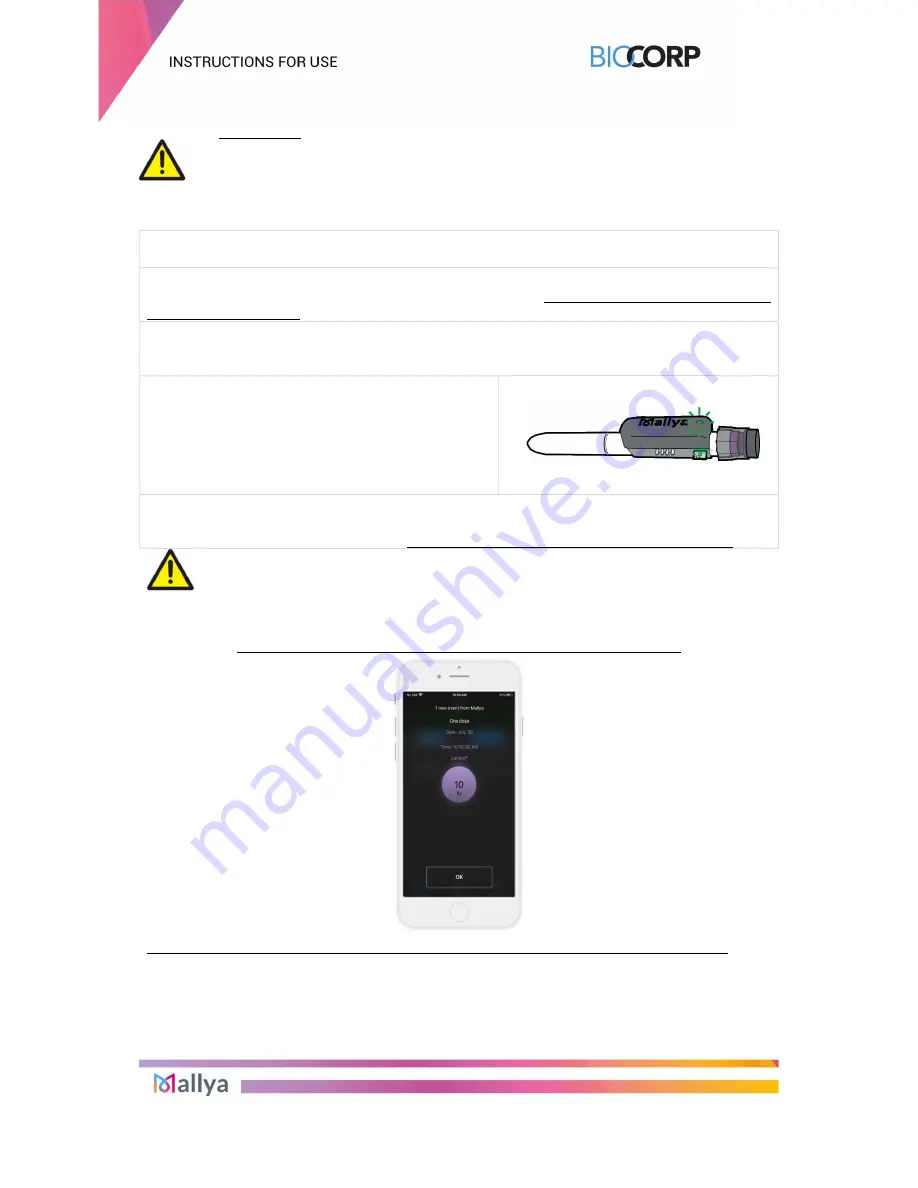
Keep the injection knob pressed in and the needle 
in the skin:


-

  While the Mallya’s 

green

 LED is flashing,


-

  Until  Mallya  emits  an  audible  signal  (BEEP) 

signaling the end of the injection.


5.2.5. 

You can release the pressure on the knob and then remove the needle from the skin when 
the 

green

 LED stops flashing and the “BEEP” signaling the end of injection is emitted. 


WARNING


If you do not see ZERO (“0”) in the pen dose window: it indicates that the full dose has not 
been injected. 


The Mallya application will automatically detect an injection: 


The information corresponding to the injected dose is displayed: 

dose

day

 and 

time.


Summary of Contents for Mallya Eli Lilly

Page 1: ..._MAL_US_V1 13 Instructions For Use Designed for Flexpen Novo Nordisk Designed for Kwikpen Eli Lilly Designed for Solostar Sanofi Embedded software versions 3 6 and over Helping you keep track of your insulin doses ...

Page 2: ...CALIBRATING YOUR MALLYA 14 4 3 ATTACHING YOUR MALLYA TO PEN 15 4 3 1 ATTACHING BASE TO PEN 15 4 3 2 ATTACHING KNOB TO PEN 15 4 4 PAIRING YOUR MALLYA 17 5 USING YOUR INSULIN PEN WITH MALLYA 19 5 1 SECURITY TEST PRIMING 19 5 2 INJECTION 20 6 MANAGING RECORDED DATA 21 6 1 DISPLAY OF THE RECORDED DATA 21 6 2 MANAGE YOUR RECORDED DATA 22 6 2 1 YOU CAN CHANGE A PRIMING OR A DOSE QUANTITY ALREADY RECORDE...

Page 3: ...NG 33 9 1 TROUBLESHOOTING MALLYA WITH BASE SIGNALS 33 9 2 TROUBLESHOOTING MALLYA WITH THE APPLICATION 36 9 3 RESET INSTRUCTIONS 38 10 MAINTENANCE AND INSPECTION 39 10 1 MALLYA DEVICE LIFETIME 39 10 2 MALLYA APPLICATION UPDATES 39 10 3 CLEANING YOUR MALLYA 39 10 4 MAINTAIN WATER DUST AND LIGHT RESISTANCE 39 11 TECHNICAL SPECIFICATIONS 40 11 1 COMPLIANCE WITH STANDARDS REGULATION AND CLASSIFICATIONS...

Page 4: ...ymbols used in these IFU Instructions for Use 1 Serious injury means electrical shock or poisoning that causes a subsequent complication or requires hospitalization or long term outpatient treatment 2 Bodily injury means an injury burn electrical shock and so on that will not necessitate hospitalization or long term outpatient treatment 3 Damage to property means extensive damage to a house and or...

Page 5: ...dentally damage the device Your Mallya contains small parts with sharp edges that may cause injuries or that may detach and create a choking hazard Mallya must only be paired with a compatible mobile application Mallya has been designed to work with ONE insulin pen If you unpair your Mallya base from the insulin pen you MUST reselect your insulin pen medication Never install a mobile application f...

Page 6: ... comply with the limits for a Class B digital device pursuant to part 15 of the FCC Rules These limits are designed to provide reasonable protection against harmful interference in a residential installation This equipment generates uses and can radiate radio frequency energy and if not installed and used in accordance with the instruction may cause harmful interference to radio communications How...

Page 7: ...s The device is intended to assist patients maintain accurate records of their insulin usage WARNING The device should not be used by children and women with gestational diabetes Contraindications There are no known contraindications to the use of Mallya Intended Patient population Intended users are patients and medical professionals Mallya can only be used by patients already familiar with the p...

Page 8: ...r KWIKPEN ELI LILLY insulin pen GLARGINE 100 IU mL LISPRO 100 IU mL Humalog Junior 200 IU mL LISPRO AND PROTAMINE 100 IU mL HUMAN ISOPHANE 100 IU mL REGULAR HUMAN USP 100 IU mL REGULAR HUMAN AND HUMAN ISOPHANE 100 IU mL Mallya designed for FLEXPEN NOVO NORDISK insulin pen DETEMIR 100 IU mL ASPART 100 IU mL ASPART AND PROTAMINE 100 IU mL HUMAN ISOPHANE 100 IU mL Mallya designed for SOLOSTAR SANOFI ...

Page 9: ...plied part For the insulin pen FLEXPEN NOVO NORDISK PN 0273727 Applied part For the insulin pen KWIKPEN ELI LILLY PN 0273698 Applied part For the insulin pen SOLOSTAR SANOFI PN 0273710 Mallya ACCESSORIES 1 x USB CABLE 1 x RESET KEY 1 x QUICK START GUIDE Quick Start Guide with reference QSG_MAL_US CAUTION Consult the Instructions For Use documents Reference IFU_MAL_US Part Number B014JOOZFS Model B...

Page 10: ...mm SOLOSTAR knob 24 4 x Ø20 mm FLEXPEN knob 26 3 x Ø19 3 mm Mallya total weight 0 022 kg Table 4 Weight and size of the main elements 2 4 STORAGE INFORMATION Temperature Atmospheric pressure Relative humidity Transport 10 C to 40 C 14 F T 104 F 500 hPa to 1060 hPa 10 to 90 Storage 10 C to 40 C 14 F T 104 F 800 hPa to 1060 hPa 10 to 90 Operating 15 C to 35 C 59 F T 95 F 800 hPa to 1060 hPa 30 to 70...

Page 11: ...n its original packaging specially designed to protect it against damage 3 INSTALLING THE MALLYA APPLICATION Mallya connects your insulin pen to your smartphone Use the Mallya smartphone application to keep track of your insulin doses 3 1 TECHNICAL COMPATIBILITIES The list of smartphones validated by BIOCORP and compatible with the Mallya application Version 1 7 is shown below SMARTPHONE MODEL COM...

Page 12: ...epting them and confirming your choice The privacy policy screen is then displayed make sure you understand it before accessing the Get Started screen 3 2 1 Select Get started 3 2 2 A video will guide you through the unboxing steps Select Continue to watch the Quick Start video The next screens will guide you through the 4 operations required to start up your Mallya Switch on as explained in step ...

Page 13: ... use your Mallya for an injection while it is connected to a USB power port and charging 4 1 1 Plug the powered USB cable into the Mallya micro USB port 4 1 2 Check that the Mallya LED is slowly flashing green 4 1 3 Let the battery charge for at least 10 minutes NOTES Fully recharging the battery takes approximately 2 hours When the battery is fully charged the green LED will turn off Optimal auto...

Page 14: ...ALLYA 4 2 1 Unplug the Mallya base from the USB cable 4 2 2 Check that the Mallya LED is flashing orange 4 2 3 Slowly tilt the Mallya base side to side to CALIBRATE 4 3 3 Continue tilting until The base beeps and the LED light turns green Then the light will turn off ...

Page 15: ...clear square plastic window with the pen dose window then snap the base onto the pen 4 3 1 3 Make sure the Mallya base window is aligned with the pen dose window NOTE A pen symbol is represented on the side of the Mallya base to help you position the pen in the correct orientation 4 3 2 ATTACHING KNOB TO PEN 4 3 2 1 Place and insert the Mallya knob over your pen injection knob Make sure the knob i...

Page 16: ... if the clear square plastic window of the Mallya base and the dose window of the pen are not correctly aligned or the Mallya knob is not pushed on enough In this case it is necessary to Re adjust re align the windows or push on the knob until the Mallya base LED flashes green and orange ...

Page 17: ...ect Pair NOTE The pairing step may take few seconds 4 4 3 Choose the insulin pen model onto which the Mallya device is assembled 4 4 4 Confirm the pen model currently assembled with the Mallya device NOTE In case you cannot find your pen model in the list select cancel pairing The application will guide you to pair a new Mallya NOTE If you select No it does not match the application will return to...

Page 18: ...to move on to the injection screen 4 4 6 The injection screen is displayed CAUTION From now on this Mallya should only be used with this pen model unless you make a new adjustment Your insulin pen can now be used as usual and Mallya will track your insulin intake NOTE When Mallya is paired and correctly attached to the injection pen the LED is green ...

Page 19: ...Mallya s green LED is flashing Until Mallya emits an audible signal BEEP signaling the end of the priming step WARNING If the liquid does not come out of the needle tip during the safety test do not use the pen and refer to the manufacturer s injector pen Instructions for Use for more information to solve the problem 5 1 3 You can release the pressure on the knob when the green LED stops flashing ...

Page 20: ...th your thumb until you return to ZERO complete dose injection 5 2 4 Keep the injection knob pressed in and the needle in the skin While the Mallya s green LED is flashing Until Mallya emits an audible signal BEEP signaling the end of the injection 5 2 5 You can release the pressure on the knob and then remove the needle from the skin when the green LED stops flashing and the BEEP signaling the en...

Page 21: ...sing the Mallya application as follows 6 1 DISPLAY OF THE RECORDED DATA Select the injection screen Doses or Priming injections are then displayed as follows The Insulin Dose information is displayed Type of injection priming or dose Injection day and time Insulin dialed dose in International Unit Color indicator of the injected insulin type or concentration PRIMING DOSES ...

Page 22: ...ed as a dose to a priming or a priming to a dose see step 6 2 2 You can delete a dose or a priming see step 6 2 3 You can add an injection that was not recorded to the history see step 6 2 4 You can fill in a dose that was not captured by the device see step 6 2 5 6 2 1 You can change a priming or a dose quantity already recorded 6 2 2 You can change an injection recorded as a dose to a priming or...

Page 23: ...IFU_MAL_US_V1 13_January 2021 P a g e 23 44 6 2 3 You can delete a dose or a priming 6 2 4 You can add an injection that was not recorded to the history To add an unrecorded dose select Add to log ...

Page 24: ...ptured you will see the message Dose not recorded You can add the dose information as follows Tap to modify the information related to the injection 7 OTHER FEATURES OF THE MALLYA APPLICATION 7 1 GENERATE A REPORT In the Injections screen select the icon to display the window that allows you to generate a report Injections screen ...

Page 25: ...ted insulin pens can be used independently They both have the status Ready for use WARNING Make sure you do not switch the pens between the two Mallya devices In case you have any doubt you can use the Find the device functionality to identify the Mallya as explained in the step below step 7 3 Mallya Devices screen ...

Page 26: ... Insulin to select the pen model onto which Mallya is currently assembled Each color indicator is associated to a type of insulin pen CAUTION It is important to check before each injection that the type of insulin selected in the application corresponds to the type of insulin indicated on the label of your pen The color indicators are also displayed in the injections screen so that you can differe...

Page 27: ...a CAUTION If you unpair your Mallya while it is out of range you will have to reset the system before pairing your Mallya again in accordance with the procedures described in the step 9 3 Reset Instructions Mallya has been designed to work with ONE insulin pen If you unpair your Mallya base from the insulin pen you MUST reselect your insulin pen medication 7 4 HELP SCREEN Video tutorials and other...

Page 28: ...e the Mallya base and Mallya knob from the current pen see step 8 1 Removing Mallya from the empty pen Assemble the Mallya base and Mallya knob to the new insulin pen see step 4 3 Attaching your Mallya to pen the Mallya should show a green light If not check the position of the Mallya knob and Mallya base CAUTION Mallya models are only compatible with the disposable insulin pens Solostar Kwikpen F...

Page 29: ... if no Mallya transfer had taken place 8 2 3 2 Moving mallya to a different pen model If you choose to move MALLYA to a different pen model select In this case the screens in steps 4 4 3 4 4 4 and 4 4 5 are displayed You have to select the new pen model on which your Mallya is currently assembled On the next injection the injection dose will be displayed in the injection history with the new model...

Page 30: ...lly detects a device removal event eg your base and or the knob have has been removed from the original pen In this situation the application will require a confirmation of the pen currently assembled with Mallya EXAMPLE 8 3 1 Log screen before transferring Mallya onto a new pen 8 3 2 Remove Mallya from the empty pen attach Mallya onto a new pen base and or knob 8 3 3 On the next PRIMING or an INJ...

Page 31: ... pen model on which your Mallya is currently assembled The new pen model currently assembled is then displayed at the top of the screen Apidra in the example below 2 Following your change of pen model some new injections or primings are pending confirmation of the insulin type that has been used Those injections are displayed in the list above with a grey colored circle and the insulin undetermine...

Page 32: ...d during the disconnection period eg your base and or the knob have has not been removed from the original pen in the meantime or Your Mallya application will display the 2 options indicated in step 8 3 3 if a removal event occurred the Mallya base and or the knob have has been removed from the original pen during the disconnection period Follow the instructions in step 8 3 3 to indicate the pen m...

Page 33: ... problem is not solved please contact a BIOCORP PRODUCTION authorized dealer Orange LED rapid flashing Calibration in progress A green light will appear for 2 seconds upon successful calibration with a beep then the green light will turn off Slowly tilt the Mallya side to side to calibrate see step 4 2 Alternating orange and green flashing rapid flashing Mallya device is correctly positioned onto ...

Page 34: ...up with the pen dose window EXACTLY The pen pointer should fit into the slot on the Mallya base The notch in the pen dose window should line up with the notch on the Mallya window outline b Check that the top edge of the Mallya base lines up with the edge of the pen body so that it does not sit below or above the edge The Mallya base should not cover any of the pen dose dial c Press the Mallya kno...

Page 35: ... properly assembled onto the pen It is either ready for use or the dose setting is in progress or the injection is in progress N A Green LED rapid flashing Mallya is at the end of an injection Keep the needle in the skin During the whole time Mallya s green LED is flashing Until Mallya emits an audible signal BEEP signaling the end of the injection Table 7 Troubleshooting with signals next ...

Page 36: ...t and apply the appropriate solution If the recommended solutions do not eliminate the problem or if you encounter an unlisted problem please contact a BIOCORP PRODUCTION authorized dealer INDICATION CAUSE TROUBLESHOOTING STEPS Mallya s base not detected Select Not Ready Check that the Mallya device is correctly assembled on the pen see step 4 3 Knob of the pen not at ZERO Select Not Ready Turn th...

Page 37: ...r Mallya device and your smartphone closer to one another A communication error occurred Select Disconnected Reset Mallya as explained in the Mallya device Instructions for Use see step 9 3 Bluetooth issue or signal lost Check that the Mallya device is powered ON Check that the Mallya device is connected to the App Check the Bluetooth connection status on your mobile phone If the problem is not so...

Page 38: ...ne smartphone If you want to delete your personal health data from the device PROCEDURE 9 3 1 Disassemble Mallya as indicated step 8 1 9 3 2 Flip Mallya over so that you can see the following indications 9 3 3 Take the Reset Key 9 3 4 Insert the Reset Key into the hole shown below and WAIT until 3 beeps are emitted before removing the key 3 BEEPS 9 3 5 Then follow step 4 to prepare your device for...

Page 39: ...ning water Do not expose the device to moisture Do not use the device in the bathroom or in areas with high temperature humidity dust or rain Do not share Mallya with other people to prevent infection 10 4 MAINTAIN WATER DUST AND LIGHT RESISTANCE As defined in the IEC standard 60529 the IP code or Ingress Protection code classifies and rates the degree of protection provided by mechanical casing a...

Page 40: ...ation Continuous operation IEC 60601 1 2 Electromagnetic compatibility According to EN 55011 CISPR 11 the device is classified as a group 1 device with class B emission limits IEC 60529 Type of protection against the access to hazardous parts and the infiltration of water as detailed in the current edition of IEC IP22 for the base Table 9 Compliance with standards regulations and classifications 1...

Page 41: ...3 1 Serial Number Product reference This device complies with part 15 of the FCC Rules Operation is subject to the following 2 conditions 1 This device may not cause harmful interference and 2 this device must accept any interference received including interference that may cause undesired operation IEC 60417 5172 Class II device in compliance with EN 60601 1 standards IEC 60417 5957 For indoor us...

Page 42: ...730 FT401235P Operating time with fully charged battery 2 weeks Charging time for fully charged battery Full charge at 4 2 V for 2 5 hours Table 13 Electrical ratings It is possible to connect the provided USB cable to the USB port of your PC or AC adaptor with the following characteristics AC ADAPTOR NOT PROVIDED Power supply External Module with automatic adaptation of the voltage no selection i...

Page 43: ... UE WEEE and 2011 65 UE RoHS II on the restriction of hazardous substances in electrical and electronic equipment on their disposal Public authorities adopt adequate measures to make sure that users distributors and manufacturers contribute to the collection of electrical and electronic equipment setting legal requirements to reuse recover or recycle the said equipment CAUTION You must take into a...

Page 44: ...ny damage resulting from transport improper use or negligence incorrect handling modification of the system poor maintenance use of incorrect voltage lightning infiltration of sand or water use of parts or accessories not provided or recommended in this Instructions for Use by BIOCORP PRODUCTION Healthcare data protection The terms of the regulation EU 2016 679 of the European Parliament and of th...

Reviews: