


5
ENGLISH
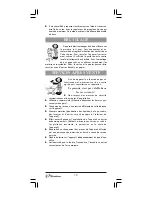
SPECIAL SAFETY MEASURES
Do not leave the iron unattended when it is
connected to a mains supply outlet. Always
switch the iron off even when you leave the
room for short periods of time.
Do not leave the hot iron in a horizontal posi-
tion: place it upright on a heat resistant sur-
face.
The iron gets hot when in operation: any skin contact with
metal surfaces, vapor or water may result in burns.
During operation of the appliance keep children away from it
especially when steam ironing.
Never iron or steam iron articles being worn by a person.
Avoid any contacts between the sole plate and plastic fittings
of an article: buttons, zippers, labels, etc.
Always disconnect the iron from the mains when filling or drain-
ing the water tank.
Store the iron in a vertical position to avoid damaging the sole
plate.
The iron should always be connected to a grounded main
electricity supply.
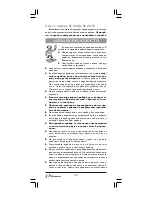
DESCRIPTION OF
COMPONENTS
1. Casing
2. Handle
3. Water inlet opening
4. Water tank cover
5. Water tank with maximum limit mark
6. Spray nozzle
7. Spray button
8. Burst of steam button (turbo steam, burst of steam in a vertical
position)
9. Steam control knob
10.Temperature control knob
11.Operation indicator
12.Iron sole plate
13.Power plug
14.Power cord
15.Measuring jug
BEFORE USE
Remove all packaging from the appliance.
Turn the steam control knob
(9)
into the
“0”
position, and the temperature control
knob
(10)
— into the
“Min”
position.
If you intend to iron with spray or steam,
push the cover
(4)
up and fill the tank
(5)
with water through the opening
(3)
. Use
the measuring jug
(15)
for convenience and ease.
Summary of Contents for SI-2600
Page 1: ...Steam Iron Instruction Manual SI 2600 SI 2610...
Page 2: ...Steam Iron SI 2600 SI 2610...
Page 3: ...3 ENGLISH FRAN AIS ENGLISH 4 FRAN AIS 12 20 28...
Page 20: ...20 SI 2600 SI 2610...
Page 21: ...21 1 2 3 4 5 6 7 8 9...
Page 22: ...22 10 11 12 13 14 15 9 0 10 Min 4 5 3 15 5 5 5 1 2 13 3 10...
Page 23: ...23 4 11 11 9 0 9 SI 2610 c Drip Stop SI 2600 9 0 8 8 1 4 10 Max...
Page 24: ...24 8 5 7 5 7 5 9 0 10 Min 13 SI 2610 SI 2600 1 9 0 2 5...
Page 26: ...26 7...
Page 28: ...28 SI 2600 SI 2610...
Page 29: ...29 1 2 3 4 5 6 7 8 9 10 11 12 13 14 15...
Page 30: ...30 9 0 10 Min 4 5 3 15 5 5 5 1 2 13 3 10 4 11 11...
Page 31: ...31 9 0 9 SI 2610 Drip Stop SI 2600 9 0 8 8 1 4 10 Max 8 5 7 5 7...
Page 33: ...33 8 9 12 9 0 10 Min 13 Min 0 5 4...
Page 34: ...34 7...
Page 36: ...36...
Page 37: ...37...
Page 38: ...38...


