background image


Chapter 6. SETTING: Basic


N6603 Operations User Manual  

25


Pic. 6.3 


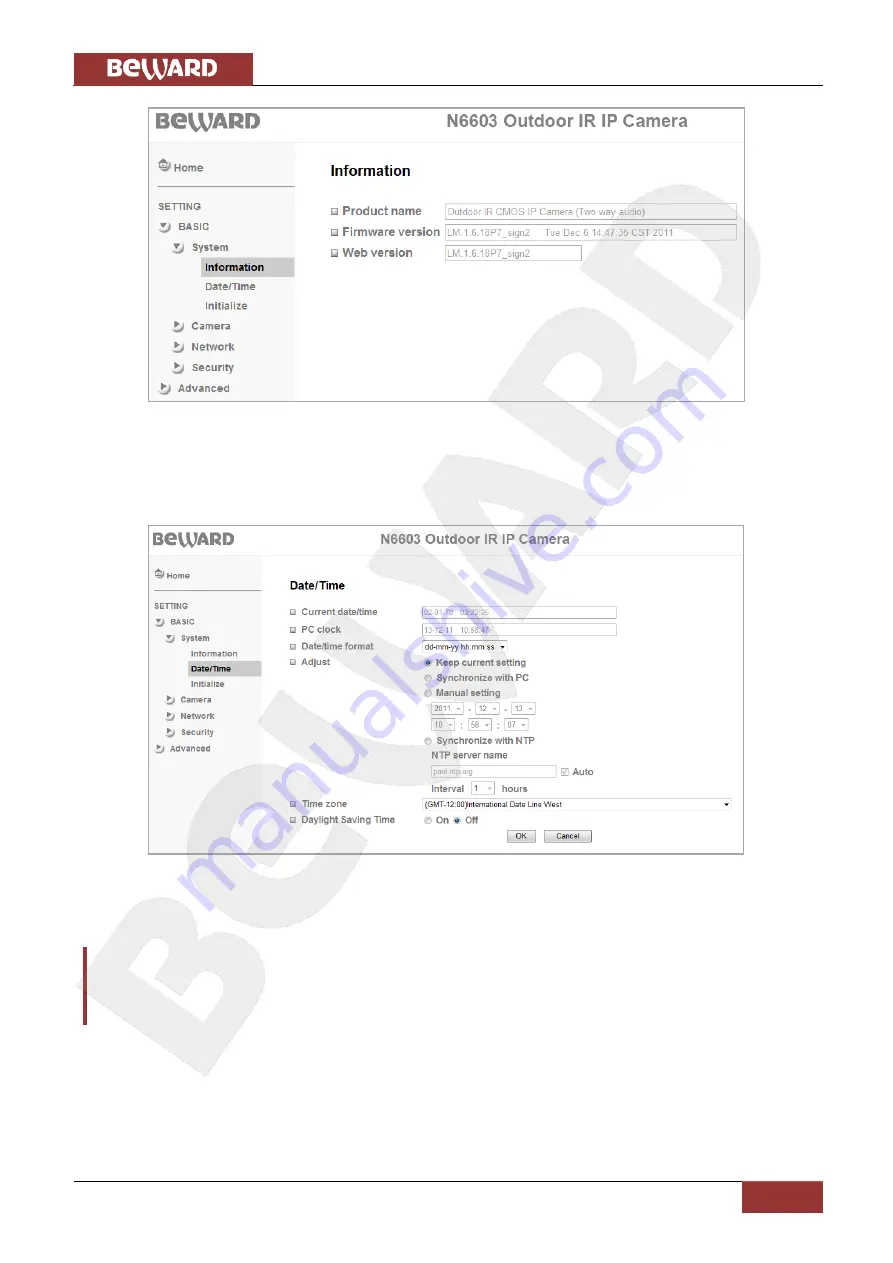
6.1.2. Date/Time 

This menu allows a user to set device date and time (

Pic. 6.4

). 


Pic. 6.4 

Current date/time

: displays the current date and time of the IP Camera. 


IMPORTANT: 

After you restart the camera, its date and time will be reset to their default values: 

1970-01-01 00:00:00

. It 

is recommended to use the 

[Synchronize with NTP] 

option to set the correct date and time.


PC clock

: displays date and time on a computer, which is used to connect to the camera 

(client computer) 

Date/Time format

: allows you to select date/time format. 

Summary of Contents for N6603

Page 1: ...IR LEDs built in...

Page 2: ...a JPEG Image 10 CHAPTER 4 MANAGING THE IP CAMERA VIA INTERNET EXPLORER 11 4 1 INSTALLING ACTIVEX CONTROLS 12 CHAPTER 5 MAIN MENU 16 5 1 LIVE VIEW 16 5 1 1 Snapshot Button 17 5 1 2 Fullscreen Button 17...

Page 3: ...2 2 Alarm Sending 57 7 2 3 Periodical Sending 60 7 3 NETWORK STORAGE 62 7 3 1 General 62 7 3 2 Alarm Sending 64 7 3 3 Periodical recording 66 7 4 HTTP EVENT 67 7 4 1 General 68 7 4 2 Alarm Sending 69...

Page 4: ...ating temperature is 65 C to 50 C avoid exposure to direct sunlight and do not locate the camera near any heat sources avoid exposure to high humidity do not locate the camera near any electrical appl...

Page 5: ...rculation in the area where the camera is located Cleaning Use a soft dry cloth for cleaning camera s external surfaces It is acceptable to use some detergent for removing persistent dirt but not the...

Page 6: ...he N6603 is equipped with progressive scan CMOS sensor and mechanical IR cut filter which ensures clear pictures under low light conditions Besides the camera offers built in IR LED which provides twe...

Page 7: ...ux F2 0 0 lux if IR LED is on Shutter time 1 7 5 1 120 sec Illumination IR LED 850 nm 21 pcs 8 mm diameter up to 10 15 meters S N ratio 50 dB Resolution 640x480 320x240 160 120 Dual streaming Motion J...

Page 8: ...pre installed Sunshield Connector pre installed RJ 45 adapter Quick installation guide CD with user manuals and software Bracket Power supply 12 V 1 A DC 2 1 4 Default Settings The main default settin...

Page 9: ...mobile device it allows viewing camera image from any location in the world though Moreover you can view it on any device such as a laptop cell phone PDA etc This User manual provides detailed informa...

Page 10: ...e device at SETTING Basic Camera MPEG 4 Mobile view IMPORTANT To view 3GP video you need to enable RTSP at SETTING Basic Camera General If your phone does not support streaming video type rtsp IP PORT...

Page 11: ...3 4 2 Playing MJPEG Video Type rtsp IP PORT video mjpg IP means IP address of your camera PORT means HTTP port of your camera default value is 80 Example rtsp 89 57 167 76 80 video mjpeg IMPORTANT To...

Page 12: ...act your system administrator to avoid IP address conflict NOTE To view camera image without showing control panel type http IP index2 htm in browser s address bar IP means IP address of your camera S...

Page 13: ...ess bar Pic 4 2 Press Enter or click Go To button Pic 4 2 IMPORTANT The camera s default IP address is 192 168 0 99 If the camera was assigned with an IP address by a DHCP server in a local network yo...

Page 14: ...notification under the address bar This website wants to install the following add on AxMediaControl cab from BEWARD Co Ltd If you trust the website and the add on and want to install it click here P...

Page 15: ...tifications that appear in other versions of Windows and Internet Explorer Step 5 by default Internet Explorer prevents ActiveX add ons from installation click Install to continue Pic 4 6 Pic 4 6 NOTE...

Page 16: ...03 Operations User Manual 15 Step 6 if everything was done correctly you should get the camera image via browser The settings bar is on the left side the camera image is on the right side Pic 4 7 Deta...

Page 17: ...ge Also this pane contains the following buttons Snapshot Fullscreen Open digital zoom Start record Microphone Pause Play Stop and Volume Pic 5 1 These functions are discussed later in this Manual NOT...

Page 18: ...need to start Internet Explorer as an administrator to save records on your local HDD 5 1 2 Fullscreen Button Click the button to hide controls and stretch the image to fill the screen Press ESC or d...

Page 19: ...record click this button to specify the path for saving records and start recording video Stop record click this button to stop recording video IMPORTANT To playback recorded video you may need to in...

Page 20: ...e volume level of the sound transmitted from your camera if the microphone is connected to the correct jack 5 2 Setting Menu This menu is used to configure an IP camera Pic 5 3 The menu is divided int...

Page 21: ...nput Alarm buffer Motion detection and System log Pic 5 5 Detailed information is discussed later in this Manual Pic 5 5 5 3 Client Setting This menu allows a user to adjust camera image These setting...

Page 22: ...iled information is discussed later in this Manual 5 3 2 View size This item allows you to adjust image resolution 640 480 320 240 This item is available for all compressions 5 3 3 Protocol This item...

Page 23: ...estriction is used When such a security policy is applied most of the nonstandard ports are closed but port 80 is often open 443 554 etc and is used by this connection type IMPORTANT When Multicast mo...

Page 24: ...llows you to increase or decrease the image saturation If the saturation is set to its minimum the image will be black and white 5 4 4 Hue This item allows you to adjust the image hue If the hue is ad...

Page 25: ...contains the following sections System Camera Network and Security Pic 6 1 Pic 6 1 6 1 System This menu contains the following sections Information Date Time Initialize Pic 6 2 Pic 6 2 6 1 1 Informati...

Page 26: ...te and time of the IP Camera IMPORTANT After you restart the camera its date and time will be reset to their default values 1970 01 01 00 00 00 It is recommended to use the Synchronize with NTP option...

Page 27: ...typically updated once an hour NOTE By default the camera synchronizes clock with the following NTP server pool ntp org IMPORTANT To synchronize time with an Internet time server an NTP server must b...

Page 28: ...ault button the confirmation dialog box appears The user will be prompted to continue or cancel the reset to factory defaults Click OK to continue or click Cancel to cancel NOTE See the Appendix E for...

Page 29: ...IMPORTANT When the update is completed it is recommended to reset camera settings to their factory defaults IMPORTANT Be careful when you update camera firmware Make sure that you use only the firmwar...

Page 30: ...ther functions Pic 6 8 Pic 6 8 RTSP this item allows you to configure RTSP stream You can enable it or disable and change the value of the port the default value is 554 This is a standard and reserved...

Page 31: ...s option if the camera is used under mixed illumination sunlight and indoor illumination or under bright sunlight If this option is selected the shutter time is set to 1 7 5 to 1 120 IMPORTANT When th...

Page 32: ...d to turn the IR LED off Pic 6 10 The right slider Pic 6 11 allows you to specify a threshold illumination level for turning the IR LED on The closer the slider to the Bright the higher illumination l...

Page 33: ...vacy mask you can set a privacy mask on the camera image so that an area protected by privacy mask will not be displayed and recorded This feature is useful when the camera observes objects that shoul...

Page 34: ...ories Computer view and Mobile view The Computer view allows you to adjust MPEG 4 image when viewing it on a computer The Mobile view allows you to adjust MPEG 4 image when viewing it on a mobile devi...

Page 35: ...or disable multicast stream If it is enabled the following items are available Multicast address Video port Audio port and Time To Live Pic 6 16 By default this item is disabled IMPORTANT To use mult...

Page 36: ...default value is the Fixed quality Auto the camera automatically adjusts image quality and frame rate depending on bandwidth If the bandwidth decreases the camera automatically changes image quality b...

Page 37: ...m is disabled 6 17 IMPORTANT To use multicasting your network router must support it Multicast address multicast IP address The default value is 226 0 0 1 Video port multicast video port Assigned auto...

Page 38: ...rate depending on bandwidth If the bandwidth decreases the camera automatically changes image quality but keeps the frame rate constant Fixed quality this option allows you to select any of the follow...

Page 39: ...s are available 1 2 3 4 5 7 10 15 frames per second Quality allows you to set the video stream quality The default value is the Fixed quality Auto the camera automatically adjusts image quality and fr...

Page 40: ...ser Manual 39 Pic 6 20 6 3 1 Information This menu allows you to configure the network connection Pic 6 21 Pic 6 21 MAC address displays the current MAC address This parameter cannot be changed and is...

Page 41: ...address is used as well as when it is obtained automatically from a DHCP server Primary DNS server type the primary DNS server IP address Secondary DNS server type the secondary DNS server IP address...

Page 42: ...ment Obtain DNS server address automatically select this option to obtain a DNS address automatically Use the following DNS server address select this option to type DNS servers addresses manually Pri...

Page 43: ...name which you can use any time to access your IP camera over the Internet Therefore the camera must be assigned with a public IP address To use DDNS select the option for On to enable it Pic 6 23 IM...

Page 44: ...e 6 3 4 UPnP Universal Plug and Play If your camera is connected to the Internet through a router you need to use a router with UPnP support to automatically forward the ports You also need to enable...

Page 45: ...d LAN and WAN ports Make sure your router supports this option IMPORTANT You must restart the camera for the changes to take effect To do so go to SETTING Basic System Initialize 6 3 5 Bonjour This se...

Page 46: ...45 Pic 6 25 NOTE Go to www apple com for detailed information about using Bonjour for OS Windows 6 3 6 IP notification This section allows you to configure your camera so that it will send e mails af...

Page 47: ...t SMTP or POP before SMTP POP server name this item is displayed when the POP before SMTP option is selected The POP server name is used for authorization 64 characters maximum User name type a userna...

Page 48: ...lt in Administrator account and its username and password are admin admin This is a main user account and you cannot change its privileges but you can change its username and password Besides the Admi...

Page 49: ...ra Off when this option is selected a user does not need to enter a username and password to access the camera A user may specify one of the following viewer modes Admin Operator and Viewer When your...

Page 50: ...rtificate first Click the Create self signed certificate to create a certificate Pic 6 30 Pic 6 30 The Create self signed certificate window appears so that you need to complete all the fields and the...

Page 51: ...ent SMTP Network storage HTTP event Alarm output Schedule Alarm input Alarm buffer Motion detection System log Pic 7 1 Pic 7 1 7 1 FTP Client This menu allows you to configure file transfer to FTP ser...

Page 52: ...racters maximum User name type a username to access the FTP server Password type a password to access the FTP server Re type password re type the entered password to avoid mistakes in password assignm...

Page 53: ...t the option for On to enable this option Pic 7 4 Pic 7 4 Remote path specify the path on the FTP server 64 characters maximum to save transferred files For example ipcam example Image file name type...

Page 54: ...After the connection is up the camera resumes file transfer to FTP To configure the alarm buffer option click the Alarm buffer button or go to SETTING Advanced Alarm buffer See paragraph 7 8 for deta...

Page 55: ...its name Suffix select a suffix to add it to the file name The following options are available None do not add any suffix to the file name An old file will be overwritten by a new one when the camera...

Page 56: ...f files To configure this option click the Schedule button or go to SETTING Advanced Schedule See paragraph 7 6 for details IMPORTANT If the camera has been recording by alarm when the scheduled recor...

Page 57: ...On to enable e mail sending or select the option for Off to disable it Pic 7 7 Pic 7 7 SMTP server name type the SMTP server IP address or name 64 characters maximum SMTP server port type the SMTP ser...

Page 58: ...e mail address 64 characters maximum Attached file type select a file type you want to attach to e mail The following options are available JPEG select this option to attach JPEG images MPEG 4 select...

Page 59: ...that correspond to the date the file was created This suffix contains the year as 4 digits the month as 2 digits the day as 2 digits the hour as 2 digits the minute as 2 digits the second as 2 digits...

Page 60: ...ick the Alarm buffer button or go to SETTING Advanced Alarm buffer See paragraph 7 8 for details IMPORTANT When you configuring this menu be aware that these parameters are applied to the other camera...

Page 61: ...available None do not add any suffix to the file name Date Time adds the dates that correspond to the date the file was created This suffix contains the year as 4 digits the month as 2 digits the day...

Page 62: ...options are available Always select this option for continuous e mail sending Schedule select this option for scheduled e mail sending To configure this option click the Schedule button or go to SETT...

Page 63: ...sly with a certain time interval or when an event occurs Pic 7 10 Pic 7 10 7 3 1 General Select the option for On to enable the option for recording to network attached storage or select the option fo...

Page 64: ...s necessary to specify the following parameters as well Workgroup enter Windows workgroup name This name should match the workgroup name of the computer with a shared folder or NAS server User name ty...

Page 65: ...g motion detection triggered recording to network attached storage Select the option for On Pic 7 13 to enable this function or select the option for Off to disable it NOTE The path to the Alarm fold...

Page 66: ...in pre alarm period option and until the connection is restored record s length is specified in post alarm period option to the temporary buffer After the connection is up the camera sends these file...

Page 67: ...specified for the network storage Pic 7 14 Image file name type a name for the files recorded to network attached storage NOTE Image file name may contain only Latin letters reserved characters and nu...

Page 68: ...he camera has been recording by alarm when the periodical recording starts the periodical recording will be stopped and resumed only after alarm triggered recording is completed Recording time allows...

Page 69: ...al This section allows you to configure access to an external alarm device Pic 7 16 Pic 7 16 URL type an IP address and command prefix 64 characters maximum For example 192 168 1 7 cgi bin operator pt...

Page 70: ...umber Proxy user ID if you use a proxy server type a username to access it 64 characters maximum Proxy password if you use a proxy server type a password to access it 32 characters maximum Test click...

Page 71: ...e unavailable for some external alarm devices Alarm input activates the external alarm device when the alarm input is triggered To configure this option click the Alarm input button or go to SETTING A...

Page 72: ...he Schedule button is available which allows you to specify the intervals Alarm allows you to select an event that activates the alarm output Motion detection the camera activates the alarm output whe...

Page 73: ...dule for each day of the week or apply it for a whole week by checking the Use the same time schedule every day box Pic 7 18 Pic 7 18 Schedule selection allows you to specify a schedule for a certain...

Page 74: ...ek NOTE Click to save the current schedule 7 7 Alarm input This section allows you to specify what the camera should do when the external sensor triggers NOTE If you use external alarm devices be awar...

Page 75: ...ws setting length of files that are recorded when the connection is lost for their further sending to FTP network storage or via e mail User can choose a file type to be sent to FTP or e mail IMPORTAN...

Page 76: ...interval for recording until the connection is restored IMPORTANT When you configuring this menu be aware that these parameters are applied to the other camera functions for example to recording to ne...

Page 77: ...sition the more the sensor is sensitive Motion detection 1 check this box to enable this area Motion detection 2 check this box to enable this area Motion detection 3 check this box to enable this are...

Page 78: ...The entries are added automatically after the camera is turned on Pic 7 23 Pic 7 23 Enable remote log allows you to send information from the system log to a remote server Server name type the remote...

Page 79: ...e A 1 MPEG4 30 fps kbps Quality 640 480 320 240 160 120 Excellent 1000 300 90 Detailed 400 150 50 Good 300 100 30 Standard 250 70 25 Medium 250 55 20 A 2 MPEG4 fps kbps Resolution Bitrate Fps Medium r...

Page 80: ...esolution Quality Fps Medium rate Medium fps 640 480 Excellent 15 4000 13 640 480 Excellent 5 1600 5 640 480 Good 15 1600 13 640 480 Good 5 650 5 640 480 Medium 15 900 14 640 480 Medium 5 360 5 320 24...

Page 81: ...9 Detailed 4 2 1 6 0 5 Good 3 2 1 1 0 3 Standard 2 6 0 7 0 3 Medium 2 6 0 6 0 2 B 2 MPEG4 15 fps 24 hour record record size GB Quality 640 480 320 240 160 120 Excellent 5 3 1 6 0 4 Detailed 2 1 0 8 0...

Page 82: ...xcellent 42 2 15 8 6 3 Detailed 25 3 9 5 4 2 Good 16 9 6 9 3 2 Standard 13 7 5 3 2 5 Medium 9 5 3 7 1 8 B 5 MJPEG 24 hour record record size GB Resolution Quality Fps Record Size GB 640 480 Excellent...

Page 83: ...Appendix N6603 Operations User Manual 82 160 120 Good 15 3 2 160 120 Good 5 1 2 160 120 Medium 15 1 8 160 120 Medium 5 0 7...

Page 84: ...to IP camera over https through the port 443 IP means camera IP address the default value is 192 168 0 99 If the default values are used the request is https 192 168 0 99 provides secured access to IP...

Page 85: ...address the default value is 192 168 0 99 If the default values are used the request is rtsp 192 168 0 99 554 video mp4 8 http IP port video mjpg request for MJPEG video port means camera RTSP port th...

Page 86: ...orwarding over UPnP 554 1024 65535 RTP start port 5000 1124 65516 RTP end port 7999 1143 65535 Multicast video port 1124 65534 Multicast audio port 1124 65534 SMTP 25 1 65535 System log remote server...

Page 87: ...x E Factory Defaults This table provides camera factory defaults Parameter Value IP address 192 168 0 99 Subnet mask 255 255 255 0 Gateway 192 168 0 1 Username administrator admin Password administrat...

Page 88: ...ion Protocol is used to associate an IP address to a hardware MAC address A request is broadcast on the local network to discover the MAC address for an IP address Aspect ratio is a ratio of width to...

Page 89: ...ynamic DNS is a method protocol network service that provides the capability for a networked device such as a router or computer system using the Internet Protocol Suite to notify a Domain Name System...

Page 90: ...appears Frame is a complete video image In the 2 1 interlaced scanning format of the RS 170 and CCIR formats a frame is made up of two separate fields of 262 5 or 312 5 lines interlaced at 60 or 50 Hz...

Page 91: ...Mbit s transmission on the 2 4 GHz band IEEE 802 11b supports data rates up to11 Mbit s on the 2 4 GHz band while 802 11g allows up to 54 Mbit s on the 5 GHz band Interlacing Interlaced video is video...

Page 92: ...ality is guaranteed regardless of movement or complexity of the image Image quality is controlled by adjusting the compression level which in turn provides control over the file size and thereby the b...

Page 93: ...ct computers onto a local area networks LAN especially Ethernets RJ 45 connectors look similar to the RJ 11 connectors used for connecting telephone equipment but they are a bit wider Router is a devi...

Page 94: ...e network and how to determine the route Some switches include the router function TCP is used along with the Internet Protocol IP to transmit data as packets between computers over the network While...

Page 95: ...for mobile devices such as mobile phones called cellular phones in some countries that uses the protocol Web server is a program which allows Web browsers to retrieve files from computers connected t...

Reviews: