background image

18 


BetterOutdoorProducts.com 


Slowly pour approximately 80% of the specified oil 
into the filler tube.  
Check the oil level; refer to Checking the Engine Oil 
Level.  
Slowly add the additional oil to bring it to the Full 
mark.  

Changing the Oil Filter (100hrs) 

Replace the oil filter every 100 operating hours or 
every other oil change.  

OEM WIX FRAM NAPA

Purolator Stens CarQuest

Kawasaki  49065 51394 PH4967

1394  PER4476

85394 

1056 L14476 120485 85065 


Note:

 Change the oil filter more frequently when the 

operating conditions are extremely dusty or sandy.  

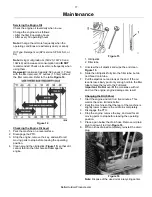
1.  Drain the oil from the engine; refer to Changing the 

Engine Oil.  

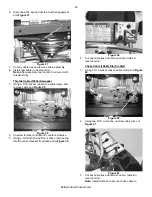
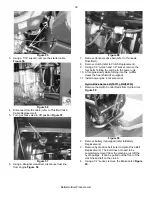
2.  Remove the old filter 

Figure 17

.  


Figure 17 

1. Oil filter  2. Adapter  
 

3.  Apply a thin coat of new oil to the rubber gasket on 

the replacement filter. Install the replacement oil filter 
to the filter adapter, turn the oil filter clockwise until 
the rubber gasket contacts the filter adapter, then 
tighten the filter an additional 3/4 turn 

Figure 17

.  

4.  Fill the crankcase with the proper type of new oil; 

refer to Servicing the Engine Oil.  
Run the engine for about 3 minutes, stop the engine, 
and check for oil leaks around the oil filter and drain 
valve.  
Check the engine oil level and add oil if needed.  
Wipe up any spilled oil.  

Servicing the Spark Plug(s) (100hrs) 

Check the spark plug(s) after every 100 operating 
hours.  
 
Ensure that the air gap between the center and side 
electrode is correct before installing the spark plug. 
Use a spark plug wrench for removing and installing 
the spark plug(s) and a gapping tool/feeler gauge to 
check and adjust the air gap. Install new spark 
plug(s) if necessary.  

Type: Champion® RCJ8Y or equivalent  
Air Gap: 0.030 inch (0.75 mm)  

Removing the Spark Plug(s)  

Disengage the PTO.  
Stop the engine, remove the key, and wait for all 
moving parts to stop before leaving the operating 
position.  
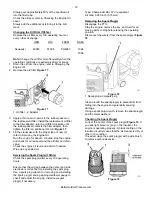
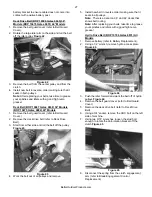
Disconnect the wire(s) from the spark plug(s) 

Figure 

18

.  


Figure 18 

1. Spark-plug wire/spark plug  
 
Clean around the spark plug(s) to prevent dirt from 
falling into the engine and potentially causing 
damage.  
Using a spark plug wrench, remove the spark plug(s) 
and the metal washers.  

Checking the Spark Plug(s)  

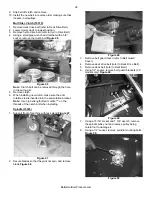
Look at the center of the spark plug(s) 

Figure 19

. If 

you see light brown or gray on the insulator, the 
engine is operating properly. A black coating on the 
insulator usually means that the air cleaner is dirty or 
other rich condition.  
If needed, clean the spark plug(s) with a wire brush 
to remove carbon deposits.  


Figure 19 


Summary of Contents for Quick Dually

Page 1: ...utdoorProducts com Operators Manual Quick Dually Mowers Featuring the EZR Control System Better Outdoor Products LLC West Point Business Park 2595 Viceroy Drive Winston Salem North Carolina 27103 866 290 7295 ...

Page 2: ...r product properly and to avoid injury and product damage You are responsible for operating the product properly and safely You may contact Better Outdoor Products directly at service betteroutdoorproducts com for product and accessory information Whenever you need service genuine Better Outdoor Products parts or additional information contact Better Outdoor Products Customer Service and have the ...

Page 3: ...ications 11 Operation 12 Adding Fuel 12 Using Stabilizer Conditioner 12 Filling the Fuel Tank 12 Checking the Engine Oil Level 12 Think Safety First 13 Starting the Engine 13 Stopping the Engine 13 Moving Forward or Backward 13 Moving Forward 13 Moving Backward 13 Stopping the Machine 13 Pushing the Machine by Hand 14 Side Discharging or Mulching the Grass 14 Operating the Deck Engagement Control ...

Page 4: ...ecking the Spark Plug s 18 Installing the Spark Plug s 19 Air Cleaner Foam and Paper Element 25 50hrs 19 Fuel Filter 200 hrs 19 Cooling System Maintenance 19 Grease Fittings 25 hrs 19 Caster Fork 25 hrs 20 Clutch 25hrs 20 Tires 25 hrs 20 EZT Hydro 21 Battery 21 Blade Inspection 8hrs 21 Troubleshooting 22 Repair 23 Ignition Switch 23 Blade Engagement Interlock Switch 10081 23 Battery 10799 23 Start...

Page 5: ...0251 10252 10483 29 Idler Pulley Replacement 10027 Deck Idler 10028 Deck Drive Idler 29 Idler Spring Replacement 10029 Small 10326 Large 29 Rear Wheel 29 Front Caster Wheel 10007 29 Engine 29 Hydro Drive Axles LH 10711 RH 10712 30 Wiring Schematics 33 Accessories 35 Mulching Kit ACC 0013 36 models ACC 0014 44 models 35 Gator Blades ACC 0002 36 models ACC 0011 44 models 35 Mulching Tips 36 Striping...

Page 6: ...e refueling Do Not smoke Never refuel or drain the machine indoors Check that operator s presence controls safety switches and shields are attached and functioning properly Do Not operate unless they are functioning properly Operation Never run an engine in an enclosed area Only operate in good light keeping away from holes and hidden hazards Be sure all drives are in neutral and parking brake is ...

Page 7: ... or service Use only Better Outdoor Products approved attachments Warranty may be voided if used with unapproved attachments Slope Operation All slopes and ramps require extra caution If you feel uneasy on a slope Do Not mow it Remove obstacles such as rocks tree limbs etc from the mowing area Watch for holes ruts or bumps Tall grass can hide obstacles Use caution near drop offs ditches or embankm...

Page 8: ...8 BetterOutdoorProducts com Safety Decals Safety decals and instructions are easily visible to the operator and are located near any area of potential danger Replace any decal that is damaged or lost ...

Page 9: ...9 BetterOutdoorProducts com ...

Page 10: ...hrottle controls engine RPM Blade Engagement Control PTO The blade engagement control PTO is used to engage the drive for the mower blades Move the lever up and to the right to engage the blades To disengage the blades move the blade control lever PTO down The left side motion control lever must be depressed for blades to engage Motion Control Levers The motion control levers are used to drive the...

Page 11: ... Contact Better Outdoor Products for information on approved accessories Parking Brake Dump Valves Figure 6 1 The parking brake is engaged by pulling the lever out and locking in place It must be disengaged for machine to move 2 The dump valves are located on either side of parking brake They are engaged by pulling out and locking in place This will allow the machine to be rolled around by hand Sp...

Page 12: ...move gas powered equipment from the truck or trailer and refuel the equipment with its wheels on the ground If this is not possible then refuel such equipment on a truck or trailer from a portable container rather than from a gasoline dispenser nozzle If a gasoline dispenser nozzle must be used keep the nozzle in contact with the rim of the fuel tank or container opening at all times until fueling...

Page 13: ...the engine off To stop the engine turn the ignition key to Off Important Make sure fuel shut off valve is closed before transporting or storing the machine as fuel leakage may occur Before storing the machine pull the wire off spark plug s to prevent possibility of accidental starting Moving Forward or Backward The throttle control regulates the engine speed as measured in rpm revolutions per minu...

Page 14: ...ition 3 Move the deck engagement control lever PTO up and to the right while holding down the left side motion control lever 4 Move throttle control lever to Run position Disengaging the Mower Blades PTO Move the deck engagement control lever PTO up and to the left then down to the Off position The Safety Interlock System If safety interlock switches are disconnected or damaged the machine could o...

Page 15: ... 3 4 socket loosen the nut 1 1 2 to 2 full turns for the rear height of cut adjustment on both sides Figure 10 Figure 10 7 Pull up or push down on the rear of the deck to align the arrow on the rear adjusters so that they both point to the number position that matches your caster fork setting and retighten nuts 8 The height of cut can be adjusted from 1 to 4 inches 25 to 100 mm Note Machines leave...

Page 16: ...Wheel Tracking The wheel tracking can be adjusted so that the machine will travel straight Note Proper tire inflation is important for the machine to track properly refer to Tire Maintenance 1 Using a 9 16 wrench loosen the jam nuts on the top and bottom of the hydro control rod Figure 12 Figure 12 2 Turn the appropriate rod to adjust the travel of the motion control lever Figure 13 Figure 13 3 Ti...

Page 17: ...und the oil dipstick Figure 15 so that dirt cannot fall into the filler hole and damage the engine Figure 15 1 Oil dipstick 2 Filler tube 5 Unscrew the oil dipstick and wipe the end clean Figure 15 6 Slide the oil dipstick fully into the filler tube but do not thread onto tube 7 Pull the dipstick out and look at the end If the oil level is low slowly pour only enough oil into the filler tube to ra...

Page 18: ...aks around the oil filter and drain valve Check the engine oil level and add oil if needed Wipe up any spilled oil Servicing the Spark Plug s 100hrs Check the spark plug s after every 100 operating hours Ensure that the air gap between the center and side electrode is correct before installing the spark plug Use a spark plug wrench for removing and installing the spark plug s and a gapping tool fe...

Page 19: ...remely flammable and highly explosive A fire or explosion from gasoline can burn you and others and can damage property Drain gasoline from the fuel tank when the engine is cold Do this outdoors in an open area Wipe up any gasoline that spills Never smoke when draining gasoline and stay away from an open flame or where a spark may ignite the gasoline fumes Fuel Filter 200 hrs 1 Turn gas tank valve...

Page 20: ...fine grit sandpaper clean any rust or dirt from caster fork shafts and caster bearings 3 Using a light lubricant WD 40 lubricate clean shafts 4 Reinstall Clutch 25hrs 1 Spray a small amount of light lubricating oil WD 40 into the opening next to clutch lever Figure 24 Figure 24 Tires 25 hrs 1 Using a tire pressure gage maintain 14 to 16 psi for rear wheels 2 Using a tire pressure gage maintain 25 ...

Page 21: ...lade Inspection 8hrs Inspect the blades every 8 hours 1 Park the machine on a level surface disengage the blades 2 Turn the ignition key to Off 3 Remove the key and disconnect the spark plug wire s from the spark plug s 4 Support the front of deck with a jack stand 5 Inspect the cutting edges item 1 Figure 25 If the edges are not sharp or have nicks remove and sharpen the blades 6 Inspect the blad...

Page 22: ...ce the fuel cap 7 Dirt in the fuel filter 7 Replace the fuel filter 8 Dirt water or stale fuel is in the fuel system 8 Drain and clean fuel system Engine overheats 1 Engine load is excessive 1 Reduce the ground speed 2 Oil level in the crankcase is low 2 Add oil to the crankcase 3 Cooling fins and air passages under the engine blower housing are plugged 3 Remove the obstruction from the cooling fi...

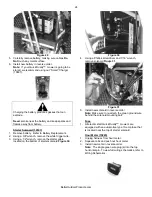
Page 23: ... causing sparks Sparks can cause the battery gasses to explode resulting in personal injury When removing or installing the battery Do Not allow the battery terminals to touch any metal parts of the machine Do Not allow metal tools to short between the battery terminals and metal parts of the machine Incorrect battery cable routing could damage the machine and cables causing sparks Sparks can caus...

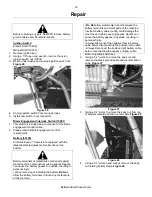
Page 24: ... Using a 1 2 wrench remove the starter cable located on the bottom of starter solenoid Figure 30 Figure 30 4 Using a Phillips screwdriver and 7 16 wrench remove solenoid Figure 31 Figure 31 5 Install new solenoid in reverse order Note Make sure to re attach the green ground wire behind the solenoid mounting bolt Fuse 1 All electric start Quick Dually mowers are equipped with an automotive type 10 ...

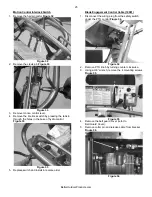
Page 25: ...ase of hydro control Figure 33 Figure 33 5 Replace switch and install in reverse order Blade Engagement Control Cable 10081 1 Disconnect the wiring plug from the safety switch under the PTO control Figure 34 Figure 34 2 Remove PTO knob by turning counter clockwise 3 Using a 3 8 wrench remove the 4 mounting screws Figure 35 Figure 35 4 Remove the belt guard cover refer to Belt Guard Cover 5 Remove ...

Page 26: ...e cable end Figure 38 Figure 38 2 Unscrew throttle control knob counter clockwise 3 Using a 3 8 wrench and 5 16 socket remove the throttle control bracket from dash panel Figure 39 Figure 39 4 Cut any cable ties and remove cable Install in reverse order Choke Cable 10440 Electric Start 1 Using a 5 16 socket loosen cable clamp end Figure 40 Figure 40 2 Using two 9 16 wrenches unscrew cable jam nut ...

Page 27: ...r side and roll the belt off the pulley Figure 43 Figure 43 4 Work the belt out of all pulleys and remove 5 Install new belt in reverse order making sure that it seats in all pulleys Note There is a decal on 36 and 44 decks that shows belt routing Note After replacing your belts take time to grease your spindles and idlers with a good high temp grease Hydro Drive Belt BOP 10706 Gates 6831 All Mode...

Page 28: ... sure the anti rotation stud is inserted into the anti rotation bracket Note Use high strength Red Loctite on the threads of the clutch bolt when installing Spindle 10323 1 Support front of machine with jack stand Figure 47 Figure 47 2 Secure blades so that they will not spin and remove blade Figure 48 Figure 48 3 Remove belt guard cover refer to Belt Guard Cover 4 Remove deck drive belt refer to ...

Page 29: ...er to Deck Drive Belt 3 Remove deck belt refer to Deck Belt 4 Using 9 16 socket remove spring retaining nut and washer and remove spring Figure 52 Figure 52 5 Using a 3 4 socket and wrench remove idler arm bolt Figure 53 Figure 53 6 Replace spring and install in reverse order Note Grease idler arm after reinstalling Rear Wheel 1 Support the rear of the machine with a jack stand 2 Using a 3 4 inch ...

Page 30: ... and 1 2 socket remove the four bolts holding the engine to the power unit 10 Lift engine slowly while turning it so the muffler clears the heat shield if equipped 11 Install new engine in reverse order Hydro Drive Axles LH 10711 RH 10712 1 Remove the Hydro Control Rods from Hydro Arms Figure 59 Figure 59 2 Remove battery if equipped refer to Battery Replacement 3 Remove hydro drive belt refer to ...

Page 31: ...g a 1 2 wrench and 1 2 socket remove the two bolts securing the rear of the hydro assembly to the frame Figure 63 Figure 63 8 You should be able to lift up on the handlebars and roll the machine off of the hydro assembly Note Be careful that the dump valves are clear of the slots before lifting up as they may bend 9 Remove the wheels from the hydro assembly refer to Rear Wheel Replacement 10 Deter...

Page 32: ...ng the hydro arm to hydro pump Figure 68 Figure 68 16 Remove the hydro arm and install it on the new hydro pump 17 Install the hydro pump back onto the lower support Note It is important to follow these steps in order for the hydro pumps to seat properly Install the two bolts that connect the hydro pumps and then back off one full turn Install the four bolts that secure the hydro pump to the lower...

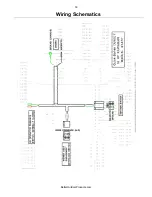
Page 33: ...33 BetterOutdoorProducts com Wiring Schematics ...

Page 34: ...34 BetterOutdoorProducts com ...

Page 35: ...ulching kit and through hole in deck Figure C Figure C 3 Secure with lock washer and knob 4 Insert carriage bolt through hole in deck and through hole in mulching kit Figure D Figure D 5 Secure with flat washer lock washer and knob Gator Blades ACC 0002 36 models ACC 0011 44 models Note Install Gator blades teeth up 1 Support the front of machine with jack stand 2 Secure blades so that they will n...

Page 36: ...ng under the deck and recycle through the cutting blades A mistake people sometimes make when transitioning from side discharge mowing to mulching is to mow on the same once every week to ten days schedule they ve been used to in the past When mulching one should mow the area every 4 5 days Because if the grass becomes too long the deck can simply become overwhelmed with the volume of clippings Mo...

Page 37: ...ing hired operators or used for income producing service We will repair or replace any part or parts found at our sole discretion to be defective without charge directly to the original owner of record Portions of Better Outdoors Products equipment are warranted separately by their respective manufacturers Kawasaki Engines Two years in homeowner use One year in commercial use Hydro Gear Axles Two ...

Reviews: