29
BNX-H110 supports Intel® LGA1151 Gen-6 Core-i Processor. For a reference list of supported processor, please
refer to the specification section. The socket 1151 is formed up with sensitive arrays of pins, improper or careless
installation may cause permanent harm to the socket pins. In some cases users may accidentally damage the
socket simply by adjusting the position of the CPU.
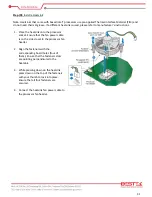
Please follow the installation instructions as shown below:
Step (A):
Opening the Socket
1.
Push the “Socket Lever” down and away
from the socket to release it.
2.
Rotate the “Socket Lever” to lift the “Load
Plate” away from the socket.
3.
Make sure the “Load Plate” is in the fully
open position, and also remove the socket
cover.
4.
When opening the socket, DO NOT TOUCH the
gold socket contacts.
3.3 Installing LGA1151 Intel® Core-i CPU, Heatsink, and Fan
Summary of Contents for BNX-H110
Page 1: ...1 Security Board BNX H110 Always at the forefront of innovation User Manual...
Page 6: ...6 Chapter 5 Programming Guide 5 1 Bypass Setting 46 5 2 GPIO 50...
Page 7: ...7 Chapter 1 General Information...
Page 11: ...11 Figure 1 1 Board Layout of BNX H110 1 4 Board Layout...
Page 12: ...12 Chapter 2 Preparation...
Page 16: ...16 2 5 Locations Of Jumpers and Connectors...
Page 25: ...25 Factory Default Power Reset Switch SW1 Up Power Switch Reset Switch Down Factory Default...
Page 26: ...26 Chapter 3 Operation...
Page 34: ...34 Chapter 4 BIOS Setup...
Page 40: ...40 CPU Configuration Display CPU Information 4 6 The Chipset Menu...
Page 45: ...45 Chapter 5 Programming Guide...


