background image

24

GSM/GPRS Alarm Communnicator

Monostable Outputs (for appliance management)

Monostable OC outputs can be activated in 2 ways.

1.

By sending a case sensitive 

SMS 

text message containing the respective Access Code placed between pound (#) signs and Output

Label followed by “

=ON

” or

 “=OFF”

, as follows:

#ACCESSCODE#OUTPUTLABEL

=ON

#ACCESSCODE#OUTPUTLABEL

=OFF

2.

By sending a cost-free call from a


preset 

Remote Control number. 

This Device will activate the output concerned without answering

the call.

,

,

,

,

,

Monostable OC outputs deactivate (switch OFF) automatically when the programmed ON Time expires.

PROGRAMMING THE DEVICE

,

,

,

,

,

For proper function of this Device, use a 32 K SIM CARD (or higher).

,

,

,

,

,

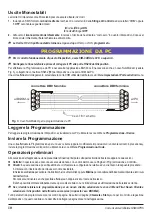
Disconnect the telecommunication line before connect the PC to the RS232 port.

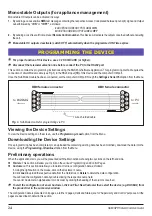
This section contains the programming instructions using the BGSM-G Software Application. This programming  method requires the
connection of a Null-Modem cable (see Fig. 3) to the RS232 input [

10

] of this Device and the computer COM port.

Once the Null-Modem cable has been connected, set the computer COM port through the 

Settings->Serial Port 

option


from the Menu.

Viewing the Device Settings

To view the Device settings on the screen, use the

 Programming->Load

 option from the Menu.

Downloading the Device Settings

Once programming has been completed (or an uploaded file containing existing data has been modified), download the data into the
Device, using the

 Programming->Download 

option from the Menu.

Preliminary operations

When the application starts, you will be presented with the Main window showing two sections on the left hand side.

z

Folders

: This section will allow you to click on the various Programming and Control Pages.

z

Customers

: This section will allow you to delete or retrieve configuration data, as follows:

1. 

Using the right button on the mouse, click on the Customer’s name.

2. 

Click 

Load

 to upload the respective data from the Hard-Disk, or 

Delete

 to delete the data configuration.

You can load the configuration data by double clicking the respective name field.
You can list Customers in alphabetical or code order by clicking the heading of the column concerned.

,

,

,

,

,

To start the configuration of a new Customer, click on File->New Customer then select the device (e.g. BGSM-G) from
the product list in the successive window.

The configuration data is presented on 4 pages, a further 2 pages (Calls and Status) are for “Supervisory and Control” purposes. All the
pages are described in detail in this section.

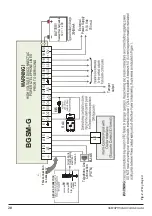
Fig. 3

 - Null-Modem cable for programming via PC


$)(&'**+


Summary of Contents for BGSM-G

Page 1: ...I I I I I G G G G G BGSM G GSM GPRS Alarm Communicator Comunicatore di Allarme GSM GPRS ...

Page 2: ...2 Comunicatore di Allarme GSM GPRS Fig 1 Identificazione delle parti Parts 2 23 1 1R 3DUWL 3DUWV 0 1 2 0 1 3 ...

Page 3: ...rossimo Invio SMS Periodico 15 Prossimo Invio Segnalazione Periodica 15 Cancella coda telefonica 15 INFORMAZIONI PER L UTENTE 15 Pereffettuareunatelefonata 15 Altreinformazioni 15 ATTENZIONE QuestoDispositivoèdotatodiunlimitatoredellacorrentedialimentazioneassorbita per evitare di sovraccaricare l uscita di alimentazione ausiliaria della centrale Questolimitatorefissaa120mAlacorrentemassimaassorbi...

Page 4: ...mo 2 Categoria di Sovratensioni II in luoghi non pericolosi al chiuso Queste istruzioni devono essere usate insieme al manuale di installazione della centrale Tutte le istruzioni presenti in questo manuale devono essere osservate Caratteristiche Generali Caratteristiche Tecniche La tensione di alimentazione per questo Dispositivo può essere fornita dalla Centrale oppure dall alimentatore ADP1512 n...

Page 5: ...one e tutti gli altri tipi di collegamento Disporre i fili come mostrato in Figura 1 QuestoDispositivodeveessereinstallatosolodaPERSONALEQUALIFICATO QuestoDispositivodeveessereinstallato alchiuso inunluogo sicuro QuestoDispositivodeveessereinstallatoinunluogoasciutto lontanodaapperecchiradio trasmittenti Provare la ricezione della Rete GSM prima di installare questo Dispositivo nel punto scelto 1 ...

Page 6: ...6 Comunicatore di Allarme GSM GPRS 5 Fig 2 Esempio di collegamento ...

Page 7: ...e in più necessaria per alcune funzioni vedere Figura 2 Questo Dispositivo deve essere collegato ad un alimentazione esterna ed a una batteria Questo Dispositivo deve essere collegato alla terra dell impianto elettrico Vedere Fig 2 ATTENZIONE la batteria può esplodere se non è del tipo raccomandato ricaricabile al Piombo sigillata 13 8 V 1 2 Ah Smaltire la batteria usata in accordo alle normative ...

Page 8: ...e antifurto trasmette gli eventi di allarme in formato DTMF QuestoDispositivodecodificaetrasformalecifreDTMFinpacchettiel inviaalricevitoredellaCentralediVigilanzatramitelareteGPRS Ilricevitorericonoscel allarmeeinviailcomandoaquestoDispositivopergenerareilcorrispondentesegnaledikiss offperalmeno800ms DopochequestoDispositivohageneratoilsegnaledikiss off senoncisonoaltrieventichedevonoessereinviat...

Page 9: ...lefonica PSTN Guasto del Modulo GSM Mancanza Rete GSM GuastoAlimentazione alimentazioneesternaobatteria ChiamatainEntrata ChiamatainUscita ChiamataContactID Abilitazionedellaprogrammazionedaremoto Fallimento della comunicazione di un evento interno Un Uscita OC attivata in automatico torna a riposo quando sono rimosse tutte le cause che ne hanno provocato l attivazione Attivazione e Disattivazione...

Page 10: ...ffettuata la Programmazione per un nuovo cliente oppure modificate le impostazioni di un cliente caricato in precedenza inviare la programmazione al dispositivo utilizzando la voce di Menù Programmazione Invia Operazioni preliminari All esecuzione dell applicazione viene presentata la finestra principale sulla parte sinistra della stessa appaiono due sezioni z Cartelle in questa sezione possono es...

Page 11: ...lino è 01 digitare 2 nel campo Cifre da rimuovere Pagina Avvisatore SMS In questa pagina vanno programmate tutte le opzioni di funzionamento ed i Messaggi SMS per utilizzare il dispositivo come Avvisatore SMS Inoltre è possibile impostare le prime 3 Linee di Ingresso per funzionalità di Servizio I numeri telefonici cui fa riferimento questa pagina sono i primi 8 programmati nella pagina Telefono P...

Page 12: ...in considerazione i valori Data e Ora prossimo invio Pagina Uscite Questapaginaèperl impostazionedelleUscite Sezione Impostazione Uscite Nella colonna Polarità selezionare la polarità a riposo delle Uscite H Normalmente aperta oppure L Normalmente chiusa Nelle colonne dalla 2 alla 9 selezionare quale Uscita attivare in presenza dell evento corrispondente Colonna Uscita Riservata Quando si abilita ...

Page 13: ...edalDispositivoenonpuòessereprogrammato Descrizione evento Qualificatore Codice Evento Descrizione su Sur Gard System III II AttivazioneIngresso1 E 11A FIRE ZONE 001 Ripristino Ingresso 1 R 11A FIRE ZONE 001 Attivazione Ingresso 2 E 12A Panic Alarm ZONE 002 Ripristino Ingresso 2 R 12A Panic Alarm ZONE 002 AttivazioneIngresso3 E 13A Burglary ZONE 003 Ripristino Ingresso 3 R 13A Burglary ZONE 003 At...

Page 14: ...le Sequestecasellevengonolasciatevuotetuttelechiamatevengonoinoltrate suGPRS DNIS Inserire il codice identificativo univoco se richiesto Codice account Inquestacasella deveesseredigitatoilCodiceidentificativoperlacomunicazioneconl applicazioneWinBCSoiricevitoriSYSTEMIIIo SYSTEM II Pagina Chiamate Questa pagina è per la visualizzazione delle chiamate effettuate ricevute e perse dal Dispositivo Ogni...

Page 15: ... 4 Uscite spiaVERDE uscita a riposo spiaROSSA uscita attivata Se una o più Uscite sono state impostate con l opzione Riservata vedere la pagina Uscite spia ROSSA accesa è possibile attivarle disattivarle in tempo reale effettuandounclickconiltastodestrodelmouseeselezionandolavocedimenù Attiva Disattiva Sezione Eventi In questa sezione viene visualizzato lo stato degli Eventi la spia ROSSAindica il...

Page 16: ...16 Comunicatore di Allarme GSM GPRS ...

Page 17: ...ion 29 Inputs section 29 Outputs section 29 Events section 29 Send next periodic message on 29 Send next periodic report on 29 Clear call queue 29 INFORMATION FOR THE USER 29 GSM Network Calls 29 FurtherInformation 29 ATTENTION In order to avoid the overload of the panel aux power output this Device is equipped with a limiter for the drawn supply current This current limiter fixes to 120 mA the ma...

Page 18: ...des the pollution degree max 2 over voltages category II in non hazardous indoor locations only This manual shall be used with the Installation Manual of the alarm control panel All instruc tions specified within that manual must be observed Features Technical Specifications TheinputvoltagetothisDevicecanbedrawnfromtheControlPanelorprovidedbythe ADP1512 power supply optional Simulateslandline Swit...

Page 19: ...4mm separation A minimum 1 4 6 4mm separation must be maintained at all points between Power Limited wiring and all other Non Power Limited wiring Route wires as indicated in Figure 1 This Device shall be installed by qualified SERVICE PERSONS only This Device must be installed indoors in a non hazardous location This Device should be located in a safe dry place away from radio transmitters and si...

Page 20: ...20 GSM GPRS Alarm Communnicator Fig 2 Wiring Diagram 5 0 ...

Page 21: ...ernal power supply and to a battery This device must be connected to a proper Earth Ground see Fig 2 WARNING Risk of explosion if a battery different from that required is used 13 8 V 1 2 Ah sealed lead rechargeable battery When disposing of batteries follow the instructions and and precautions printed on the batteries and contact your municipal offices for information on the disposal of used batt...

Page 22: ...h enabled before dialing the number The Device detects the DTMF dialing and stops dial tone The Device will send the required Contact ID dual tone handshake After receiving the handshake panel transmits alarm message in DTMF format TheDevicedecodesandtransformsDTMFdigitsintothepacketandsendsittotheCentralStationReceiverovertheGPRSnetwork The receiver acknowledges the alarm and sends command to the...

Page 23: ...ted No Service Power supply trouble external power supply or battery Incomingcall Outgoingcall ContactIDcall Enablementofremoteprogramming Fail to communicate for internal events FTC Once an output has been activated automatically it will not restore its state until all the causes of activation clear Activating Deactivating Remote control Outputs The OC outputs can be programmed as BISTABLE activa...

Page 24: ...the screen use the Programming Load option from the Menu Downloading the Device Settings Once programming has been completed or an uploaded file containing existing data has been modified download the data into the Device using the Programming Download option from the Menu Preliminary operations When the application starts you will be presented with the Main window showing two sections on the left...

Page 25: ...calls are sent over the GSM Network it must be removed from the digits which form the telephone number Enter the number of digits that form the switchboard number e g if switchboard number is 01 enter 2 in the Digits to remove field as 2 numbers form the switchboard number SMS Dialer Page This page will allow you to program the SMS Dialer functions and Messages and also set up the Special Function...

Page 26: ...olumn A transmission of the Periodic message will be subordinate to Unbalance on Input Line 1 refer to the Special functions table If this occurs the Date and Hour of the Periodic message will be irrelevant Outputs Page This page will allow you to set up and control the outputs Output Settings Polarity select the polarity of the output H Normally Open L Normally Closed For Land Line Trouble GSM Tr...

Page 27: ... Device and can not be programmed Event Description Qualifier Event Code Sur Gard System III II Description Input1activation E 11A FIRE ZONE 001 Input 1 Restoral R 11A FIRE ZONE 001 Input2activation E 12A Panic Alarm ZONE 002 Input 2 Restoral R 12A Panic Alarm ZONE 002 Input3activation E 13A Burglary ZONE 003 Input 3 Restoral R 13A Burglary ZONE 003 Input4activation E 15A 24 HOUR AUXILIARY ZONE 00...

Page 28: ...ountCodeinthisfield Telephone numbers to decode InthissectionyoumayenteruptotwotelephonenumbersdialedbythepanelthatwillberecognizedbytheDevicewhencalled totrigger GPRS communication If a number is programmed any time a number dialed does not match one of the phone number entered the call will be routed through the voice channel Leaving it blank will route all calls to GPRS Calls Page This page wil...

Page 29: ...section shows the status of each of the 4 Outputs GREEN LED Output in standby RED LED Output activated If any of the Outputs has been set up as Reserved refer to Outputs page REDLED On it will be possible to activate deactivate the Outputs inreal timebyright clickingtherespective PolarityoptionandselectingtheActivate Deactivatesub option Events section This section shows the events as they occur R...

Page 30: ......

Page 31: ......
Page 32: ... Dispositivo venga manomesso da personale non autorizzato Il contenuto di questo manuale può essere soggetto a modifiche senza preavviso e non rappresenta un impegno da parte della BENTEL SECURITY Hereby BENTEL SECURITY declares that BGSM G AM and BGSM G EU are in compliance with the essential requirements and other relevant provisions of Directive 1999 5 EC The complete R TTE Declaration of Confo...

Reviews: