background image

4. Basic Operation

BenQ HT 480W User’s Guide

18

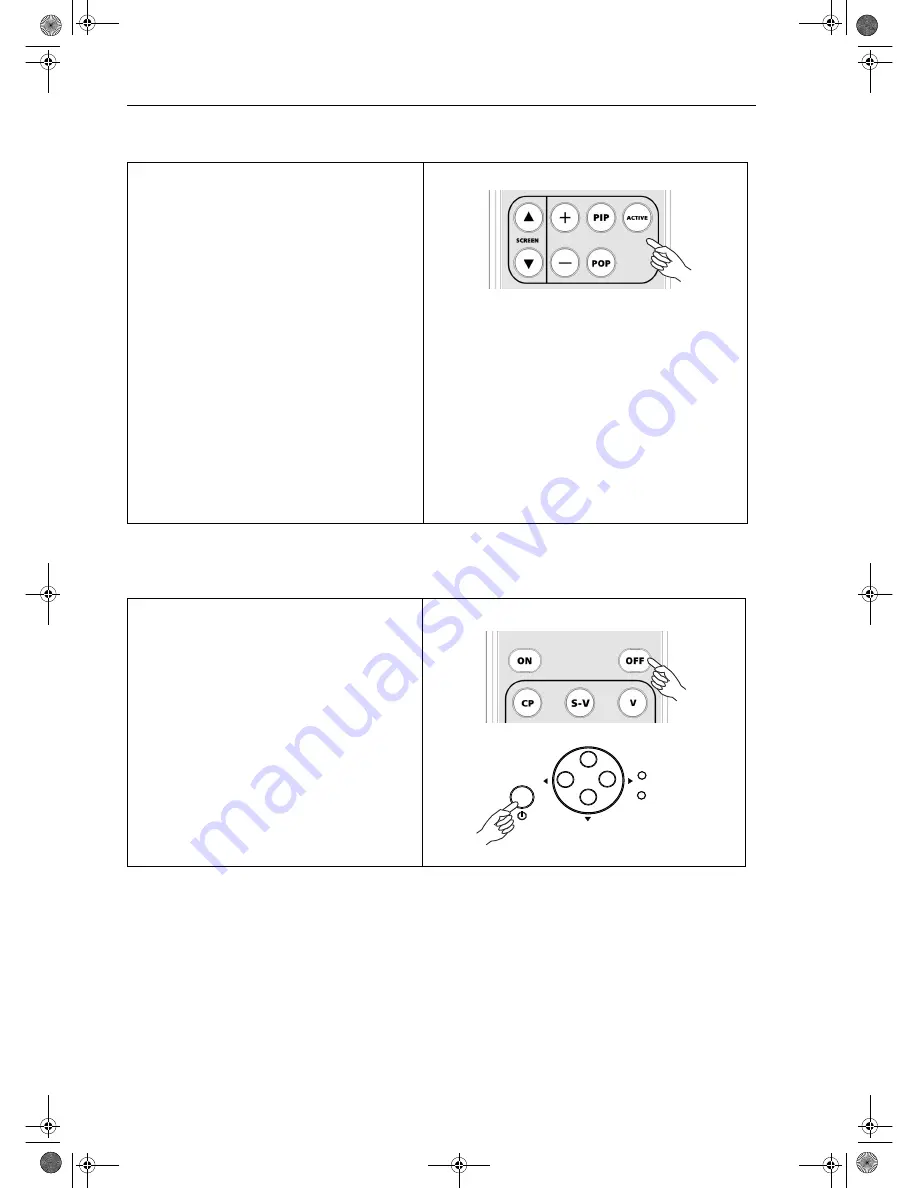
PIP (Picture-In-Picture)/POP (Picture-On-Picture) functions    

Turning the Projector Off 

Press the PIP button to enable the PIP function.

For PIP purposes, there are two groups of inputs 
classfied according to their display modes: 
Video Group: Video, S-Video and Component Y/
C

B

/C

R

 inputs 

Graphic Group: HDTV input and Computer input. 

The PIP function allows the projector to display 
one input from the Graphic Group within one 
input from the Video Group, or display one input 
from Video Group within one input from the 
Graphic Group.

Press the PIP button to switch to the main 
window or turn off the PIP function.

Select the input source for the main window by 
pressing the INPUT button.

 Press the POP key to enable the POP function.

Press the ACTIVE button to switch to the active 
window. You can change the input signal setting in 
the active window.

Press + or - to adjust the size of the PIP window.

Adjust the position of the PIP window with the 
ARROW keys (

c

/

e

/

d

/

f

).

Press the OFF key on the remote control or the 
STANDBY/ON key on the projector to turn the 
projector off.

After turning the projector off, the POWER LED 
will flash green and the fans will run for one 
minute to cool the lamp. The projector will not 
respond to any commands until cooling process is 
complete. The POWER LED will be lit a steady 
orange once the cooling process has finished.

Power

Lamp

Content-e.fm  Page 18  Monday, July 8, 2002  4:23 PM

Summary of Contents for HT480W

Page 1: ...or triggering Do not connect to any other power input or output This could cause damage to this unit 10 Use only accessories specified by BENQ Corporation 11 Keep the packing material in case the proj...

Page 2: ...2 Connecting Video Inputs 12 Video S Video Component Interlaced Video 12 Progressive Component DTV Y PB PR 13 RGBHV DTV RGB 13 Connecting a Computer 14 4 Basic Operation 15 Turning the Power on 15 Zoo...

Page 3: ...m design prevents annoying fan noise and is rated at less than 30 dB Wide Variety of Inputs The projector can support various video formats including Composite S Video Component DTV Y PB PR DTV RGB an...

Page 4: ...is backlight can be turned off using the OSD on screen display control menus For more details see ENVIRONMENT Menu on page 22 8 Kensington Lock This lock can withstand 150 N of force 1 Connector Panel...

Page 5: ...indicate that the lamp is cooling 2 INPUT Switches input sources sequentially 3 MEMORY Sequentially recalls settings 1 3 saved to memory Please see Selecting the Video Memory on page 17 4 MENU Turns t...

Page 6: ...CR video signal input 4 RGB HDTV BNC DTV Y PB PR or DTV RGB video signal input 5 Computer D Sub 15 pin RGB Computer signal input 6 RS 232C mini DIN 8 pin RS 232C control signal input 7 12V Trigger mi...

Page 7: ...Computer signal input DEFAULT Restores the default settings for the current input source Memory 1 Restores settings saved in memory 1 Memory 2 Restores settings saved in memory 2 Memory 3 Restores se...

Page 8: ...t obstruct the infrared beam The effective range of the remote control is between 3m from the front of the projector and 4m from the rear of the projector and within 30 degrees horizontally and 15 deg...

Page 9: ...size you need with the zoom ring on the lens To focus the image rotate the focus ring on the lens There are four screw adjusters on the bottom of the projector You can adjust the height or projection...

Page 10: ...you desire for the center of the screen s Height 4 Mount this unit using ceiling mounting rack with a suitable length Roof Height Offset to meet your requirements and avoid any keystone distortion 5 A...

Page 11: ...the center of the screen s Height 4 Place the projector on a table with a suitable height Height Offset to meet your requirements to avoid any keystone distortion 5 Alternatively use the adjusters to...

Page 12: ...ables for each source 3 Ensure the cables are firmly inserted 4 Connect all audio signals to external speakers This projector is not equipped with speakers Connecting Video Inputs Video S Video Compon...

Page 13: ...ormats Progressive component DTV Y PB PR and DTV RGB The projector will detect the resolution automatically S Video Computer G Y B P R P H V B R Trigger Video Y C C RS 232C 12V B R DTV Source S Video...

Page 14: ...projector only supports resolutions up to XGA If the input signal is greater than XGA the projector will display a warning message S Video Computer G Y B P R P H V B R Trigger Video Y C C RS 232C 12V...

Page 15: ...ill be displayed on the screen before the projector identifies the input signal This message will remain on the screen until a valid signal is detected If the horizontal frequency of the input signal...

Page 16: ...axis to provide full screen display ar a 16 9 aspect ratio 4 3 The input signal will be scaled to accommodate a 4 3 aspect ratio display in the center of screen LB LETTERBOX An image in letter box for...

Page 17: ...sed to restore the default setting for the current input source Press the MENU button to turn the on screen display menu on or off Use the ARROW buttons c e d f to select items in the menu or to make...

Page 18: ...r turn off the PIP function Select the input source for the main window by pressing the INPUT button Press the POP key to enable the POP function Press the ACTIVE button to switch to the active window...

Page 19: ...save settings for items shown in the menus There are four main menus available PICTURE Menu In this menu all front panel adjustments can be made These settings can be stored in three separate video m...

Page 20: ...nd two filters for graphic input 0 1 The higher the setting the less the noise 8 RED Adjusts red hues independently to values between 0 and 30 The higher the setting the greater the intensity of red h...

Page 21: ...mage so that it is displayed with a 4 3 aspect ratio display mode in the center of the screen which you have set in the INSTALLATION menu LETTERBOX Enlarges an image in letter box format to display in...

Page 22: ...memories ENVIRONMENT Menu In this menu global settings for the projector can be made There are five items available DEFAULT LAMP TIMER BACK LIGHT AUTO OFF LAMP HOURS 1 DEFAULT Loads the default value...

Page 23: ...NT CEILING FRONT FLOOR REAR CEILING REAR 3 KEYSTONE Corrects for trapezoidal distortion resulting from the angle of projection It can provide correction up to 12 degrees of offset 4 SCREEN Selects a p...

Page 24: ...e the lamp will be displayed on the screen continuously and the POWER LED will flash orange and green sequentially if the lamp has been in use for more than 1 500 hours The projector will turn off aut...

Page 25: ...signal has not been correctly selected in the INPUT SOURCE item in the DISPLAY menu Select the correct input signal POWER LED or LAMP LED flashing Please contact your BenQ dealer for assistance Image...

Page 26: ...p p 2 dB NTSC 75 ohms terminated burst 0 3 Vp p 2 dB PAL 75 ohms terminated Component RCA Jacks Y luminance 1 Vp p 2 dB sync negative 75 ohms terminated CB 0 7 Vp p 2 dB CR 0 7 Vp p 2 dB RGB HDTV BNC...

Page 27: ...6 Additional Information BenQ HT 480W User s Guide 27 Dimensions Unit mm Content e fm Page 27 Monday July 8 2002 4 23 PM...

Reviews: