background image

48

USING THE WEB-BASED ADVANCED USER INTERFACE

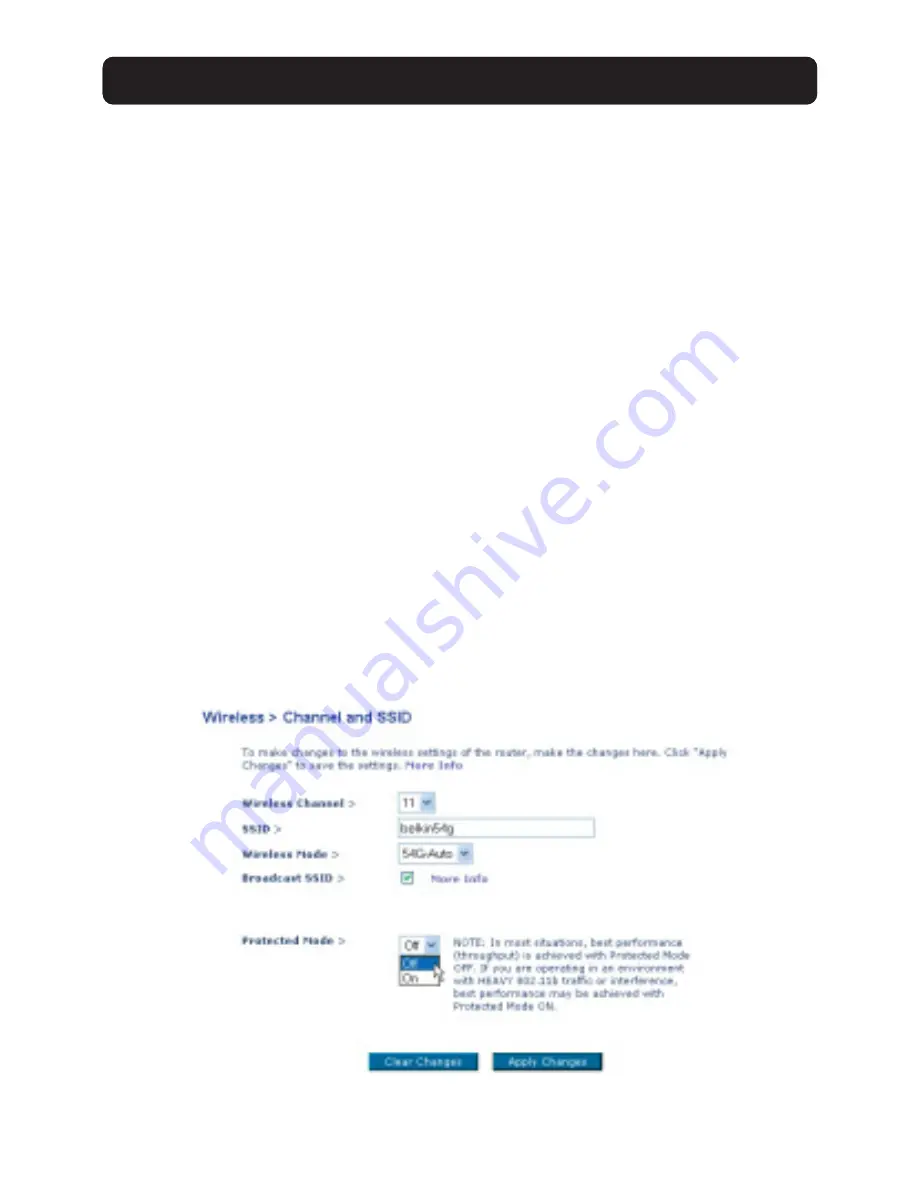
Using the Broadcast SSID Feature

Note: This advanced feature should be employed by advanced users only. 

For security, you can choose not to broadcast your network’s SSID. Doing so will
keep your network name hidden from computers that are scanning for the
presence of wireless networks. To turn off the broadcast of the SSID, remove the
check mark from the box next to “Broadcast SSID”, and then click “Apply
Changes”. The change is immediate. Each computer now needs to be set to
connect to your specific SSID; an SSID of “ANY” will no longer be accepted. Refer
to the documentation of your wireless network adapter for information on
making this change.

Protected Mode Switch

As part of the 802.11g specification, Protected mode ensures proper operation of
802.11g  clients and access points when there is heavy 802.11b traffic in the
operating environment. When protected mode is ON, 802.11g scans for other
wireless network traffic before it transmits data. Therefore, using this mode in
environments with HEAVY 802.11b traffic or interference achieves best
performance results. If you are in an environment with very little—or no—other
wireless network traffic, your best performance will be achieved with Protected
mode OFF. 

Summary of Contents for 54g

Page 1: ...User Manual F5D7230 4 WirelessRouter Share your broadband Internet connection without running cables...

Page 2: ...Software System Requirements 5 Knowing your Router 6 Placement of your Router 10 Connecting and Configuring your Router 11 Alternate Setup Method 24 Using the Web Based Advanced User Interface 40 Man...

Page 3: ...wireless technology that achieves data rates up to 54Mbps nearly five times faster than 802 11b Integrated Parental Control Web Content Filter Belkin has teamed with Cerberian a leading content filter...

Page 4: ...or Horizontal Desktop Application Your Router can stand vertically on the desktop to save space or lay down flat on a shelf or under your modem The included vertical mounting base lets you decide how...

Page 5: ...f connected devices The switch will transfer data between computers and the Internet simultaneously without interrupting or consuming resources Universal Plug and Play UPnP Compatibility UPnP Universa...

Page 6: ...terface and you can control access to your network Applications and Advantages Economically connect multiple computers to a single Internet connection SOHO Small Office Home Office networking needs Pr...

Page 7: ...h an installed network interface adapter TCP IP networking protocol installed on each computer CAT5 networking cable or better Microsoft Internet Explorer 4 0 or later or Netscape 4 0 or later Easy In...

Page 8: ...mpletely booted up the Power Ready LED becomes a SOLID light indicating the Router is ready for use OFF Router is OFF Blinking Green Router is Booting Up Solid Green Router is Ready 2 Wireless Network...

Page 9: ...er is connected to the Internet When the light is OFF the Router is NOT connected to the Internet When the light is blinking the Router is attempting to connect to the Internet When the light is solid...

Page 10: ...ategory 5 or 6 Ethernet cable The ports are labeled 1 through 4 These ports correspond to the numbered LEDs on the front of the Router 8 Internet WAN Port This port is for connection to your cable or...

Page 11: ...nces where you may have forgotten your custom password a Resetting the Router Push and release the Reset button The lights on the Router will momentarily flash The Power Ready light will begin to blin...

Page 12: ...y from metal cabinets and computer cases Do not place objects or components on top of the Router Make sure that both antennas are pointing UP at all times Metallic based UV window tint can affect wire...

Page 13: ...Card Modem Requirements Your cable or DSL modem must be equipped with an RJ45 Ethernet port Many modems have both an RJ45 Ethernet port and a USB connection If you have a modem with both Ethernet and...

Page 14: ...this manual Step 1 Run the Easy Install Wizard Software 1 Shut down any programs that are running on your computer at this time 2 Make sure you have the following items at the computer that is now dir...

Page 15: ...Installation 2 1 Click on Set Up the Router to begin 2 2 Welcome Screen The Wizard welcome screen will appear Make sure you have not connected the Router at this point If you have connected your Route...

Page 16: ...you want to continue using the software Click I disagree if you do not want to continue Click Next to move on 2 4 Examining Settings The Wizard will now examine your computer s settings and gather inf...

Page 17: ...one network adapter installed in your computer the Wizard will need to know which adapter is connected to your modem Select the network card that is connected to your modem from the list and click Nex...

Page 18: ...t see this screen Your user name and password is provided to you by your Internet Service Provider If you have to type in a user name and password to connect to the Internet then type that same user n...

Page 19: ...unplugged into the port on the back of the Router labeled Internet WAN 3 4 Connect the new network cable from the back of the computer to one of the ports labeled 1 4 Note It does not matter which num...

Page 20: ...4 The light which corresponds to the numbered port that you connected your computer to should be ON if your computer is connected properly Step 4 Continue Following the Wizard s Instructions 4 1 Chec...

Page 21: ...uring the Router The Wizard will now transfer all of the configuration information to the Router This will take approximately one minute 4 3 When the transfer is complete the Wizard will tell you that...

Page 22: ...n take a few minutes The Wizard may not detect a connection right away If not it will retry a number of times The Connected light on the front panel of the Router will flash during this time Please be...

Page 23: ...outer is now connected to the Internet Now you can begin surfing the Internet by opening your browser and going to your favorite web page Congratulations You have finished installing your new Belkin R...

Page 24: ...rd to set up the computer For Computers Already Equipped with a Wired or Wireless Network Adapter 5 1 For wired computers connect an Ethernet cable between the computer you want to add to the network...

Page 25: ...hen finished it will prompt to reboot your computer Click Yes 5 5 When your computer reboots your computer will be connected to the network To begin surfing the Internet open your browser and go to yo...

Page 26: ...plications port forwarding Set up security features such as client restrictions and MAC address filtering Enable the DMZ feature for a single computer on your network Change the Router s internal pass...

Page 27: ...ter by checking the lights on the front of the Router The green light labeled WAN should be ON if your modem is connected correctly to the Router If it is not recheck your connections 1 8 Verify that...

Page 28: ...ced User Interface In your browser type 192 168 2 1 do not type in anything else such as http or www Then press the Enter key Logging into the Router You will see the Router s home page in your browse...

Page 29: ...ime out after a specified period of time The default login time out is 10 minutes This can be changed from 1 to 99 minutes For more information see the section in this manual titled Changing the Login...

Page 30: ...ted to the Internet the indicator will read no connection in RED The indicator is automatically updated when you make changes to the settings of the Router 4 Login Logout Button This button enables yo...

Page 31: ...f the links or by clicking the Quick Navigation links on the left side of the screen 8 Internet Settings Shows the settings of the Internet WAN side of the Router that connects to the Internet Changes...

Page 32: ...nection settings are provided to you by your ISP To configure the Router with the settings that your ISP gave you click Connection Type A on the left side of the screen Select the connection type you...

Page 33: ...e From the connection type page you can select the type of connection you use Select the type of connection you use by clicking the radio button 1 next to your connection type and then clicking Next 2...

Page 34: ...ne Your host name is assigned by your ISP Some dynamic connections may require that you clone the MAC address of the PC that was originally connected to the modem 1 Host Name This space is provided to...

Page 35: ...5 After you apply the changes the Internet Status indicator will read connection OK if your Router is set up properly 1 IP Address Provided by your ISP Enter your IP address here 2 Subnet Mask Provide...

Page 36: ...system Type in the information provided by your ISP in the space provided When you have finished click Apply Changes 9 After you apply the changes the Internet Status indicator will read connection OK...

Page 37: ...ISP did not give you a connection ID leave this blank 8 Disconnect after X The Disconnect feature is used to automatically disconnect the Router from your ISP when there is no activity for a specifie...

Page 38: ...o User decide login server manually 4 and type in the address next to Login Server 5 When you have entered all of your information click Apply Changes 7 After you apply the changes the Internet Status...

Page 39: ...that translates Universal Resource Links URLs like www belkin com to IP addresses Many ISPs do not require you to enter this information into the Router The Automatic from ISP box 1 should be checked...

Page 40: ...the Router its own MAC address will be seen by the ISP and may cause the connection not to work Belkin has provided the ability to clone copy the MAC address of the computer into the Router This MAC a...

Page 41: ...Clone button 1 Click Apply Changes 2 Your MAC address is now cloned to the Router Entering a Specific MAC Address In certain circumstances you may need a specific WAN MAC address You can manually ente...

Page 42: ...www then press the Enter key You will see the Router s home page in your browser window Viewing the LAN Settings Clicking on the header of the LAN tab 1 will take you to the LAN tab s header page A q...

Page 43: ...nged if needed To change the IP address type in the new IP address and click Apply Changes The IP address you choose should be a non routable IP Examples of a non routable IP are 192 168 x x where x i...

Page 44: ...so as not to exceed the 100 client limit The starting IP address must be lower in number than the ending IP address 5 Lease Time The length of time the DHCP server will reserve the IP address for eac...

Page 45: ...s which are connected to your network You are able to view the IP address 1 of the computer the host name 2 if the computer has been assigned one and the MAC address 3 of the computer s network interf...

Page 46: ...ed The default SSID of the Router is belkin54g You can change this to anything you want to or you can leave it unchanged If there are other wireless networks operating in your area you will want to ma...

Page 47: ...Mode drop down box Then click Apply Changes 54g LRS Mode We recommend you DO NOT use this mode unless you have a very specific reason to do so This mode exists only to solve unique problems that may...

Page 48: ...faster than any standard 802 11g equipment to 802 11g clients This measurement is based on aggregate throughput in a mixed 802 11b and 802 11g environment Belkin 802 11g clients with the latest drive...

Page 49: ...e in The default channel is 11 unless you are in a country that does not allow channel 11 The channel can be changed if needed If there are other wireless networks operating in your area your network...

Page 50: ...your specific SSID an SSID of ANY will no longer be accepted Refer to the documentation of your wireless network adapter for information on making this change Protected Mode Switch As part of the 802...

Page 51: ...s time Microsoft s patch only supports devices with WPA enabled drivers such as Belkin 54g products There are two types of WPA security WPA PSK no server and WPA with server WPA PSK uses a so called p...

Page 52: ...Security Mode drop down menu select WPA with server 2 For Encryption Technique select TKIP or AES This setting will have to be identical on the clients that you set up 3 Enter the IP address of the r...

Page 53: ...ter selecting your WEP encryption mode you can type in your HEX WEP key manually or you can type in a passphrase in the Passphrase field and click Generate to create a WEP key from the passphrase Clic...

Page 54: ...4 E7 128 bit key In the boxes below make up your key by writing in two characters between A F and 0 9 You will use this key to program the encryption settings on your Router and your wireless computer...

Page 55: ...ault IP address is 192 168 2 254 and subnet mask is 255 255 255 0 These can be customized for your need 1 Enable the AP mode my selecting Enable in the Use as Access Point only page When you select th...

Page 56: ...eless Router Model F5D7230 4 to a Belkin 54g Wireless Access Point model F5D7130 Bridging with Access Points of other manufacturers is not supported at this time You can use the bridge mode to extend...

Page 57: ...n Access Point to your Wireless Router allows you to add another network segment in another area in the home or office without running wires Connecting a network switch or hub to the Access Point s RJ...

Page 58: ...e bottom label of the Access Point There are two MAC addresses on the bottom label You will need the MAC address named WLAN MAC Address The MAC address starts with 0030BD and is followed by six other...

Page 59: ...ss Bridge 2 on the left hand side of the screen You will see the following screen 7 Check the box that says Enable ONLY specific Access Points to connect 1 8 In the field named AP1 3 type in the MAC a...

Page 60: ...sks common ports that are frequently used to attack networks These ports appear to be Stealth meaning that for all intents and purposes they do not exist to a would be hacker You can turn the firewall...

Page 61: ...t which port settings you need Choosing an Application Select your application from the drop down list Click Add The settings will be transferred to the next available space in the screen Click Apply...

Page 62: ...omputer you wish to restrict access to in the IP fields 1 Next enter 88 in both the port fields 2 Select Both 3 Select Block 4 You can also select Always to block access all of the time Select the day...

Page 63: ...network easily for any computer without having to add and remove the computer s MAC address from the list To enable this feature select Enable MAC Address Filtering 1 Next enter the MAC address of ea...

Page 64: ...n a temporary basis The computer in the DMZ is NOT protected from hacker attacks To put a computer in the DMZ enter the last digits of its IP address in the IP field and select Enable Click Apply Chan...

Page 65: ...IP address and receiving a response from the IP address a hacker can determine that something of interest might be there The Router can be set up so it will not respond to an ICMP ping from the outsid...

Page 66: ...CED USER INTERFACE 64 Utilities Tab Utilities This screen lets you manage different parameters of the Router and perform certain administrative functions Parental Control See separate Parental Control...

Page 67: ...on 1 Click the Restart Router button 2 The following message will appear Click OK 3 The following message will appear Restarting the Router can take up to 60 seconds It is important not to turn off th...

Page 68: ...following message will appear Click OK 3 The following message will appear Restoring the defaults includes restarting the Router It can take up to 60 seconds It is important not to turn the power to...

Page 69: ...ent configuration by using this feature Saving your configuration will allow you to restore it later if your settings are lost or changed It is recommended that you back up your current configuration...

Page 70: ...guration file Select a location You can name the file anything you want or use the default name Config Be sure to name the file so you can locate it yourself later When you have selected the location...

Page 71: ...s option will allow you to restore a previously saved configuration 1 Click Browse A window will open that allows you to select the location of the configuration file All configuration files end with...

Page 72: ...to 60 seconds for the configuration restoration to complete Click OK 4 A 60 second countdown will appear on the screen When the countdown reaches zero the Router s configuration will be restored The...

Page 73: ...download the firmware from the Belkin update website and update your Router s firmware to the latest version Checking for a New Version of Firmware The Check Firmware 1 button allows you to instantly...

Page 74: ...uch as the following 1 To download the new version of firmware click Download 2 A window will open that allows you to select the location where you want to save the firmware file Select a location You...

Page 75: ...e the firmware follow the next steps in Updating the Router s Firmware Updating the Router s Firmware 1 In the Firmware Update page click Browse 2 A window will open that allows you to select the loca...

Page 76: ...s message tells you that the Router may not respond for as long as one minute as the firmware is loaded into the Router and the Router is rebooted Click OK 6 A 60 second countdown will appear on the s...

Page 77: ...a password if you plan to use the remote management feature of your Router Changing the Login Timeout Setting The login timeout option allows you to set the period of time that you can be logged into...

Page 78: ...SURE YOU HAVE SET THE ADMINISTRATOR PASSWORD Remote management allows you to make changes to your Router s settings from anywhere on the Internet There are two methods of remotely managing the Router...

Page 79: ...ur firewall functions Enabling Disabling UPnP UPnP Universal Plug and Play is yet another advanced feature offered by your Belkin Router It is a technology that offers seamless operation of voice mess...

Page 80: ...version of firmware and alert you that the new firmware is available When you log into the Router s advanced interface the Router will perform a check to see if new firmware is available If so you wi...

Page 81: ...Ethernet Built In or Ethernet in the Connect via drop down menu 1 3 Next to Configure 2 if Manually is selected your Router will need to be set up for a static IP connection type Write the address in...

Page 82: ...K SETTINGS Manually Configuring Network Settings in Mac OS X 1 Click on the System Preferences icon 2 Select Network 1 from the System Preferences menu 3 Select Built in Ethernet 2 next to Show in the...

Page 83: ...o configure your Router for a PPPoE connection type using your user name and password 5 If Manually is selected your Router will need to be set up for a static IP connection type Write the address inf...

Page 84: ...menu 4 In the Local Area Connection Properties window click Internet Protocol TCP IP and click the Properties button The following screen will appear 5 If Use the following IP address 2 is selected y...

Page 85: ...static IP connection type Write the address information in the table below You will need to enter this information into the Router 4 Write the IP address and subnet mask from the IP Address tab 3 5 Cl...

Page 86: ...s settings to the recommended settings in this section Internet Explorer 4 0 or Higher 1 Start your web browser Select Tools then Internet Options 2 In the Internet Options screen there are three sele...

Page 87: ...click on Connections and select LAN Settings 4 Make sure there are no check marks next to any of the displayed options Automatically detect settings Use automatic configuration script and Use a proxy...

Page 88: ...SETTINGS Netscape Navigator 4 0 or Higher 1 Start Netscape Click on Edit then Preferences 2 In the Preferences window click on Advanced then select Proxies In the Proxies window select Direct connect...

Page 89: ...l support information at www networking belkin com or www belkin com through the tech support area If you want to contact technical support by phone please call 800 223 5546 Technical support is avail...

Page 90: ...you have verified that the Internet connection is working run the Easy Install Wizard again 2 If your ISP requires a user name and password make sure that you have typed in your user name and passwor...

Page 91: ...cable going from the computer to the Router 3 If the Easy Install Wizard told you that it detected multiple network adapters run the Easy Install Wizard again and try a different adapter 1 Check the c...

Page 92: ...our ISP may bind your connection to the MAC address of your computer s NIC Clone your MAC address 1 Make sure your computers are correctly configured and all network cables are properly connected 2 Ma...

Page 93: ...ly 2 Make sure your computers are correctly configured and all network cables are properly connected 3 Make sure the coaxial cable or DSL line is properly attached on your cable or DSL modem Refer to...

Page 94: ...ctions it may cause harmful interference to radio or television reception which can be determined by turning the equipment off and on the user is encouraged to try and correct the interference by one...

Page 95: ...for radio equipment ETS 300 826 General EMC requirements for radio equipment To determine the type of transmitter check the identification label on your Belkin product Products with the CE marking co...

Page 96: ...IVE IN LIEU OF ALL OTHERS WHETHER ORAL OR WRITTEN EXPRESSED OR IMPLIED BELKIN SPECIFICALLY DISCLAIMS ANY AND ALL IMPLIED WARRANTIES INCLUDING WITHOUT LIMITATION WARRANTIES OF MERCHANTABILITY AND FITNE...

Page 97: ...95...

Page 98: ...ilding Boeing Avenue 333 1119 PH Schiphol Rijk The Netherlands Tel 31 0 20 654 7300 Fax 31 0 20 654 7349 Belkin Ltd 7 Bowen Crescent West Gosford NSW 2250 Australia Tel 61 0 2 4372 8600 Fax 61 0 2 437...

Reviews: