background image

7

Kaleido-IP VM

Quick Start Guide

Step 3: Networking Setup

To complete your system’s networking setup

1 In XAdmin, click 

System configuration

, in the navigation area on the left of the page.

The System Configuration page appears, showing the current system name, 
management and data IP addresses, network masks, default gateway, connection-
speed and duplex-mode settings, as well as the date and time settings.

2 Under 

Ethernet

, type the appropriate IP addresses, network masks, and gateway 

settings, and review the detected connection speeds and duplex modes for your 
Kaleido-IP VM’s 

data

 ports.

3 Under 

Date and Time

, select the appropriate time zone and format for your location.

4 If this Kaleido-IP VM is meant to monitor HLS sources, enable NTP synchronization: next 

to 

NTP synchronization

, click 

Enabled

, and then type the NTP server’s IP address.

5 Click 

Save

.

A message appears, informing you that the new settings are first saved locally.

6 Click 

OK

 to dismiss the message.

7 The 

Apply settings

 button becomes available.
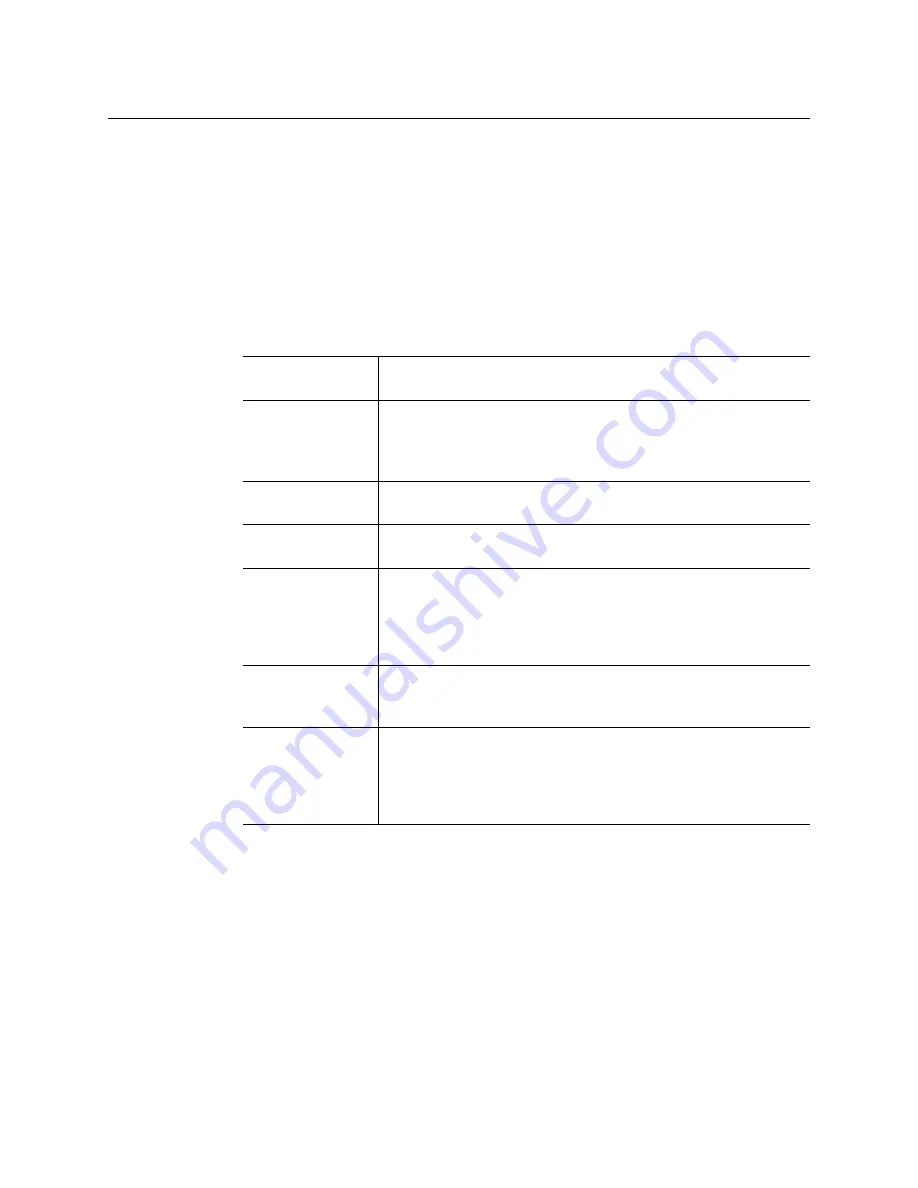
Management IP 
address

Must be within the network to which the Kaleido-RCP2 units, and 
the operators’ PCs or laptops are normally connected.

Data port

The IP address for a data port must be within the same range as the 
associated streaming devices (e.g. encoders, multiplexers).
To omit network configuration for an unused data port, clear the 
corresponding 

Enabled

 check box.

Network mask

Must be set to the appropriate values, for the management and data 
networks.

Default gateway

If your management network is not configured with a gateway, clear 
the default gateway IP address, by clicking 

Remove

.

Gateway

If data ports and the management network are configured within 
different subnets, and this Kaleido-IP VM multiviewer is meant to 
monitor HLS, RTSP, or RTMP sources, add the required gateway 
addresses, by clicking 

Add

, and then typing the appropriate 

gateway address, in the desired data port sections.

Detected link mode By default, all network adapters are set to auto-negotiate. The 

connection speed and duplex mode will be set automatically based 
on the corresponding port settings on the associated switch.

Configured link 
mode

1000 Mbps full-duplex

 communication can only be achieved via 

auto-negotiation, as required by the IEEE-802.3 standard, section 
28D.5. Should your network configuration require specific speed 
and duplex mode settings, select the appropriate value from the 

Configured link mode

 list.

Summary of Contents for grass valley KALEIDO-IP VM

Page 1: ...Quick Start Guide M926 9005 101 2017 01 31 KALEIDO IP VM COMPLETE VIRTUAL IMAGE VERSION OF THE KALEIDO IP VIDEO MULTIVIEWER ...

Page 2: ...multiviewers to use their product manuals for their own internal business use Manuals for Grass Valley products may not be reproduced or transmitted in any form or by any means electronic or mechanical including photocopying and recording for any purpose unless specifically authorized in writing by Grass Valley A Grass Valley manual may have been revised to reflect changes made to the product duri...

Page 3: ...X 4911 cards the Kaleido Modular X cards the Kaleido Modular KMV 3901 3911 cards The Kaleido IP can monitor and display HD and SD television programs distributed over IP across two HDTV displays or in the case of a Kaleido IP VM through one streaming output It supports MPEG 2 and H 264 AVC compressed video and the AAC AC 3 DD MPEG 1 MPEG 2 MPEG 4 AAC LC and MPEG 4 HE AAC compressed audio formats w...

Page 4: ...n to the multiviewer s streaming output you can start using these layouts to monitor television signals distributed over IP Consult the Kaleido X User s Manual available from the Documentation Library section of Grass Valley s website for instructions on how to define more layouts to suit your specific requirements Limitations The Kaleido IP VM is subject to the limitations listed below in additio...

Page 5: ... your intended Kaleido IP configuration Client PC or Laptop A client PC or laptop meeting the following requirements is required to access the XAdmin Web client and the other Kaleido X client applications Step 1 Creating the Kaleido IP Virtual Machine The installation of an Kaleido IP image on a virtual machine is simple As long as the requirements above are met the whole process should not take m...

Page 6: ...ears 10 Review the deployment settings and then click Next A window appears showing the OVA deployment progress followed by a confirmation message once the deployment is complete 11 Click Close to dismiss the confirmation message In the main vSphere Client window the status of the recently completed deployment appears in the Recent Tasks area 12 On the View menu point to Inventory and then click I...

Page 7: ... appears prompting you to confirm your intention 2 Click Yes Your virtual machine is powered off 3 Right click the virtual machine and then click Edit Settings The Virtual Machine Properties window appears 4 In the Hardware tab click Add The Add Hardware wizard appears 5 Click Ethernet Adapter and then click Next The Network Type page appears 6 Select the appropriate adapter type and physical netw...

Page 8: ...gistering your Multiviewer s Security Credentials with your Browser in the Kaleido X User s Manual 4 Internet Explorer users If a blank page appears then refer to Enabling the Compatibility View in Internet Explorer in the Kaleido X User s Manual The XAdmin Status and Options page appears 5 Take note of the authorization code located in the top heading row and send it along with your purchase orde...

Page 9: ...ators PCs or laptops are normally connected Data port The IP address for a data port must be within the same range as the associated streaming devices e g encoders multiplexers To omit network configuration for an unused data port clear the corresponding Enabled check box Network mask Must be set to the appropriate values for the management and data networks Default gateway If your management netw...

Page 10: ...onfiguration page appears b Type the appropriate suffixes for your primary domain and search domain and the IP addresses for the primary and secondary DNS server c Select Enable proxy and then type the URL of the appropriate proxy auto config PAC file if required d Click Apply configuration A message appears confirming that the changes have been applied e Click OK to dismiss the message 11 If this...

Page 11: ...rd to your Kaleido RCP2 if desired and proceed with Configuring a Kaleido RCP2 on page 10 Configuring Head Streaming To configure head streaming 1 Click Head streaming in the navigation area on the left of the page The Head Streaming Configuration page appears 2 Expand the streaming options section 3 Configure the appropriate parameters for your purposes ...

Page 12: ...o Installation and Operation available from the Documentation Library section of Grass Valley s website To access Kaleido X rooms located in other subnets the Kaleido RCP2 must be configured with the appropriate unicast IP addresses see the Configuring Unicast IP Addresses section in the Kaleido RCP2 Guide to Installation and Operation available from the Documentation Library section of Grass Vall...

Page 13: ... to your system as Admin A message prompting you for a password appears on the LCD display 7 Press ENTER again by default there is no password The message Access granted will appear on the LCD display if the login is successful If a mouse is connected to the Kaleido RCP2 then you should be able to see and move the mouse pointer on the monitor wall Step 4 XEdit Installation XEdit is a client applic...

Page 14: ...ur browser s security features warnings may appear which you may safely dismiss 3 Unless your browser let you run the file and you chose to do so navigate to the location were you saved the installer file and open it More security warnings or prompts may appear which you may safely dismiss or accept A window appears showing the download and installation progress At the end of the installation proc...

Page 15: ... the installation has completed the XEdit startup screen appears Depending on your Windows Firewall settings a security alert may appear Click Allow access to unblock the application If XEdit cannot find all of the fonts it needs already on your PC or laptop it downloads them from the multiviewer automatically in which case a message will appear to confirm the font update and instruct you to resta...

Page 16: ...u wish to use as your local workspace and then click OK Once the database has completed loading XEdit s main application window appears Note Once it has been installed from the multiviewer XEdit remains on your PC or laptop and can be launched from the shortcut that was added to your desktop Apps view or Start screen see page 12 or from the Start menu Whenever you install a new version of the Kale...

Page 17: ...Edit See Changing the Multiviewer Type on page 16 The supported stream types are source specific multicast source filtered multicast filtering limited to a single source IP in include mode only any source multicast unicast RTSP RTMP and HTTP Live Streaming HLS The procedures in this section apply to the online mode See Configuring Transport Streams on page 17 Opening XEdit in Online Mode To open X...

Page 18: ...select the appropriate multiviewer model Kaleido IP 4 or Kaleido IP 6 from the replace with options on the menu A message appears prompting you to confirm your intention 3 Click Yes The next message prompts you about populating the database with a factory default configuration for the selected multiviewer model 4 Click No so you can still use the predefined room and layouts Note A Kaleido IP VM mu...

Page 19: ... Set of Predefined Streams To modify settings for a multicast transport stream 1 In the main window click the System tab and then click Description Calibrations on the second level tab bar 2 Expand the System hierarchical list and then navigate to the multicast transport stream you wish to configure under NETWORK ADAPTER 2 The settings for the selected multicast stream appear in the Properties pan...

Page 20: ... list 6 Repeat this until you have completed the required configuration changes to match the set of transport streams you wish to monitor 7 If there are default transport streams left which you will not use right click them and then click Remove Notes The Kaleido X Software supports UTF 8 encoded stream names The only characters which cannot be used in a stream name are and Verify the protocol you...

Page 21: ...s on importing transport stream configuration information from a spreadsheet adding source specific or source filtered multicast SSM or SFM transport streams adding HLS playlists adding RTSP transport streams adding RTMP transport streams adding NMOS devices Adding a Multicast Transport Stream To add a multicast transport stream 1 In the main window click the System tab and then click Description ...

Page 22: ...automatically appear under the transport stream element in the System list Notes The Kaleido X Software supports UTF 8 encoded stream names The only characters which cannot be used in a stream name are and Verify the protocol you selected Registering an RTP stream as UDP instead of RTP may result in the decoded video appearing jerky or accelerated on the monitor wall Note VLAN adapter settings mus...

Page 23: ...icast Stream Configuration replace the default stream name if desired select the appropriate protocol RTP UDP type the port number associated with the transport stream you wish to add and then click OK The Kaleido IP VM establishes a connection with the selected stream All programs that are part of the stream and the elementary streams included in these programs automatically appear under the tran...

Page 24: ...ces 3 Right click the transport stream and then click Create logical sources on the menu Logical sources are automatically created for every program signal found in the selected transport stream 4 Repeat until you have added logical sources for every stream you wish to monitor 5 If your system involves a control panel from which you will control your multiviewer as a router then configure source n...

Page 25: ...he monitor wall Specifications Kaleido IP Inputs Note To access other layouts press the LOAD button To assign a layout to a preset button press and hold the button for more than six seconds while the desired layout is showing on the monitor wall IP INPUTS Transport MPEG transport streams over UDP or RTP Multicast Unicast MPEG elementary streams over RTP Multicast Unicast IGMPv3 SSM SFM Multi Progr...

Page 26: ...T H 265 MPEG 4 Chroma format 4 2 0 and 4 2 2 AUDIO DECODERS Standard MPEG 1 Layer 1 MPEG 1 Layer 2 MPEG 1 Layer 3 MPEG 2 Layer 1 MPEG 2 Layer 2 Dolby Digital AC 3 optional Dolby Digital Plus DD optional AAC HE AAC HE AAC v2 optional Video formats MPEG transport stream over Unicast or Multicast RTSP Audio format MPEG 1 Layer 2 stereo On screen control Kaleido RCP2 optional Source and layout configu...

Page 27: ......

Page 28: ...in a local phone number for the support center nearest you please consult the Contact Us section of Grass Valley s website www grassvalley com An online form for e mail contact is also available from the website Corporate Head Office Grass Valley 3499 Douglas B Floreani St Laurent Quebec H4S 2C6 Canada Telephone 1 514 333 1772 Fax 1 514 333 9828 www grassvalley com ...

Reviews: