


INSTALLATION AND STARTUP
22-8
Belanger, Inc.® * PO BOX 5470. * Northville, MI 48167-5470 * Ph (248) 349-7010 * Fax (248) 380-9681
1MANUL220
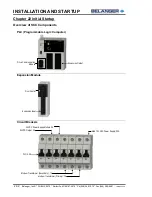
Chapter 22 Initial Startup
Check Inputs and Motion
•
Carriage Enter Proximity Switch
•
Carriage Exit Proximity Switch
•
This should be the first time that the carriage has been jogged end-to-end.
•
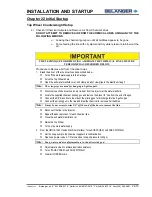
Check and adjust the roller clearance and the rail spacing if necessary, using the following:
Verify that the rail spacing is
95-
1/4”
Inside Spacing. Perform a measurement in 3 locations, Entrance, Center,
and Exit of the bay.
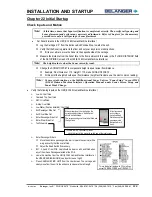
Move to th
e NEXT Screen where we will be performing a “Find Limits” and
verifying that the roller flanges are
not binding.
Pull out the Emergency Stop Button.
Press the Carriage Home Button. Verify that the carriage moves to the Exit of the bay and stops.
Press the
“Carriage Find Limits” Button. Verify that the carriage moves
to the Entrance of the bay. As the
Carriage is moving to the Entrance walk with the machine and verify that each roller is moving smoothly without
binding on the side of the rail.
Press the Carriage Home Button. Verify that the carriage starts moving to the Exit of the bay. Quickly move to
the next step.
Press the “Jog Button”. The carriage will move toward the Exit of the bay.
As the Carriage is moving view the “Position” numbers. Verify that as
they count down in inches to zero that
the numbers prior to z
ero are single digit numbers. Example: 10”, 8”, 6”, 4”, 2”, and then 0”.
Note:
If you see a countdown that jumps in large increments, for example: 30”, 20”, 0”, this is an
indication that the encoder proximity switches are not counting properly.
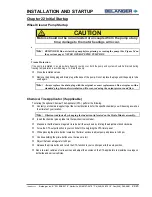
Entrance
Proximity Sensor
Exit Proximity Sensor
Driver Side
of Carriage
Navigate to the JOG Screen on the HMI (E-1063 Human Machine Interface).
Press CARRIAGE FORWARD until the machine gets within 4” of the
Exit End
Positive Stops
and verify that the Exit Limit oval is filled. Adjust the Prox gap if
necessary, to 1/4
” from target.
Press CARRIAGE BACKWARD until the machine gets within 4
” of the
Entrance
End Positive Stops
and verify that the Entrance Limit oval is filled. Adjust the
Prox gap if necessary, to 1/4
” from target.
Side Pod Cover Omitted for Clarity
Direction of
Travel
Proximity Sensors are shown in
the dotted circles
Summary of Contents for FreeStyler
Page 1: ...FreeStyler Installation Startup FreeStyler Installation Startup 1MANUAL220 Rev14 ...
Page 2: ......
Page 4: ......
Page 12: ......
Page 13: ... Chapter 1 Introduction Chapter 1 Introduction ...
Page 14: ......
Page 26: ......
Page 28: ......
Page 31: ... Chapter 3 Getting Started Chapter 3 Getting Started ...
Page 32: ......
Page 52: ......
Page 53: ... Chapter 4 Frame and Carriage Assembly Chapter 4 Frame and Carriage Assembly ...
Page 54: ......
Page 123: ... Chapter 5 Entrance and Exit Photo Eyes Chapter 5 Entrance and Exit Photo Eyes ...
Page 124: ......
Page 135: ... Chapter 6 Treadle Assembly Chapter 6 Treadle Assembly ...
Page 136: ......
Page 142: ......
Page 144: ......
Page 151: ... Chapter 8 MixStir Options Chapter 8 MixStir Options Triple Foam and High Pressure Wax ...
Page 152: ......
Page 163: ... Chapter 9 Reclaim Water Adapter Kit Option Chapter 9 Reclaim Water Adapter Kit Option ...
Page 164: ......
Page 167: ... Chapter 10 Booster Pump Assembly Option Chapter 10 Booster Pump Assembly Option ...
Page 168: ......
Page 174: ......
Page 175: ... Chapter 11 Bug Spray Applicator Option Chapter 11 Bug Spray Applicator Option ...
Page 176: ......
Page 183: ... Chapter 12 Undercarriage Options Chapter 12 Undercarriage Options ...
Page 184: ......
Page 191: ... Chapter 13 Water Softener Option Chapter 13 Water Softener Option ...
Page 192: ......
Page 205: ... Chapter 14 HydroBlade Assembly Option Chapter 14 HydroBlade Assembly Option ...
Page 206: ......
Page 226: ......
Page 249: ... Chapter 16 Signage Options Chapter 16 Signage Options ...
Page 250: ......
Page 253: ... Chapter 17 Onboard Dryer Option Chapter 17 Onboard Dryer Option ...
Page 254: ......
Page 258: ......
Page 259: ... Chapter 18 Spot Free Rinse R O Option Chapter 18 Spot Free Rinse R O Option ...
Page 260: ......
Page 264: ......
Page 265: ... Chapter 19 Trades Chapter 19 Trades ...
Page 266: ......
Page 270: ......
Page 271: ... Chapter 20 Electrical Chapter 20 Electrical ...
Page 272: ......
Page 282: ......
Page 284: ......
Page 293: ... Chapter 22 Initial Startup Chapter 22 Initial Startup ...
Page 294: ......
Page 320: ......
Page 321: ......