background image

V8L.801-01

Summary of Contents for 15WLP530HID

Page 1: ...INTEGRATED DIGITAL HD READY COLOUR TELEVISIONS Operating Instructions 15WLP530HID ...

Page 2: ... the initial use 7 4 3 Performing initial start and settings 7 4 4 Batteries 7 5 5 Your new television 8 5 1 TV Control Panel 8 5 2 External Connections 8 5 3 Remote Control 9 6 6 Performing the initial power on settings 10 6 1 TV controls 10 6 2 Turning on the TV and Setting the Channels 11 6 3 Performing Digital Tunings 11 6 4 Performing Analog Tunings 15 7 7 Settings of Your New Television 18 7...

Page 3: ...processes the signals coming from digital transmitters and can convert them into superior sound and image qualities TV Guide valid for digital broadcastings only informs you about changes in the program list briefly and provides program lists of all digital broadcastings for a number of forthcoming days You can display detailed information about each program by pressing a single button if this fea...

Page 4: ...e appropriate wiring information below for your particular cable 1 6 Stand assembly Cover a table with a soft towel or other protection to prevent damage to the TV or table insert the tabs of the support piece that is mounted on the TV so that they snap into the base of the stand The rear of the stand base is indicated by a hole or recessed section ...

Page 5: ... feature and picture resolution LTI in black white transitions A clearer Picture made possible with a Digital Comb Filter DNR Noise reduction Manual fine tuning 100 Analog Program memory 1000 Digital Program memory Returning to the last viewed program by single button SWAP Infrared remote control equipped with all functions Ability to watch NTSC broadcast via scart input User friendly on screen me...

Page 6: ...in dusty environments should also be avoided Never block the slots and openings by placing the TV on a bed sofa pillow or other similar surfaces 3 Important Safety Instructions his symbol is used to warn the user about the dangerous voltage contained inside the housing of the product that may create a risk of electrical shock This symbol is used to remind the user important usage and service instr...

Page 7: ...ve it checked immediately by qualified personnel Keep flammable materials and open flame sources such as candles away from TV in order to avoid risk of fire 11 DO NOT USE headphones at extremely high volume levels since this may cause permanent loss of hearing 12 Operate your TV only in the 230 V 50Hz voltage range Use the AC power cable supplied with the product If your TV is a grounded Class I p...

Page 8: ...ith a cloth slightly moistened with soap and lukewarm water Never use solvents such as thinner or gasoline for cleaning Unplug the AC power cable from the socket when cleaning the TV Otherwise there is the risk of electric shock 19 Do not dispose of the batteries in fire Do not short circuit dismantle or burn the batteries There is the risk of explosion if the batteries are not replaced correctly ...

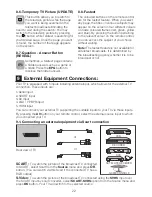
Page 9: ...the remote control For this process you can also use the buttons on your TV The picture will appear on the screen after a short while Note If you are not going to use the television for a long time unplug its power cable from the mains socket 4 3 Performing initial start and settings To set up your television read the sections on the TV controls and making the channel settings 4 4 Batteries Open t...

Page 10: ...External Connections 1 1 Power input 2 Aerial input 3 Scart input 4 VGA PC YPbPr connection input 5 CI Slot Input 6 HDMI input 7 Video input 8 Audio input R 9 Audio input L 10 PC Comp audio input Important Note Note Above drawing for external connections is representational Their order and places on your TV may be different Please see Technical Specifications Table on page 27 for the available ext...

Page 11: ...age selection button in Txt mode Right Left movement buttons Menu Menu selection confirm Volume down button Volume up button Program forward selection button Program backward selection button Red teletext button Start Digital Teletext Green teletext button Yellow teletext button Blue teletext button TV Teletext selection button Teletext page enlarge button Double A Picture Mode selection button Pa...

Page 12: ...on If you are not going to use your television for a long time unplug its power cable from the socket 6 1 2 Channel Selection You may select whichever program number you would like by pressing the PR PR buttons located on your television and your remote control To select the programs that are above 9 you can use the Numerical buttons You may enter the number of the program you would like to select...

Page 13: ...enu Finish the Digital channel searching process by pressing the OK button PRESS OK KEY TO START ANALOG SEARCH PRESS MENU KEY TO EXIT message will be displayed You can make Analog channel tuning with OK button or finish the searching process by pressing the MENU button 6 3 Performing Digital Tunings You can either tune the Digital programs automatically or manually and store them in your televisio...

Page 14: ...nel you want to search if you know by using the numeric keys on the remote control If you don t know the frequency number you can scan frequencies by using the Left Right movement buttons After entering Channel Search Waiting for signal Service found TV 0 Radio 0 Other 0 Stop Search 6 3 2 Manual tuning of channels and storing in the memory Press MENU button in digital mode and MAIN MENU will be di...

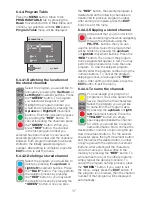
Page 15: ...ould like to set a reminder in EPG menu and 6 3 4 1 Displaying Television and Radio channel lists and selecting the channels When the program table menu is opened all TV channels stored in the list are displayed You can navigate between the TV and radio channels with Up Down Left Right movement buttons or you can select any channel you wish to watch or listen to by pressing the OK button Press the...

Page 16: ... has been set as 0000 at the factory You can change the password as you wish under Change PIN item in the Access Control menu Access Control Lock Unlock Channels Change PIN Select Back To perform language selection select Subtitling Language 1 Subtitling Language 2 Audio Language 1 Audio Language 2 tab from the Language Settings menu by using Up Down movement buttons and make your language selecti...

Page 17: ...ically with the Autoprogram function of your television and then sort the channels as you desire by means of the Program Table Press AV button on your remote control select ANALOG tab from the SOURCE menu by using Up Down movement buttons and COUNTRY SELECTION BELGIUM CZECH REP DANMARK DEUTSCHLAND ELLADA ESPANA FRANCE HUNGARY IRELAND ITALIA NETHERLANDS NORGE ÖSTERREICH POLSKA PORTUGAL SCHWEIZ SUOM...

Page 18: ...emselves to the channel However you might need it in case the television transmitters do not operate according to the standards To store in the memory the settings you have made select the Store tab and press the Right or Left movement button Select the system in which you would like to make the search from the SYSTEM tab Move into CHANNEL tab by pressing the down movement button Press OK on your ...

Page 19: ...PR buttons then you can use this function Select the program that will be hidden by pressing the up down or right left movement buttons Press the RED button The name of the program to be skipped shall appear in red You may perform this procedure for more than one program To view the skipped program directly enter the program number using the numeric buttons To cancel the program skipping process p...

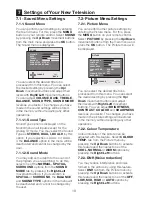
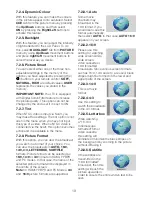
Page 20: ...ur selection is SPATIAL or SURROUND the BALANCE and SOUND TYPE options in the menu will be deactivated and cannot be changed by the user 7 2 Picture Menu Settings 7 2 1 Picture Menu You can perform other picture settings by entering the Picture menu For this press the MENU button on your remote control Select PICTURE by pressing the Up Down movement buttons from the main menu and press the OK butt...

Page 21: ...ture 7 2 5 Backlight With this feature you can adjust the intensity of light reflected to the LCD Panel To do this select BACKLIGHT tab from PICTURE menu by using Up Down movement buttons and press right left movement buttons to select the level as you desire 7 2 6 Picture Smart You can select either one of the three non adjustable settings in the memory or the options you have adjusted by pressin...

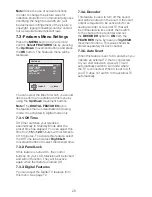
Page 22: ...value should be stored separately for each channel 7 3 5 Auto Scart When this feature is set to On and when you operate an external TV that is connected to your LCD television via scart TV will automatically switch to AV mode where the TV is connected When it is set to Off your TV does not switch to the external TV automatically You can select the titles for which you would like to perform an oper...

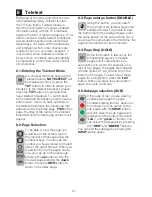
Page 23: ...transmission of various updated information along with the TV broadcast signal in the form of text and graphics To be able to receive a quality teletext broadcast a good antenna system and a broadcast signal that is not weak with no reflections and interference from other channels are required Even in a very clear reception it is normal for some characters or tabs to be lost Such conditions will a...

Page 24: ...out waiting Note The fastext feature is not available for all teletext broadcasts It is determined by the broadcasting agency whether it is to be broadcast or not 9 External Equipment Connections Your TV is equipped with 5 inputs including antenna input which allows for the external TV connection These inputs are 1 Aerial input 2 SCART input 3 AV input 4 VGA YPBPR input 5 HDMI input You can connec...

Page 25: ... DVD Picture connection Sound connection YPBPR Component Input When a connection is made via VGA socket with VGA to YPBPR select YPBPR option from the Source menu and press the OK button to display the picture Your TV will switch to the selected source 9 4 Connecting an external equipment via HDMI connection Side view of TV DVD SATELLITE RECEIVER GAME CONSOLE HDMI When a connection is made via HDM...

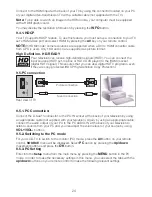
Page 26: ...s ensures that you can view digital HDTV programs even if they are copy protected HDCP High Definition Copy Protection 9 5 PC connection Rear view of TV Picture connection Sound connection 9 5 1 PC Connection Connect the D Sub15 connector to the PC IN socket at the back of your television by using an appropriate cable not supplied with your television Again by using an appropriate cable connect th...

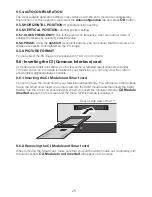
Page 27: ... Inserting the CI Common Interface card CI module and Smart card allows you to view some scrambled paid channels in Digital TV mode When no CI module is inserted in your television you can only view the current unscrambled digital analogue channels 9 6 1 Inserting the CI Module and Smart card You can not use the smart card in your television independently You will need a CAM module to use the smar...

Page 28: ...is at the lowest setting Lighten the colour Broadcast system setting if setting choice is available Select the broadcast system Problem in channel broadcasting Test with another channel No or defective teletext Television channel no teletext or antenna system Test another channel for fine tuning and shadowy pictures Very weak signal Check the antenna system No sound Temporary sound mute may be on ...

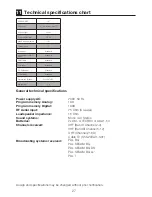
Page 29: ...311x387x135 Weight Kg 2 8 General technical specifications Power supply AC 230V 50 Hz Program memory Analog 100 Program memory Digital 1000 RF Aerial input 75 Ohm Co axial Loudspeaker impedance 16 Ohm Sound systems Mono AV Stereo Batteries 2xUM 4 IEC R03 or AAA 1 5V Channels received VHF Band I Channel 2 4 VHF Band III Channel 5 12 UHF Channel 21 69 Cable TV S1 S20 S21 S41 Broadcasting systems rec...

Page 30: ...ragkelly 31 27 24 21 48 7 Sutton Coldfield 46 40 43 50 37 22 Darvel 33 26 23 29 35 9 The Wreckin 26 33 23 29 25 20 Durris 22 28 25 32 67 5 Mindlands East Eitshal Lewis 33 26 23 29 49 Waltham 58 64 61 54 35 21 Keeylang Hill 40 46 43 50 1 South West Knock More 33 26 23 29 4 Beacon Hill 57 63 60 53 37 Rosemarkie 39 45 49 42 3 Caradon Hill 22 28 25 32 38 Rumster Forest 31 27 24 21 2 Huntshaw Cross 55 ...

Page 31: ...repairs or inexpert installation that fails to meet the requirements contained in the user instruction book Repairs or replacements to product installed or used on commercial or non household premises Important notes The product is guaranteed for domestic household use only The guarantee will be void if the product is installed or used in commercial or non household premises The product must be co...

Page 32: ...e will normally be there within 48hrs of receipt of your call excluding Bank Holidays or at your earliest convenience Before telephoning for service please check the trouble shooting guide in the instruction book as often minor problems are easily identified and resolved by following the instructions contained there in Service visits where there is no fault with the product could incur a charge ev...

Page 33: ...V8L 801 01 ...

Reviews: