


62
SIDE BURNER
SIDE BURNER
OPERATING INSTRUCTIONS
Manual lighting
In the event of the automatic ignition system not working, the
barbecue can be lit manually
•
Position the manual igniter next to the burner
•
Depress the knob and rotate to ‘HIGH’
•
The burner should light
•
Do not attempt to manually light the burner for more
than 5 seconds
•
If the burner did not light, depress the knob and turn
back to the ‘OFF’ position
•
Allow several minutes for gas to disperse then repeat
lighting procedure
Lighting Instructions
1.
Do not attempt to light burner with the cooking surfaces
covered
2.
Read the instructions before lighting
3. To light burner depress knob and rotate to
‘HIGH’
4.
Keep knob pushed in for 5 seconds to ensure flame
safety is activated (if fitted)
5.
If burner did not light, turn knob to the ‘
OFF
’ position.
Allow gas to disperse, then repeat lighting procedure
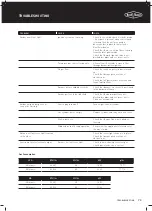
Using cookware on the side burner
Do not use oversized cookware or place cookware off-centre
over the burner as this can cause high temperatures in
control knob and surrounding panels. Cookware should
not exceed 200mm in diameter, the use of larger cookware
may cause damage to the appliance and is not covered
under warranty.
Correct
2
3
Incorrect – pan too large
Incorrect – pan not centred
2
2
Incorrect – flame too high
FFLE
ATION
Summary of Contents for 7000 Series
Page 5: ...5 BMF7645SA PRODUCT DIMENSIONS DIMENSIONS 1602 708 1284 ...
Page 7: ...7 BMF7655SA PRODUCT DIMENSIONS DIMENSIONS 1758 708 1284 ...
Page 9: ...9 BMG7642SA PRODUCT DIMENSIONS DIMENSIONS 1602 685 1284 ...
Page 11: ...11 BMG7652SA PRODUCT DIMENSIONS DIMENSIONS 1758 685 1284 ...
Page 15: ...15 ASSEMBLING THE BARBECUE 4 18 19 3 ...
Page 16: ...16 19 15 ASSEMBLING THE BARBECUE 5 6 11 BMF7645SA BMF7655SA ASSEMBLY ...
Page 17: ...17 ASSEMBLING THE BARBECUE 7 8 11 ...
Page 18: ...18 ASSEMBLING THE BARBECUE 17 9 10 BMF7645SA BMF7655SA ASSEMBLY ...
Page 19: ...19 ASSEMBLING THE BARBECUE 11 12 13 16 ...
Page 20: ...20 ASSEMBLING THE BARBECUE 11 13 14 23 BMF7645SA BMF7655SA ASSEMBLY ...
Page 21: ...21 ASSEMBLING THE BARBECUE 15 16 20 22 21 ...
Page 26: ...26 ASSEMBLING THE BARBECUE 25 26 BMF7645SA BMF7655SA ASSEMBLY ...
Page 27: ...27 ASSEMBLING THE BARBECUE 27 28 6 7 ...
Page 28: ...28 ASSEMBLING THE BARBECUE 29 30 BMF7645SA BMF7655SA ASSEMBLY ...
Page 31: ...31 ASSEMBLING THE BARBECUE 35 36 1 Locate the warming rack Sliding locked Sliding unlocked ...
Page 32: ...32 ASSEMBLING THE BARBECUE 10 37 38 9 BMF7645SA BMF7655SA ASSEMBLY ...
Page 33: ...33 ASSEMBLING THE BARBECUE 39 40 8 Spanner 19mm Spanner 22mm ...
Page 39: ...39 ASSEMBLING THE BARBECUE 5 Assemble the back trolley panels with M6 head screws x7 11 11 ...
Page 40: ...40 ASSEMBLING THE BARBECUE 6 7 13 13 BMG7642SA BMG7652SA ASSEMBLY ...
Page 41: ...41 ASSEMBLING THE BARBECUE 17 16 8 9 Assemble the trolley top panel with M6 head screws x8 ...
Page 43: ...43 ASSEMBLING THE BARBECUE 14 12 13 ...
Page 44: ...44 ASSEMBLING THE BARBECUE 14 15 BMG7642SA BMG7652SA ASSEMBLY ...
Page 46: ...46 ASSEMBLING THE BARBECUE 18 19 BMG7642SA BMG7652SA ASSEMBLY ...
Page 47: ...47 ASSEMBLING THE BARBECUE 4 20 21 ...
Page 49: ...49 ASSEMBLING THE BARBECUE 10 24 25 ...
Page 51: ...51 ASSEMBLING THE BARBECUE 28 29 Push down ON to brake Push down OFF to move ...
Page 74: ...74 NOTES NOTES NOTES ...