background image


RST973 IN-VEHICLE INSTALLATION & USER MANUAL 

9


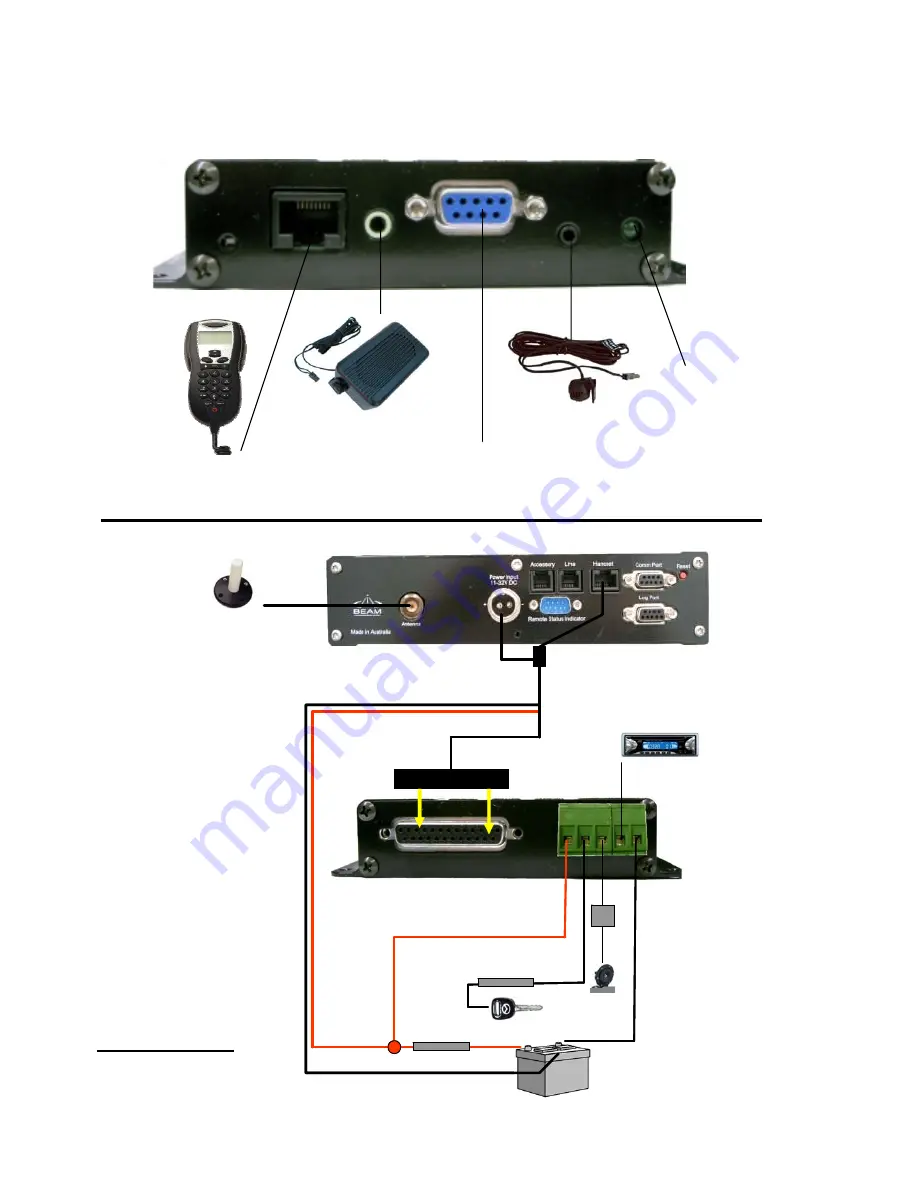
Installation Overview 


Intelligent Handset 


Speaker


Microphone


Power LED


DB9 Comm 

Port


ELECTRICAL LEGEND 
RED = A+  
Black = GND 
Green = Auxiliary Power  
 
Radio Mute & Horn Alert: Switch to ground when active
 

Horn Alert

11-32V DC Input

Radio 

Mute

+  

Negative 
Ground

Positive
3A fuse

Accessory

1A fuse

Antenna

Beam RST100 back

D25 Connector

JOIN

RED wire for illustration only

Horn Alert

11-32V DC Input

Radio 

Mute

+  

Negative 
Ground

Positive
3A fuse

Accessory

1A fuse

Antenna

Beam RST100 back

D25 Connector

JOIN

RED wire for illustration only

Summary of Contents for RST 973

Page 1: ...1 In Vehicle Hands Free RST 973 Installation User Manual Suitable for Beam Remote Satellite Terminals RST100 RST200 RST310 Beam Communications Pty Ltd ...

Page 2: ...rom its use No licence is granted by implication or otherwise under any patent or patent rights of Beam Beam reserves the right to change specifications at any time without notice Copyright 2007 Beam Communications Pty Ltd All rights reserved 8 Anzed Court Mulgrave Victoria 3170 AUSTRALIA Note This Device is only suitable for the following Beam Terminals RST100 serial number 100AXXXX Must be an A ...

Page 3: ...LIGENT HANDSET 14 SELECTING A LOCATION FOR THE SPEAKER 14 SELECTING A LOCATION FOR THE MICROPHONE 15 GUIDELINES FOR ROUTING CABLES 16 WIRING FOR ADDITIONAL FEATURES 17 CONVENIENCE ON OFF FEATURE 17 ENTERTAINMENT MUTE FEATURE OPTIONAL 17 HORN ALERT RING FEATURE OPTIONAL 17 PRELIMINARY TESTING 17 PREPARING FOR INSTALLATION 18 INSTALLATION PROCEDURE 18 PRIOR TO ANY FIXING OF COMPONENTS 19 INSTALLING ...

Page 4: ...HONE BOOK 34 EMERGENCY NUMBER DIALING 34 CALL A NUMBER IN A MESSAGE 34 ENDING A CALL 34 RECEIVING A CALL 34 RECEIVE A PHONE CALL 34 RECEIVING A HANDS FREE CALL WHEN IN CAR UNIT FITTED 34 RECEIVING A PERSONAL CALL ON THE HANDSET 34 UNANSWERED CALLS 35 VOICEMAIL MAILBOX 35 CHANGING FROM PRIVATE TO HANDS FREE IF IN CAR UNIT FITTED 35 ADJUSTING EARPIECE VOLUME 35 ADJUSTING RINGER VOLUME IN CAR KIT USE...

Page 5: ...RING THE PHONE SETUP MENU 46 ADJUSTING THE RINGER VOLUME 47 SETTING THE RINGER TONE 47 GETTING TO PHONE SETUP 47 SETTING THE KEYPAD TONES 48 LOCKING AND UNLOCKING YOUR PHONE 48 LOCK THE PHONE AUTOMATICALLY 48 LOCK THE PHONE INSTANTLY 48 UNLOCK THE PHONE 48 CHANGE THE UNLOCK CODE 49 GETTING TO REQUIRE SIM CARD PIN 49 PROTECTING THE SIM CARD 49 ACTIVATE AND DEACTIVATE THE SIM CARD PIN CODE 49 GETTIN...

Page 6: ...L CALLS 53 GETTING TO AUDIBLE CALL TIMERS 53 SETTING AUDIBLE CALL TIMERS 53 SET THE REPETITIVE TIMER 54 SETTING UP YOUR ACCESSORIES 55 ENTERING THE ACCESSORY SETUP MENU 55 MUTE CAR RADIO 55 ACTIVATE DEACTIVATE EXTENDED MENUS 56 TROUBLESHOOTING THE RST973 57 GLOSSARY 59 ...

Page 7: ...s address the needs of individuals communities government agencies and the corporate sector providing voice and data access without the need for traditional wire line or mobile phone infrastructure As the Iridium satellite network is global Beam s products address global markets across the spectrum of rural and remote users including households motor vehicles telemetry maritime and emergency servi...

Page 8: ...Intelligent Handset RST970 The handset supports voice calls as well as utilizing the Iridium SMS service The handset is compact and includes an inbuilt ring alert The handset also enables a private in vehicle conversation RS232 Data Port A RS232 serial data port is provided via the Comm Port allowing data calls or tracking alerting modules or a PC to be connected Refer to the AT commands guide on ...

Page 9: ...er Radio Mute Horn Alert Switch to ground when active Horn Alert 11 32V DC Input Radio Mute _ Negative Ground Positive 3A fuse Accessory 1A fuse Antenna Beam RST100 back D25 Connector JOIN RED wire for illustration only Horn Alert 11 32V DC Input Radio Mute _ Negative Ground Positive 3A fuse Accessory 1A fuse Antenna Beam RST100 back D25 Connector JOIN RED wire for illustration only ...

Page 10: ...alth agencies and industry reviewed the available body of research to develop the updated ANSI standard Antenna Care Use only the supplied or an approved replacement antenna Unauthorized antennas modifications or attachments could damage the phone and may violate local agency regulations Please refer to your Service Provider for further information Phone Operation Do not operate your mobile teleph...

Page 11: ...er Medical Devices If you use any other personal medical device consult the manufacturer of your device to determine if it is adequately shielded from external RF energy Your physician may be able to assist you in obtaining this information Turn your phone OFF in health care facilities when any regulations posted in these areas instruct you to do so Hospitals or health care facilities may be using...

Page 12: ... as gasoline stations below deck on boats fuel or chemical transfer or storage facilities areas where fuel odors are present for example if a gas propane leak occurs in a car or home areas where the air contains chemicals or particles such as grain dust or metal powders and any other area where you normally would be advised to turn off your vehicle engine For Vehicles Equipped with an Air Bag An a...

Page 13: ...lled and the air bag inflates serious injury could occur Selecting a location for the Hands Free Interface In many vehicles the best location for these units is on the floor or the rear vertical panel of the trunk compartment Alternate locations include under the dashboard under the front or rear seat or under the rear speaker deck panel Be sure that whatever location you choose meets these guidel...

Page 14: ...re with vehicle operation or with driver or passenger seating or leg space Selecting a Location for the Speaker The speaker should be mounted under the dashboard on the transmission hump or in another suitable location using the mounting bracket supplied with the speaker assembly When selecting a location for the speaker consider these guidelines Position the speaker so that it does not interfere ...

Page 15: ...entre of the vehicle either on the driver side sun visor or on the head liner above the driver Do not position the microphone where it may be blocked by the visor Position the microphone so that it faces the user of the mobile when the user is seated normally Do NOT position the microphone near a window or in any location where road noise or any ambient background noise may be substantially high a...

Page 16: ...they are protected from pinching sharp edges and crushing Where possible avoid routing cables above the catalytic converter Use grommets wherever a cable must pass through a hole in a metal panel In a vehicle equipped with electronically controlled anti skid brakes route all cables on the opposite side of the vehicle from the braking modulator box to minimize possible interference from the phone K...

Page 17: ...onality Note This output signal from the Mute connector sinks a maximum of 100mA 0 1A to ground Horn Alert Ring Feature optional The horn Alert Ring output connects to the horn of the vehicle or other device for alerting when an incoming call is received on the terminal Local laws and regulations regarding the connection of Audible horn Alerts must be abided by Please consult local authorities in ...

Page 18: ...he supplied mounting hardware Only qualified personnel should install communication equipment If necessary contact the vehicle manufacturer for air bag information specific to the vehicle Caution An air bag inflates with great force DO NOT place objects including communication equipment in the area over the air bag or in the air bag deployment area If the communication equipment is improperly inst...

Page 19: ...ient cable distance between all components Intelligent Handset Speaker Microphone Power LED DB9 Comm Port Horn Alert 11 32V DC Input Radio Mute _ Negative Ground Positive 3A fuse Accessory 1A fuse Antenna Beam RST100 back D25 Connector JOIN RED wire for illustration only Horn Alert 11 32V DC Input Radio Mute _ Negative Ground Positive 3A fuse Accessory 1A fuse Antenna Beam RST100 back D25 Connecto...

Page 20: ...ver Module Mount the Transceiver module in a safe location away from driver obstruction Ensure the distance between the transceiver module and the Hands Free Interface enables the D25 Connector cable to reach both units Use the Velcro tape supplied to conveniently attach the Transceiver module to a fixed surface For ease of use orient the handset hang up cup vertically with the spring loaded clip ...

Page 21: ... can then be simply concealed in a location that is no greater than 45cm 1 6 away from the driver The microphone can also be installed in the centre of the cabin if required so it is central to the vehicles interior space Follow these guidelines for positioning the microphone 1 Do not place the microphone so that the visor can block it when flipped up or down 2 Do not place the microphone where it...

Page 22: ...use heavy feedback within the system 3 Route the cable carefully to ensure that it does not get crimped by any heavy objects or enclosures this will avoid damaging the cable Correct microphone speaker positioning Installing the terminal Connector Cable Connect the cable to the RJ45 connector of the Beam Satellite terminal Ensure there is sufficient cable between the unit and the HFI kit Ensure the...

Page 23: ... ground loops and high impedance ground paths run the green red stripe and black wires directly to the battery or as close as possible to the battery Use a grommet or other protection to prevent wear on metal surfaces for these wires 4 Prepare the fuse block Remove all fuses and tape them to their respective holders before making any connection DO NOT insert fuses until you have completed and insp...

Page 24: ...ecurely fastened Ensure that no wires are exposed once the screw is fastened to avoid blowing a fuse The cables should only be connected as specified according to the below diagram The external ring alert and the Mute connector are for optional wiring Refer to the earlier section for details ELECTRICAL LEGEND 1 RED 12v B 2 Black GND B 3 Green Accessory Power Acc Radio Mute Horn Alert Output that s...

Page 25: ...meone place a call to the mobile and confirm proper operation Checking the Entertainment Mute Feature If the entertainment mute feature has been connected check it by following these steps Enable the entertainment mute feature Prepare the mobile to receive test calls by enabling the entertainment feature For instructions on enabling this feature refer to the User Guide Turn on the car radio and se...

Page 26: ...utton on the handset will not work A This is normal the power button on the handset do not control the power of the terminal Q I am unable to make a call A Check the antenna connection Check the connector cable Check the phone has power Check the phonies registered on the network Try switching the engine off and on again Try resetting the Remote terminal by power cycling the unit Q I am unable to ...

Page 27: ...n you are in motion form time time the satellite signal may become obstructed by such things as buildings bridges tunnels larger vehicles Check the antenna connection Ensure the antenna cable has not been damaged Ensure that only approved antenna cable has been used Q Poor voice quality A Ensure the signal strength is at 5 bars on the handheld terminal Check your location and for interference Keep...

Page 28: ...ur Operator coverage map Is Restricted displayed Check the Call Barring setting Has a new SIM card been inserted Q You can t receive calls A Check to see that your phone is powered on Check the antenna Is it properly mounted Do you have a clear view of the sky Check the signal strength If the signal is weak move the vehicle to a more open area Check the Call Forwarding and Call Barring settings Ch...

Page 29: ... the SIM and phone contacts If they are dirty clean them with an antistatic cloth Q You can t cancel call forwarding or call barring A Wait until you are in an area with good network coverage and try again Q Your PIN is blocked A Check Card or Insert Card Check the card is inserted correctly Check the contacts of the card are clean Clean the chip with a soft cloth See your Service Provider if cont...

Page 30: ...r phone s power on it performs a self test to let you know it is operational You may see a number of other power on messages see below When the 0 no service indicator disappears and the home system indicator appears you are ready to start calling Power On Messages Once your phone is powered on you may see Message Description Searching The phone is attempting to establish communications with the sa...

Page 31: ...k Card This message indicates that the SIM card is damaged or inserted the wrong way Blocked If the SIM card PIN code is incorrectly entered three times in a row your phone becomes blocked See Unblock the PIN Code for instructions on how to to unblock it Blocked If the SIM card PIN2 code is incorrectly entered three times in a row your phone becomes blocked See Unblock the PIN2 Code for instructio...

Page 32: ...d on have a SIM card inserted be unlocked and be in contact with the satellite network See Accessing the Network for network information Making A Hands Free Call 1 Enter the number you wish you call 2 Use the symbol for international calls 3 Once the number is entered the Call will appear 4 Press OK to attempt call 5 To end call End Call appears press OK 6 To end call press C LCD Display Hang up C...

Page 33: ...atic Redial If the number or your network is busy you will see Redial for five seconds Press OK to redial the number automatically Note The maximum number of redial attempts is set by your service provider If the call cannot be connected within this maximum you will see the message Redial failed Redial Last Number Called Whenever your phone is on standby you can redial the last number called 1 Pre...

Page 34: ...ears press OK Replace the handset in the hang up cup for an in vehicle installation Receiving a Call Receive a Phone Call To receive a call your phone must be powered on have a SIM card inserted be unlocked and be in contact with the satellite network See Accessing the Network for network information Receiving a Hands free Call When In car unit fitted 1 In call alert leave the handset in the hang ...

Page 35: ... If In car unit fitted 1 Press mute key on the handset 2 Replace the handset into the hang up cup 3 You are now in direct conversation with Speaker Mic OR 1 Press MENU key until mute appears then press okay 2 Replace the handset into the hang up cup 3 You are now in direct conversation with Speaker Mic CAUTION If you return the handset to the hang up cup without muting first your call will end Adj...

Page 36: ...lect 3 Increase the volume by pressing the upper volume key or 3 Decrease the volume by pressing the lower volume key 4 Press and hold C to exit the menu Using In Call Features Muting a Call For privacy during a call try muting the phone You hear the party on the other end but the other party does not hear you To unmute a call While in a call press the Mute key or Press MENU until you see Turn Mut...

Page 37: ...ENU to access the Options menu You will see the first available submenu scroll through the Options menu Press MENU to scroll forward Press or to scroll backward or forward select options and submenus Press OK to select a menu option or submenu when that option or submenu name is displayed exit features and menus Press e to exit the feature or submenu Press and hold e to exit the Options menu Note ...

Page 38: ...mutes the phone 5 Lock Now locks your phone immediately 6 Adjust Ring displays and sets the incoming call ring tone volume 7 Read Messages displays the newest message received 8 Register Now initiates a systematic manual search for a network which to register You must wait three minutes between registra attempts 9 Forward On Off activates or deactivates unconditional call forwa depending on the cu...

Page 39: ...enter the Phone Book menu 1 Press MENU to open the Options menu 2 Press MENU to scroll forward or 1 Press or to scroll backward or forward 2 Press OK when you see Organizing Your Phone Book Each name and phone number in your Phone Book is stored in a numbered memory location The satellite phone has two types of memory phone memory and SIM card memory Phone Memory SIM Card Memory Personal Numbers 1...

Page 40: ...en you use them Most people call a different set of numbers during the day than they do in the evening and on weekends You can switch one touch dialing to your phone s memory locations 1 9 your SIM card s memory locations 101 109 or to your fixed dial list locations 1 9 Store your evening and weekend numbers on one type of memory and your daytime numbers on another Getting to Personal Numbers 1 Pr...

Page 41: ...d XXX Or 1 Press OK to select the next available location You will see Stored XXX 2 Press and hold OK to exit the menu Entering Names You can use the keypad to produce any letter in the alphabet For example press 2 to enter the letters A B or C as shown Correct an Entry To make a change 1 Press or to scroll to the character you want to delete 2 Press OK to delete one character at a time Or 2 Press...

Page 42: ...and Number 1 Find an entry and then press OK 2 Press MENU until you see Erase Name and Number and then press OK You will see Erased xxx Storing Your Voicemail Number To store a voicemail number 1 Go to Message Settings and then Press OK to select 2 Press OK to select Voicemail Number You will see Enter Voicemail Number followed by your current voicemail number If this is the first time you have st...

Page 43: ... that you can store depends on your service provider If the message indicator is flashing your SIM card is full See Delete Messages to make room for the new message What Messages Contain You can receive short text or numeric messages in your Personal Mailbox Text messages may contain up to 160 characters Messages contain multiple screens with the following information the message the date and time...

Page 44: ...es 1 Follow the steps in Go to the Next Message until you see the message you want to delete and then press C 2 Press MENU until you see Delete Message and then press OK You will see Message Deleted 3 Press and hold C to exit the menu Accessing Your Messages 1 Press MENU until you see Messages and then press 0K 2 Press MENU until you see Received Messages and then press 0K 3 Press MENU to scroll t...

Page 45: ... enclosed you can instantly place a call to that number If one is not included your phone selects the first number in the message 1 Follow the steps in Go to the Next Message to display the desired message and then press 0K 2 Press MENU until you see Return Cal 1 3 Press 0K to place a call to that number You will see the number followed by Calling ...

Page 46: ... for security resetting or clearing your phone s settings selecting the language displayed by your phone Entering the Phone Setup Menu To enter the Phone Setup menu 1 Press MENU to open the Options menu 2 Press MENU to scroll forward or 1 Press or to scroll backward or forward 2 Press when you see Press MENU to scroll through the submenu or Press or to scroll backward or forward through the submen...

Page 47: ...r Tone Select your favourite tone from 10 different options 1 Follow the steps in Getting to Phone Setup to get to Set Ringer Tone and then press OK to select 2 Press MENU to scroll through the following options Standard Tone Single Ring Tone British Tone French Tone German Tone Bravo Tone Three Ring Tone Siren Tone Quick Tone High Tone You will hear a one ring cycle demonstration 3 Press OK to se...

Page 48: ...help you prevent unwanted use of your phone Lock the Phone Automatically Use this feature to set your phone to lock itself every time it is powered on 1 Follow the steps in Getting to Phone Lock to get to Automatic Lock and then press OK to select 2 Press MENU to choose On or Off and then press 0 to select You will see Completed 3 Press and hold 0 to exit the menu Lock the Phone Instantly Use this...

Page 49: ... and then press OK 2 Press MENU until you see Require SIM Card PIN and then press 0 3 Press MENU to scroll to one of the features described below You will see the feature name followed by View Options Protecting the SIM Card You can use a Personal Identification Number PIN code to protect the information stored on your SIM card even when it is inserted into someone else s phone Activate and Deacti...

Page 50: ...Re enter the new PIN code and then press OK again You will see Completed 5 Press and hold C to exit the menu Unblock the PIN Code If your PIN code is entered incorrectly three times in a row Blocked appears in the display You need to enter a PIN unblocking key PUK1 which you can obtain from your provider Getting to Phone Setup 1 Press MENU until you see Phone Setup and then press OK 2 Press MENU t...

Page 51: ...s OK to select You will see Enter Security Code 2 Enter your six digit security code You will see Reset Complete 3 Press and hold C to exit the menu Clear All Stored Information The Master Clear option resets the same items as Master Reset plus the following clear phone book entries from phone memory not from SIM memory clear last calls made list reset resettable call timers Master Clear does not ...

Page 52: ... name followed by Select Registering With the Satellite Network Your phone searches for the Iridium satellite network 1 Follow the steps in Getting to Network Selection to get to Register Now 2 Press 0 to select You will see Registering This may take a few seconds If the phone finds the signal you will see Registered and the signal strength indicator The home system indicator appears If the phone ...

Page 53: ...cumulated since the timer was last reset The airtime is displayed in hours minutes and seconds After several seconds the display returns to Total For All CalIs 2 Press and hold C to exit the menu Getting to Audible Call Timers 1 Press MENU until you see Call Meters and then press OK 2 Press MENU until you see Set Audible Call Timers and then press OK 3 Press MENU to scroll to one of the features d...

Page 54: ...conds 1 Follow the steps in Getting to Audible Call Timers to get to Repetitive Timer and then press OK to select 2 Press MENU to scroll to On or Off then press OK to select If you select On you will see Enter Seconds Continue with step 3 If you select Off you will see Completed Continue with step 4 3 Press OK to accept the current setting You will see Seconds XXX or 3 Enter a number from 11 to 99...

Page 55: ...menu 1 Press MENU to open the Options menu 2 Press MENU to scroll forward or 2 Press or to scroll backward or forward 3 Press OK when you see 4 Press MENU to scroll through the submenu or 4 Press or to scroll backward or forward through the submenu Mute Car Radio This feature automatically mutes your car radio when you make or receive a call Note This feature works with your car radio s mute featu...

Page 56: ...lect 2 Press MENU until you see Extended Menus and then press OK to select 3 Press MENU to scroll to either On or Off and then press OK to select All hidden features are accessible when you activate the extended menus Access Hidden Features If you want to access a feature hidden in the extended menus but don t want to leave the extended menus active you can use this shortcut Press and hold MENU fo...

Page 57: ...nnector Try resetting the terminal by pressing the reset button Q There is no Audio from the Speaker A Check that the speaker connector is installed directly to the HFI kit Check the signal strength on the intelligent handset Q You can t make calls A Check that the antenna is properly mounted Do you have a clear view of the sky Did you enter the number in international format All calls made from t...

Page 58: ...blocking key PUK1 or contact your service provider Q Your PIN2 is locked A Enter the PIN2 unblocking key PUK2 or contact our service provider Q Your SIM card won t work A Is the card inserted the correct way Is the gold chip visibly damaged or scratched Return the card to your service provider Check the SIM and phone contacts If they are dirty clean them with an antistatic cloth Q You can t cancel...

Page 59: ...al communication L lock Use this feature to prevent unauthorized access to your satellite telephone M memory location A space in the internal Phone Book both phone memory and SIM memory where you can store a telephone number and a name Each phone memory location can hold up to 32 digits and 16 letters The SIM card memory can hold up to 20 digits and 16 letters menu feature Any feature that can be ...

Page 60: ...ward through the menu system or the name directory security code A six digit code used to access sensitive features service provider A company affiliated with a satellite carrier that provides satellite service to its customers signal The radio waves that carry information between your phone and the satellite system submenu A secondary level of your phone s menu system hierarchy T talk time The am...

Page 61: ...cations to the Customer Beam Communications will repair or replace at our option any defective product provided that our analysis and or inspection discloses that such defects developed under normal and proper use 4 This warranty does not extend to goods subjected to liquid or particulate ingress extreme humidity misuse neglect accident or improper installation or to maintenance or repair of produ...

Reviews: