background image


75.5351.02  EN   20080317   (75.5350) 

Page 6 of 7 


DETECTION 

MODE


Press the 

DETECTION MODE key (7). 

Use the 

NUMBER Keys 1-3 (1)

 to select the required mode:

Key 1: bi-directional  
Key 2: unidirectional approach  
Key 3: unidirectional depart  
Detection mode:                            


Press the 

REJECTION MODE key (8). 

Immunity

 is used to avoid detection due to environmental 

interferences (vibrations, rains, etc). 

‘Pedestrian/parallel traffic rejection’

 provides both 

rejection of pedestrian and rejection of any parallel traffic at 
the same time.  
 
Use the 

NUMBER keys 1- 5 (1)

 to enter the required 

rejection mode: 
key 1 : detection of all kind of targets in motion 
key 2 : detection of all kind of targets in motion  
            + interference immunity 
key 3 : Low  ‘Pedestrian/parallel traffic’ rejection  
            + interference immunity 
key 4 : Mid  ‘Pedestrian/parallel traffic’ rejection  
            + interference immunity 
key 5 : High  ‘Pedestrian/parallel traffic’ rejection  
            + interference immunity  
 
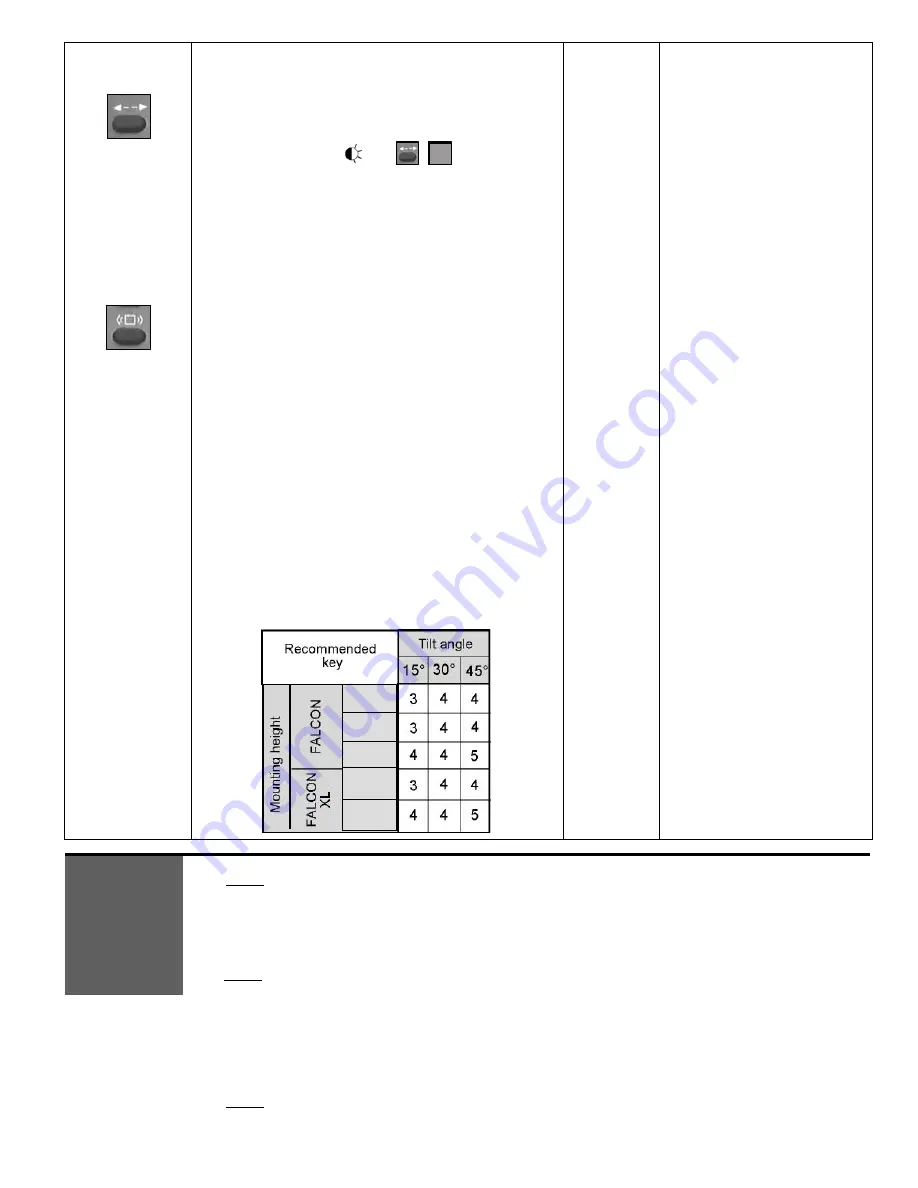
The discrimination between a pedestrian and the different 
vehicles depends mainly on the mounting height and the 
microwave module tilt angle. Be careful that the rejection 
function increases the response time of the sensor. 
 
Use the next table as suggestions and do not hesitate to 
increase or decrease the rejection level to obtain the 
required rejection. 


(Unidirectional 

Approach)


(No rejection

 
The red LED flashes quickly 
waiting for the value. 
Once this has been entered, it 
flashes slowly again. 


The red LED flashes quickly 
waiting for the value. 
Once this has been entered, it 
flashes slowly again. 


Without remote control all of the parameters can be set using the 2 push buttons.  

NOTE:  These two buttons are accessible from the sensor front cover with a small point. 


 To adjust the sensor using the buttons:  

   Press and hold either push button for 2 seconds (until the LEDs flash) and then release the button 

 To end adjusting the sensor using the buttons: 

   Press and hold either push button for 2 seconds (until the LEDs stop flashing) and then release the button; 
   NOTE:  If no button is pressed within 20 seconds the adjustment session is automatically ended. 

 To reset all the parameters to the factory values: 

Press and hold both push buttons simultaneously until the two LEDs switch on for 1 second  (after 2   
seconds). 

 
During the manual adjustment session the red and green LEDs flash successively and continuously.  

• 

The flashing number of the 

red LED

 provides the 

number of the displayed parameter

 (see next table); 

 The flashing number of the 

green LED

 provides the 

value of the displayed parameter

NOTE:  No red flashing indicates the zero value. 


FUNCTIONS 

CONFIGURATION 

WITH PUSH 

BUTTONS


23 ft 


16.5 ft


11.5 ft


10 ft 


7.5 ft 

1-3

REJECTION 

MODE


Summary of Contents for Falcon

Page 1: ... current 1A resistive Max switching power 30W DC 60 VA AC Hold time 0 5s to 9s adjustable Manual adjustment orientation of sensing field mechanically multiple functions by push buttons Remote control adjustments Sensitivity Hold time Detection mode Pedestrian and parallel traffic rejection mode Relay configuration Temperature range 22 F to 122 F 30 C to 60 C Degree of protection IP65 Product confo...

Page 2: ...housing slot guides Gently push the front cover and make sure that the external housing is properly seated front cover must be flush with housing Screw the 2 front cover screws and tighten the retaining nut Ceiling Mounting Wall Mounting Remark The bold type values give the minimum distance required to be able to fully adjust the sensor Check that both locking collar are at the same angle Align th...

Page 3: ...following adjustments tilt angle 15 30 45 sensitivity 9 The sensing fields here on the right correspond to the following adjustments tilt angle 30 sensitivity 9 6 3 When the power is turned ON the red and green LEDs flash for few seconds During a detection the red LED lights on During configuration the red LED flashes a number of times corresponding to the parameter being changed see next table Th...

Page 4: ...to the 0000 value factory setting or during the first minute after the power on press only the UNLOCK Key 3 no code required UNLOCK with code UNLOCK without code 0000 The red LED flashes quickly waiting for the access code After entering the correct code or if no code is required the red LED flashes slowly to indicate that the unlock is successful and the adjustment session has begun NOTE Adjustme...

Page 5: ...ent session all the parameters may be reset to their factory values in the following way PARAMETER KEY USER S ACTIONS DEFAULT VALUES Press the DEFAULT VALUES Key 12 then press the NUMBER Key 1 All the parameters are reset to the factory values see below DEFAULTS VALUES PARAMETER KEY USER S ACTIONS FACTORY SETTING LED SIGNAL SENSITIVITY Press the SENSITIVITY Key 6 Use the NUMBER Keys 0 9 1 to enter...

Page 6: ...level to obtain the required rejection 2 Unidirectional Approach 1 No rejection The red LED flashes quickly waiting for the value Once this has been entered it flashes slowly again The red LED flashes quickly waiting for the value Once this has been entered it flashes slowly again Without remote control all of the parameters can be set using the 2 push buttons NOTE These two buttons are accessible...

Page 7: ... and then release it SYMPTOM PROBABLE CAUSE CORRECTIVE ACTION The door will not open and the red LED does not light up The sensor power is off Check power supply Check the supply voltage The sensor sees the door moving Increase the tilt angle and or reduce the sensitivity The door opens and closes constantly When closing the door creates vibrations picked up by the sensor Ensure that the sensor is...

Reviews: