BEA Falcon User Manual Download Page 5


75.5351.02  EN   20080317   (75.5350) 

Page 5 of 7 


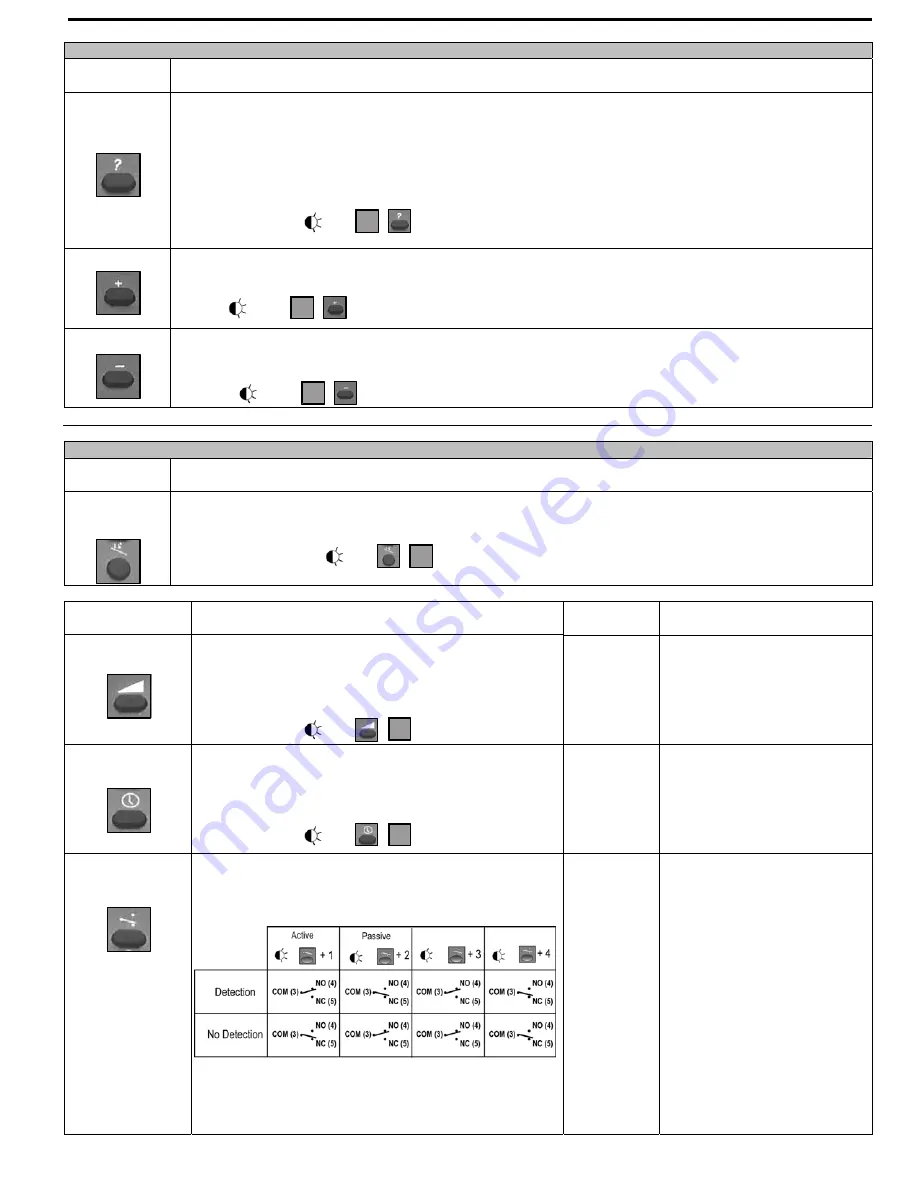
During an adjustment session each parameter may be checked or changed at any time in the following way:  
PARAMETER 
KEY 

 USER'S ACTIONS 


CHECK 

VALUES 


Press the K

ey (5,6,7,8,11)

 corresponding to the parameter to be checked and then press the 

CHECK 

VALUES Key 

(9). 
Count the number of times the green LED flashes, which correspond to the value of the checked parameter. No 
green LED flash corresponds to the value 0. 
Repeat this operation to check the value of the other parameters if required. 
Example:  SENSITIVITY Key (6)  – 7 flashes of the green LED: the sensitivity is set at the value 7. 

 
CHECK VALUES


PLUS 


Press the 

Key (5 or 6)

 corresponding to the hold time or sensitivity parameter to be modified 

and then press the 

PLUS Key (2)

 to increase the value by 1 unit. 

PLUS

:                              

MINUS 


Press the 

Key (5 or 6)

 corresponding to the hold time or sensitivity parameter to be modified. 

and then press the 

MINUS Key (4)

 to reduce the value by 1 unit. 

 
MINUS

:                             


During a sensor adjustment session all the parameters may be reset to their factory values in the following way:  
PARAMETER 
KEY 

USER'S ACTIONS 


DEFAULT 

VALUES


Press the 

DEFAULT VALUES Key (12),

 then press the 

NUMBER Key 1

.  All the parameters are reset to the 

factory values (see below). 

DEFAULTS VALUES: 


PARAMETER KEY  USER'S ACTIONS 

FACTORY 

SETTING 

LED SIGNAL 


SENSITIVITY 


Press the 

SENSITIVITY Key (6).


Use the 

NUMBER Keys 0-9 (1)

 to enter the sensitivity 

required  (or adjust this sensitivity using the 

PLUS (2)

 or 

MINUS (4)

 keys as explained above) 

SENSITIVITY:  


The red LED flashes quickly 
waiting for the value. 
Once this has been entered, it 
flashes slowly again. 


HOLD TIME 


Press the 

HOLD TIME Key (5).


Use the 

NUMBER Keys 0-9 (1)

 to enter the required hold 

time (0.5 s to 9 s)  (or adjust this parameter using the 

PLUS 

(2)

 or 

MINUS (4)

 keys as explained above). 

HOLD TIME

:  


0.5 s 

 
The red LED flashes quickly 
waiting for the value. 
Once this has been entered, it 
flashes slowly again. 


RELAY 

CONFIGURATION


Press the 

RELAY CONFIGURATION Key (11). 

Use the 

NUMBER Keys 1-4 (1)

 to select the required relay 

configuration: 


(Active 

Output) 


The red LED flashes quickly 
waiting for the value. 
Once this has been entered, it 
flashes slowly again. 


1

X

X

X

0-9

0-9

Summary of Contents for Falcon

Page 1: ... current 1A resistive Max switching power 30W DC 60 VA AC Hold time 0 5s to 9s adjustable Manual adjustment orientation of sensing field mechanically multiple functions by push buttons Remote control adjustments Sensitivity Hold time Detection mode Pedestrian and parallel traffic rejection mode Relay configuration Temperature range 22 F to 122 F 30 C to 60 C Degree of protection IP65 Product confo...

Page 2: ...housing slot guides Gently push the front cover and make sure that the external housing is properly seated front cover must be flush with housing Screw the 2 front cover screws and tighten the retaining nut Ceiling Mounting Wall Mounting Remark The bold type values give the minimum distance required to be able to fully adjust the sensor Check that both locking collar are at the same angle Align th...

Page 3: ...following adjustments tilt angle 15 30 45 sensitivity 9 The sensing fields here on the right correspond to the following adjustments tilt angle 30 sensitivity 9 6 3 When the power is turned ON the red and green LEDs flash for few seconds During a detection the red LED lights on During configuration the red LED flashes a number of times corresponding to the parameter being changed see next table Th...

Page 4: ...to the 0000 value factory setting or during the first minute after the power on press only the UNLOCK Key 3 no code required UNLOCK with code UNLOCK without code 0000 The red LED flashes quickly waiting for the access code After entering the correct code or if no code is required the red LED flashes slowly to indicate that the unlock is successful and the adjustment session has begun NOTE Adjustme...

Page 5: ...ent session all the parameters may be reset to their factory values in the following way PARAMETER KEY USER S ACTIONS DEFAULT VALUES Press the DEFAULT VALUES Key 12 then press the NUMBER Key 1 All the parameters are reset to the factory values see below DEFAULTS VALUES PARAMETER KEY USER S ACTIONS FACTORY SETTING LED SIGNAL SENSITIVITY Press the SENSITIVITY Key 6 Use the NUMBER Keys 0 9 1 to enter...

Page 6: ...level to obtain the required rejection 2 Unidirectional Approach 1 No rejection The red LED flashes quickly waiting for the value Once this has been entered it flashes slowly again The red LED flashes quickly waiting for the value Once this has been entered it flashes slowly again Without remote control all of the parameters can be set using the 2 push buttons NOTE These two buttons are accessible...

Page 7: ... and then release it SYMPTOM PROBABLE CAUSE CORRECTIVE ACTION The door will not open and the red LED does not light up The sensor power is off Check power supply Check the supply voltage The sensor sees the door moving Increase the tilt angle and or reduce the sensitivity The door opens and closes constantly When closing the door creates vibrations picked up by the sensor Ensure that the sensor is...

Reviews: