background image

Voice Services Software Installation Guide

5-8

303143-A Rev. 00

A progress bar is displayed as files are copied and the database is created. 
A message is displayed stating this process may take several minutes 
while the databases are configured.

c.

Proceed to 

Continuing Server Installation

.

Using Oracle Workgroup Server

If you selected 

Oracle

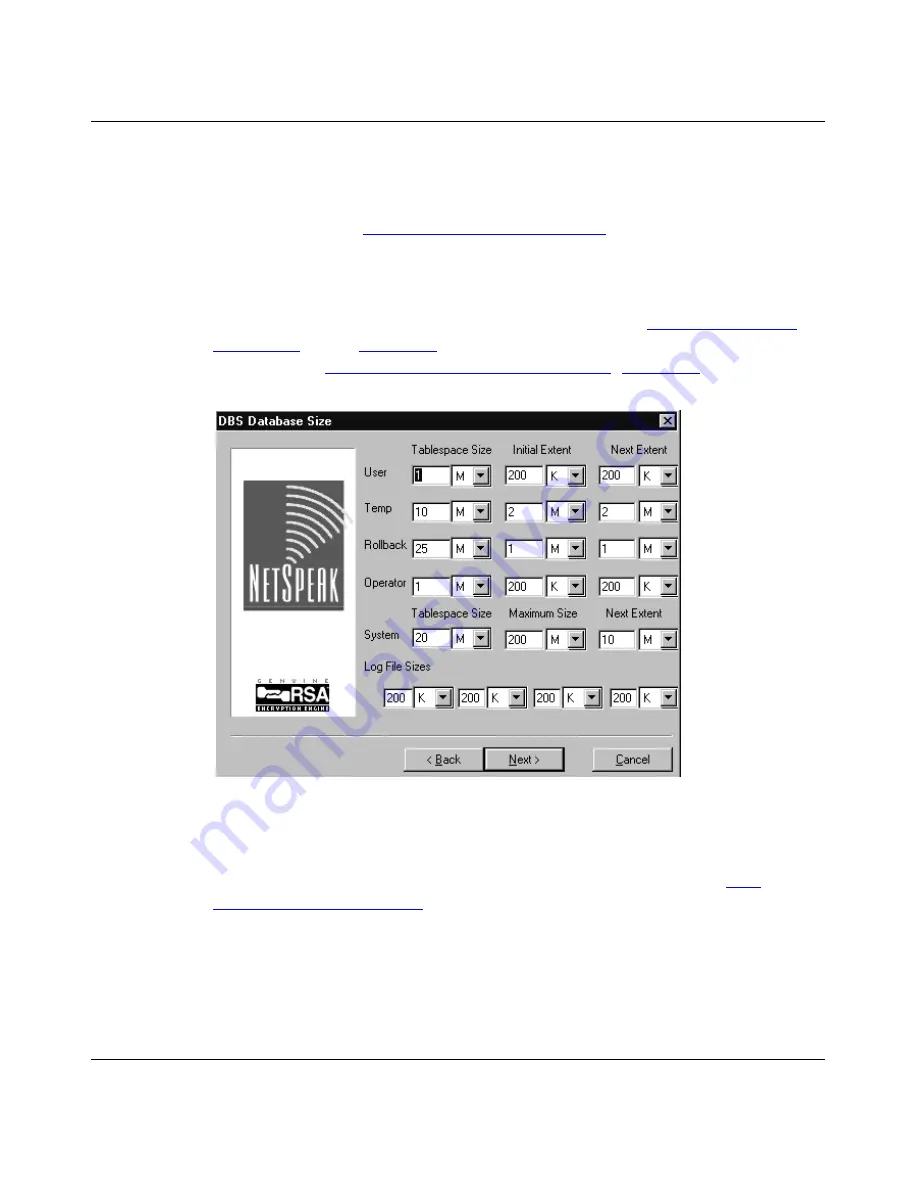
 in the Database Type dialog box, a 

DBS Database Size 

Dialog Box

 opens (

Figure 5-6

). This dialog box opens for each component 

selected in the 

Select Usage Components Dialog Box

 (

Figure 5-3

).

Figure 5-6.

DBS Database Size Dialog Box

The installation program automatically sets these parameters when installing the 
databases. Typically the defaults are suitable for most environments. 

Bay 

Networks Customer Service

 can help you customize these settings if the defaults 

are not suitable.

a.

Click on 

Next

 to accept the default settings.

A progress bar is displayed as files are copied and the database is created. 
There is a delay while the databases are created.

Summary of Contents for Voice Gateway

Page 1: ...Part No 303143 A Rev 00 July 1998 Voice Services Software Installation Guide ...

Page 2: ...escribed in this document incorporate security technology from RSA Data Security Inc NetSpeak Corporation is a certified POS port application developer and a member of the POS port Ready program All other trademarks and registered trademarks are the property of their respective owners Restricted Rights Legend Use duplication or disclosure by the United States Government is subject to restrictions ...

Page 3: ...software without specific prior written permission SUCH PORTIONS OF THE SOFTWARE ARE PROVIDED AS IS AND WITHOUT ANY EXPRESS OR IMPLIED WARRANTIES INCLUDING WITHOUT LIMITATION THE IMPLIED WARRANTIES OF MERCHANTABILITY AND FITNESS FOR A PARTICULAR PURPOSE In addition the program and information contained herein are licensed only pursuant to a license agreement that contains restrictions on use and d...

Page 4: ......

Page 5: ...structions 1 2 System Requirements 1 3 Before You Install 1 4 SQL Database Licenses 1 5 Hard and Soft License Limits 1 5 Managing Licenses 1 5 SQL Database License Limits 1 5 Gateway Routing Manager Licenses 1 6 Configuring Oracle System Identification 1 7 Adding Database Alias 1 7 Editing the listener ora File 1 9 Chapter 2 Starting the Installation Process Installing the Hardware Key 2 1 Softwar...

Page 6: ...dify the SQL Database 4 14 Inserting Sample Code into the SQL Database 4 14 Customizing the Sample Code for One Customer 4 15 Customizing the Sample Code for Multiple Customers 4 15 Entering the Customers in the Database 4 16 Entering the Correct Customer Name and Address 4 16 Viewing the Database Containing the Customer Account Numbers and PINs 4 17 Starting the Server 4 17 Chapter 5 Installing t...

Page 7: ...ystem Information Dialog box 4 6 Figure 4 5 Control Center Initialization Login Information Dialog Box 4 7 Figure 4 6 Select Database Type Dialog Box 4 8 Figure 4 7 Select Routing Option Dialog Box 4 9 Figure 4 8 Database Login Information Dialog Box 4 10 Figure 4 9 CS Database Size Dialog Box 4 11 Figure 4 10 CS Database Table Size Dialog Box 4 12 Figure 4 11 Overwrite Existing File Dialog Box 4 ...

Page 8: ......

Page 9: ...ce Services Components 1 1 Table 1 2 Control Center CC System Requirements 1 3 Table 1 3 Gateway Routing Manager CS System Requirements 1 3 Table 1 4 Event Manager EMS System Requirements 1 4 Table 1 5 Database License Limit Definitions 1 5 ...

Page 10: ......

Page 11: ...tion process Chapter 2 Install the Control Center application Chapter 3 Install the Gateway Routing Manager CS and review information about prerequisite software products Chapter 4 Install the Event Manager EMS and review information about prerequisite hardware and software products Chapter 5 Note This document contains examples of windows displayed by Voice Services applications These are include...

Page 12: ... directory names and book titles quotation marks Indicates the title of a chapter or section within a book screen text Indicates data that appears on the screen Example Friendly Fred fred fred acme com 199 999 9 99 Bay Networks Technical Publications You can now print technical manuals and release notes free directly from the Internet Go to support baynetworks com library tpubs Find the Bay Networ...

Page 13: ...tact the technical support staff for that distributor or reseller for assistance If you purchased a Bay Networks service program call one of the following Bay Networks Technical Solutions Centers Region Telephone number Fax number United States and Canada 800 2LANWAN then enter Express Routing Code ERC 322 when prompted to purchase or renew a service contract 978 916 8880 direct 978 916 3514 Europ...

Page 14: ... about Bay Networks products Training programs can take place at your site or at a Bay Networks location For more information about training programs call one of the following numbers Region Telephone number United States and Canada 800 2LANWAN then enter Express Routing Code ERC 282 when prompted 978 916 3460 direct Europe Middle East and Africa 33 4 92 96 15 83 Asia Pacific 61 2 9927 8822 Tokyo ...

Page 15: ...his application allows system administrators to configure modify and manage the features of all Voice Services It is the exclusive interface to all Voice Services operations and runs on Windows 95 and Windows NT Gateway Routing Manager CS This server allows organizations to set up connections internally and externally among users and customers This server is managed using the Control Center applic...

Page 16: ...n on your Voice Services Software and Documentation CD All documentation is in Adobe Acrobat format pdf files and can be found in the manuals directory on this CD Install Adobe Acrobat Reader Version 3 01 to view these files Overviews Control Center Description Control_Center pdf Gateway Routing Manager Description Gateway_Routing_Manager pdf Call Detail Recording Description Call_Detail pdf Event...

Page 17: ...at least 256 colors recommended CD ROM drive Mouse or pointing device Network Interface Adapter Operating System One of the following Microsoft Windows NT Server 4 0 or later with Service Pack 3 Windows NT Workstation 4 0 or later Windows 95 NT Network Protocol TCP IP connectivity to Voice Services Recommended Power backup uninterruptible power supply UPS Table 1 3 Gateway Routing Manager CS Syste...

Page 18: ...vity to Voice Services Recommended Power backup uninterruptible power supply UPS Table 1 4 Event Manager EMS System Requirements Component Description Hardware Intel Pentium 166 MHz processor minimum 64MB RAM minimum 300MB available free hard disk space includes space for SQL log and database files CD ROM drive Network Interface Adapter Working parallel port LPT on the computer system for hardware...

Page 19: ...tions to the Oracle database In addition the Gateway Routing Manager CS uses a variation of the soft limit for the number of connections The database license limit definitions are Managing Licenses When the number of hard limit licenses are exceeded the connect request is queued in a first in first out FIFO list When a license becomes available the first in queue is granted a license to connect SQ...

Page 20: ...ing used It is very important that each application has enough licenses Gateway Routing Manager Licenses The number of SQL database licenses required for the Gateway Routing Manager CS is based on the following formula The number of licenses required for the CS is the result of the number of persistent sockets plus the number of active CS applications being run in a given time slice plus the numbe...

Page 21: ...abase alias and then configure Oracle to add a system identification SID to the listener ora file This file is used by Oracle Listener to listen for connections to the database The listener ora file includes the SID of the databases they listen for and various control parameters including tracing and logging data If you are using the Event Manager EMS follow these instructions to create a database...

Page 22: ...tance dialog box opens 6 Enter the TCP IP host name If you have any questions about the information entered here contact your Network Administrator or Bay Networks Customer Service A host is a computer system with a unique IP address and domain name that can function as the beginning and end point of data transfers 7 Change the Database Instance to CS or DBS 8 Click on OK The Confirm Adding Databa...

Page 23: ...ormation dialog box opens 12 Make sure the information listed is correct before clicking on OK 13 Click on OK Editing the listener ora File The next step is to add the database alias CS system identification to the listener ora file To do this follow these steps 1 Use a text editor to open the listener ora file Double click on the file name in the directory to open NotePad The listener ora file is...

Page 24: ...vices Software Installation Guide 1 10 303143 A Rev 00 SID_LIST_LISTENER SID_LIST SID_DESC SID_NAME ORCL SID_DESC SID_NAME CS PASSWORDS_LISTENER oracle 4 Save the changes to the file 5 Exit from the text editor ...

Page 25: ...on Installing the Hardware Key The hardware key also known as a dongle is the device that connects to the parallel port of the personal computer on which you install and run Voice Services software Plug the hardware key into the parallel port of the computer before starting the installation program The hardware key must be connected to the port while installing and using Voice Services software If...

Page 26: ...he installation process the installation program prompts you to insert the diskette containing the registration file The registration file has the file name extension reg and is stored in the path NetSpeak config If the Voice Services software is re installed on moved to another computer the same registration file can be used only if the associated hardware key is connected to the parallel port of...

Page 27: ...ion dialog box 3 Select the component or components you want to install based on the package you purchased The installation process continues based on the components selected If you select a component accidentally you can undo the selection later because the installation program allows you to verify and change selections before it installs the Voice Services software onto the system Note Only the ...

Page 28: ...port of the computer If the key is not connected and you are installing a Voice Service you cannot continue The installation program displays an error message and then stops Record the software serial number for future use It is required when ordering registration files or software upgrades from Bay Networks Customer Service 5 Click on Next The Ready to Install Dialog Box opens If you want to revi...

Page 29: ...owing the version of the Voice Services software you are installing Record this information for future use If you ever contact Bay Networks Customer Service a representative might ask you for the software version you are using You can also retrieve version information from the Control Center by displaying the About Control Center dialog box ...

Page 30: ...t 8 Review the displayed information and if you agree click on Next to continue The Registration Information dialog box opens The user name and company name fields could contain data if the installation program obtained information from the Windows NT Registry The Registration Information dialog box displays information about the previous installation if one exists 9 Do one of the following Accept...

Page 31: ...k on Next From this point on the installation process is different for each component To continue go to the specific component chapter Chapter 3 Installing the Control Center Chapter 4 Installing the Gateway Routing Manager Chapter 5 Installing the Event Manager ...

Page 32: ......

Page 33: ...oftware is set up and configured with the Control Center items listed in System Requirements Make sure all steps in Chapter 2 have been completed Application Installation After the Control Center computer system is properly set up and configured proceed with the installation process 1 Complete the steps in Starting the Server Installation Program The Destination Directory Dialog Box opens Figure 3...

Page 34: ...is dialog box displays the default directory and subdirectories created by the installation program when installing the Control Center application If you want to change the directory where files will be installed click on Browse 2 Click on Next to continue The System Identification Dialog Box opens Figure 3 2 ...

Page 35: ...computer system to the Voice Services network Use a naming convention such as cc domain name com cc_fl admin acme com or cc 123 123 45 67 The name entered in this dialog box is used as a host identifier when managing Control Center and Voice Services server security For information about security administration refer to the Control Center Administration Guide 4 Click on Next The Continue Installat...

Page 36: ...s choose Start 2 Choose Programs 3 Choose NetSpeak 4 Choose NetSpeak Control Center If the Control Center was installed correctly it starts and then displays Initialization and Login windows For information about starting initializing and using the Control Center application refer to the Control Center Administration Guide If the Control Center did not install correctly it displays errors at start...

Page 37: ...the Gateway Routing Manager Make sure you have the following before starting the installation process Make sure you have a sufficient number of SQL database licenses for the Gateway Routing Manager CS For more information refer to SQL Database Licenses The installation program requires you to enter the user ID and password of the database administrator This information is used to create the Gatewa...

Page 38: ...to the documentation provided with SQL Server Server Installation After the Gateway Routing Manager CS computer system is properly set up and configured proceed with the installation process 1 Connect the hardware key to the parallel port of the computer Refer to Installing the Hardware Key for complete instructions 2 Complete the steps in Starting the Server Installation Program The Select Destin...

Page 39: ... when installing the Gateway Routing Manager CS If you want to change the directory where files will be installed click on Browse 3 Click on Next to continue The Select Subcomponent Option Dialog Box opens Figure 4 2 The Service and Database check boxes are selected as the default setting 4 If you are installing the CS on one computer system and the database on another computer system select only ...

Page 40: ... Service when installing the Gateway Routing Manager application b Choose Database when using an SQL database If you are reinstalling the Voice Services server software do not select Database to prevent overwriting existing database tables 5 Click on Next to continue The System Identification Dialog Box opens Figure 4 3 ...

Page 41: ...ieves from the Windows registry you should enter a unique name to identify this server on this computer system to the Voice Services network Use a naming convention such as CS domain name com CS_FL admin acme com or CS 123 123 45 67 The name entered in this dialog box is used as a host identifier when managing Control Center and Voice Services server security For information about security adminis...

Page 42: ...egistry The System Hostname appears in these fields 8 Click on Next to continue The Control Center Initialization Login Information Dialog Box opens Figure 4 5 This information serves as authorization to access the Gateway Routing Manager CS from the Control Center The installation program automatically enters the first name last name and user name based on information contained in the Windows NT ...

Page 43: ...log Box 9 Enter a user name password and password verification to access the Control Center 10 Click on Next The Select Database Type Dialog Box opens Figure 4 6 11 Select the type of database you are going to use with the CS Figure 4 6 Depending on your selection different windows are displayed to configure the database ...

Page 44: ...ous database files will be deleted If you want to skip the database installation click on Back to return to the Select Subcomponent Option Dialog Box in Figure 4 2 Clear the Database check box and continue with the installation program 14 Click on Next The Select Account Management Information dialog box opens 15 Click on Next to accept the default setting The Select Routing Option Dialog Box open...

Page 45: ...y is using routing 17 Click on Next The Ready to Install dialog box opens If you want to review or change selections and field data click on Back to return to previous installation windows The installation program does not start installing files until you click on Next 18 Click on Next to start copying program files A progress window opens showing files as they are copied onto the system One or tw...

Page 46: ... Server If you selected Microsoft SQL Server in the Select Database Type Dialog Box Figure 4 6 the Database Login Information Dialog Box opens Figure 4 8 Figure 4 8 Database Login Information Dialog Box a In this dialog box specify the User ID and Password used to access the SQL Server database The user ID and password are required so the installation program can log in to the SQL Server and creat...

Page 47: ...nge the SQL Server user ID and password if instructed to do so If the SQL Server is not accessible to the Gateway Routing Manager CS as described in Before You Install the installation program displays an error message and does not completely install the server b Click on Next A progress bar is displayed as files are copied and the database is created c Proceed to Continuing Server Installation Us...

Page 48: ...ings if the defaults are not suitable a Click on Next The CS Database Table Size Dialog Box opens Figure 4 10 Again these defaults are suitable for most environments Figure 4 10 CS Database Table Size Dialog Box b Click on Next to accept the default settings A progress bar is displayed as files are copied and the database is created There is a delay while the databases are created c Proceed to Con...

Page 49: ...f Voice Services software on the computer system the Overwrite Existing File Dialog Box opens Figure 4 11 Figure 4 11 Overwrite Existing File Dialog Box 3 Click on Yes to overwrite the existing registration file Click on No to save an existing registration file and then click on Next to continue to a successful installation dialog box When the software is installed successfully the Installation Co...

Page 50: ...Center to add customer account numbers and PINs so you have to add them directly to your SQL database If you ran the typical installation of SQL you should have a tool called SQL Query or ISQL w Inserting Sample Code into the SQL Database 1 Start SQL Query or ISQL w You can find the program in the Microsoft SQL 6 5 section of your Start menu 2 When you are asked enter the SQL server name and the u...

Page 51: ... the appropriate number 4 Change the Customer PIN variable to the appropriate number Customizing the Sample Code for Multiple Customers 1 Perform the procedure to customize the sample code for one customer See Customizing the Sample Code for One Customer 2 Copy the four lines beginning with INSERT INTO and paste them after the sample code DELETE FROM webphone_t WHERE password 6 IA _J JNE JRD3F1 XR...

Page 52: ...ing the Customers in the Database 1 Right above the Query tab in SQL Query there is a drop down box with DB next to it Find the database called ns_db in the list and select it 2 Go back down to the code you entered and verify that it is correct Make sure that the code is punctuated exactly as shown on the previous page 3 When you are ready to enter the customers into the database go to Query in th...

Page 53: ...ts window To authenticate the customer s account and PIN numbers at the time of the call you need to collect the digits and authorize the user to place the call Refer to the Control Center Administration Guide to read how to use the Control Center to edit the Gateway s call flow Starting the Server The Gateway Routing Manager runs as a Windows NT Service The installation program sets the service t...

Page 54: ...Voice Services Software Installation Guide 4 18 303143 A Rev 00 For information about logging in to and configuring the Gateway Routing Manager refer to the Control Center Administration Guide ...

Page 55: ...Manager Make sure you have the following before starting the installation process The installation program uses the default system administrator user ID sa to access the SQL Server database that is used by the EMS Confirm with your SQL database administrator that the SQL Server uses the sa user ID If not get and have available the correct user ID and password before starting the installation proce...

Page 56: ...he Server Installation Program The Select Destination Directory Dialog Box opens Figure 5 1 Figure 5 1 Select Destination Directory Dialog Box This dialog box displays the default directory and subdirectories created by the installation program when installing the Event Manager If you want to change the directory where files will be installed click on Browse 3 Click on Next The Select Subcomponent...

Page 57: ...atabase Installation Options Dialog Box opens Figure 5 2 Figure 5 2 Database Installation Options Dialog Box 7 Select from one of three options Select Install New Database Use this option only if there are no existing program files from a previous installation of this server Select Add Server Components Use this option to add a server component to an existing EMS database Select Migrate GFS Tables...

Page 58: ... to add a new server or migrate the GFS tables the Control Center Initialization Login Information dialog box opens This information serves as authorization to access the Event Manager from the Control Center The installation program automatically enters the first name last name and user name based on information contained in the Windows NT registry You can change the user name but make sure to ma...

Page 59: ...ager EMS Include in the name the location purpose domain or IP address of the system Although the installation program displays a name in the field that it retrieves from the Windows registry you should enter a unique name to identify this server on this computer system to the network Use a naming convention such as EMS domain name com EMS_FL admin acme com or EMS 123 123 45 67 Note The CS option ...

Page 60: ...tion windows The installation program does not start installing files until you click on Next 15 Click on Next A progress dialog box opens showing files as they are copied onto the system One or two windows may display with a message that the NS_DB data source already exists Select Yes to replace the definition From this point on the installation process is different for each database type Continu...

Page 61: ...d already contains the default SQL Server user ID which is sa however your SQL database administrator may have changed the default user ID The Password field is blank however your SQL database administrator may require a password to access the SQL Server database Consult your SQL database administrator and change the SQL Server user ID and password if instructed to do so If the SQL Server is not a...

Page 62: ... Dialog Box opens Figure 5 6 This dialog box opens for each component selected in the Select Usage Components Dialog Box Figure 5 3 Figure 5 6 DBS Database Size Dialog Box The installation program automatically sets these parameters when installing the databases Typically the defaults are suitable for most environments Bay Networks Customer Service can help you customize these settings if the defa...

Page 63: ...stallation program continues with the next component from the list Starting the Server The Event Manager runs as a Windows NT Service The installation program sets the service to start automatically To configure the server to start manually 1 From Windows choose Start 2 Choose Settings 3 Choose Control Panel 4 Choose Services 5 After the Services program is running choose NetSpeak EMS in the Servi...

Page 64: ...Voice Services Software Installation Guide 5 10 303143 A Rev 00 For information about logging in to and configuring the EMS refer to the Control Center Administration Guide ...

Reviews: