background image


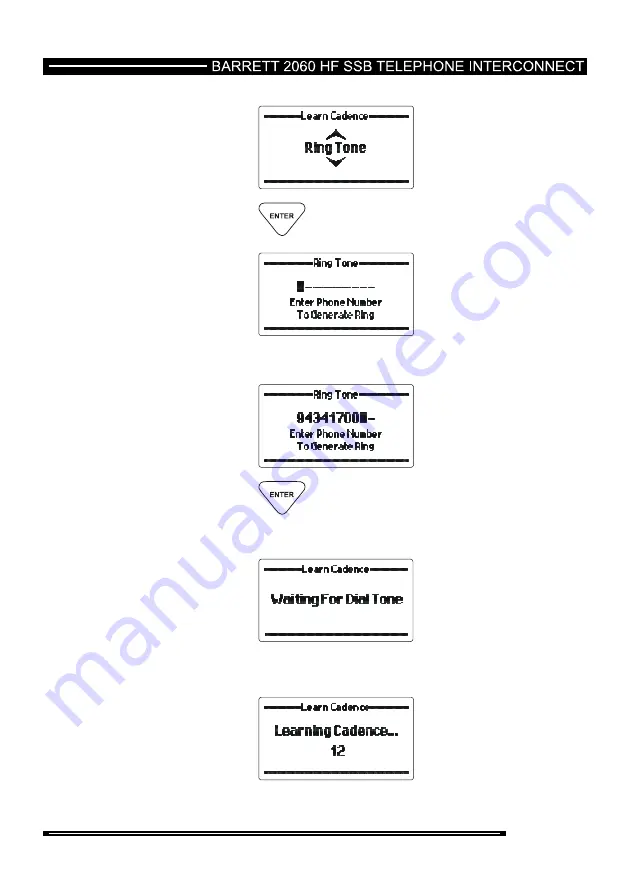
Ring tone 


Press the 

key to enter the learn ring tone option. 


Enter the phone number to dial. 


Press the 

key. 

 
The 2060 will now look for dial tone. 


Once dial tone is detected the 2060 will dial the telephone number 
entered and begin learning the ring tone. 


The learning phase takes 15 seconds then the cadence values 
are stored. 


93 of 133


Summary of Contents for 2060

Page 1: ...ommunications Head Office Barrett Communications Pty Ltd 47 Discovery Drive Bibra Lake WA 6163 Australia Tel 61 8 9434 1700 Fax 61 8 9418 6757 Email information barrettcommunications com au www barrettcommunications com au ...

Page 2: ...user 20 Selecting a channel 20 Sending a beacon request 20 Sending a Selcall 21 Sending a Telcall 22 Sending an ALE call 22 Sending a Secure Call 23 Sending a GPS request 23 Using the voice operated switch VOX 24 Requesting current channel information 24 Turning off Call Timer 24 Frequency hopping mode 24 Entering the hopping prefix code 25 To enable hopping mode 25 To disable hopping mode 25 Requ...

Page 3: ... two stations Beacon Call 35 Sending a Beacon Call 35 Receiving a Beacon Call 36 Sending a Selcall 37 Receiving a preset phone number Selcall 38 Direct dial telephone calls Telcalls 40 Making ALE calls 42 Disconnecting ALE calls 43 Scanning 44 Mute squelch Selection 45 Front panel mute 45 Scan mute 45 Mode Selection 46 Advanced Selective Call Functions 47 Requesting a station s GPS position 47 Men...

Page 4: ...for ring 78 Line reversal 79 Ring till answer 80 Ring till hang up 81 Call length 82 Hang up counts 83 PABX prefix 84 Telcall num length 85 STD num length 86 Preset numbers 87 Cadence Settings 88 Set country cadence 88 Manual set cadence 89 Learn cadence 91 Busy tone 91 Ring tone 93 Scan Settings 95 Scan dwell 95 Scan resume time 96 Scan on start up 97 Scan mute 98 Scan entries 99 Adding channels ...

Page 5: ...mming using the Barrett 2060 supervisory software 123 Programming using the Barrett cable P N BCA90023 BCA204020 123 Programming a channel from the front panel 124 Transmit and receive frequencies 124 Operating mode 125 Selcall format 125 Antenna socket selection 125 Deleting a channel from the front panel 127 Installing the Barrett 2060 Interconnect 128 Connectors 130 Power connector 130 RS232 co...

Page 6: ... Acronyms This term Means Station ID The ID of the station being called the receiving station s self ID GPS Global Positioning System HF High Frequency LCD Liquid Crystal Display LSB Lower Sideband USB Upper Sideband PCB Printed Circuit Board PIN Personal Identification Number PSTN Public Switched Telephone Network PTT button Press to talk button RDD Radio Direct Dial Revertive signal An acknowled...

Page 7: ...sed by other stations to call you SSB Single Sideband a transmission format Tx Transmit USB Upper Sideband Warning Equipment will be inoperable when mains power fails Battery Warning This equipment has a Lithium Ion battery which although contains no toxic materials can be a fire risk if the used internal battery is exposed to moisture Proper battery handling and disposal procedures must be observ...

Page 8: ...ne network The 2060 telephone interconnect provides a fully automated interface between the international telephone network and an HF network Stations in an HF network equipped with selective call systems based on CCIR 493 can call up to 98 preset telephone numbers that can be stored in the 2060 telephone interconnect Stations fitted with a Telcall facility based on selective call format CCIR 493 ...

Page 9: ... multiple functions assigned to them depending on when the key is pressed and for how long the key is pressed Key functions are listed below followed by a detailed description of their functions Key Key Primary function Secondary function Power on off None Channel up General scroll key Channel down General scroll key Volume up None Volume down None 9 of 133 ...

Page 10: ...y 6 Alpha mno Clear back one step None Enter direct channel change mode Decimal point Numeric key 4 Alpha ghi Numeric key 8 Online Offline Switch Alpha tuv Enter program mode None Mute squelch selection Alpha space Numeric key 0 Mode select USB LSB AM Alpha pqrs Numeric key 7 Start scan force next scan channel Alpha wxyz Numeric key 9 10 of 133 ...

Page 11: ...Key Key Primary function Secondary function Scroll left Numeric key 1 Numeric key 2 Alpha abc Scroll right Alpha def Numeric key 3 Numeric key 5 Alpha jkl 11 of 133 ...

Page 12: ... here Note When the interconnect is supplied it is assembled in the one piece base station configuration and the microphone is already fitted Interconnect cable The small interconnect cable supplied in the kit is plugged in here with the other end into the front of the main interconnect module 12 of 133 ...

Page 13: ...is RJ11C jack allows the connection of a telephone set telephone to 2060 The telephone can be connected to the telephone line when the 2060 is in Manual mode allowing the handset to be used as a standard telephone for receiving and making telephone calls When the unit is switched to Online this jack is disconnected from both the line and the unit until the 2060 goes back to an Offline state POWER ...

Page 14: ...ns transceiver off After switching on the 2060 performs a series of internal checks and displays important system information on the front panel display Display 1 2 3 5 4 6 7 8 The LCD display shows 1 Channel number 2 Time 3 Receive Transmit frequency 4 Online Offline 5 Auto Manual mode 6 Selective call type 7 Mode 8 RX TX Mode 14 of 133 ...

Page 15: ...Adjusting the Audio Volume To increase the audio volume in the loudspeaker To decrease the audio volume in the loudspeaker The display looks like this when adjusting the volume 15 of 133 ...

Page 16: ...elect respectively the next higher or lower programmed channel Holding down either of the keys will cause the rate of the channel change to increase The channel up down keys on the microphone have the same function as the channel up down keys on the keypad Channel up Channel down 16 of 133 ...

Page 17: ...99 inclusive Note Channel zero cannot be selected example selects channel 12 press the keys press the key If the channel selected had not been previously programmed then the following is displayed Note Empty channels can only be accessed by direct channel selection and are not displayed when scrolling through channels 17 of 133 ...

Page 18: ...the microphone Press and hold down the PTT transmit button only while talking Hold the microphone close to your mouth Speak clearly Use the word over to indicate you have finished speaking and release the PTT transmit button 18 of 133 ...

Page 19: ...he required access privilege programmed by the system supervisor if so it then initiates a telephone call and connects the telephone party with the HF station return to scan when the call is complete answer an incoming telephone call prompt the telephone caller with recorded instructions on how to select a channel and how to send a call to connect to a user on the HF network send periodic beacons ...

Page 20: ...ber Note channel numbers must be two digits in length e g Enter 03 instead of 3 Note once channel entry commences HF receiver noise will disappear until the DTMF function being entered is complete This lack of HF receiver noise identifies that you are still in the DTMF request sequence Sending a beacon request A beacon request is used to test to see if a channel is open to an HF station you may wi...

Page 21: ...Then enter the 4 or 6 digit Selcall of the transceiver you wish to contact followed by two key presses only one press is necessary on Level 1 Interconnects The tones of the Selcall being sent will now be heard Note IDs 9900 to 9999 are reserved for ALE calls See Sending an ALE call If the entered ID does not have the access level to receive Selcalls then the Access Denied pre recorded message will...

Page 22: ...the HF station transceivers Selcall history an audible acknowledgement will be heard if the call was successful If the HF station does not have the access level required for this operation the Access Denied pre recorded message will be heard and no action will be taken Sending an ALE call If the optional ALE is fitted then an ALE call can be made to a transceiver also fitted with ALE To send an AL...

Page 23: ...Secure key code assigned to it Please see Program Secure Sections of the manual If the HF station does not have the access level required for this operation the Access Denied pre recorded message will be heard and no action will be taken Sending a GPS request The telephone user can request an HF stations location via a GPS request call A GPS request can only be made to an HF station that has at le...

Page 24: ...he telephone keypad the internal synthesised voice will annunciate ON indicating automatic VOX is on again Requesting current channel information The telephone subscriber can request the 2060 to annunciate the current channel s number and frequency information using its internal synthesised voice by entering 77 on their telephone keypad Turning off Call Timer To turn off the call timer enter 66 on...

Page 25: ...one keypad This causes the 2060 interconnect to instantly hang up The telephone user then replaces the handset on his telephone The 2060 interconnect is now immediately ready for the next caller A busy tone is transmitted out to the radio operator as well to show that a hang up from the phone has been received the second method is to simply hang up the telephone handset See Cadence Settings Set Co...

Page 26: ...with Self ID of 45 In a 6 digit call the pre dialled numbers are still the last 2 digits ie 123404 will dial pre dial number 04 The HF station sending the Selcall must have a relevant access level assigned to their Selcall number to permit dialling to a preset phone number Sending a Telcall dialling a telephone number To make a telephone call enter the self ID of the 2060 to be used via the numeri...

Page 27: ...reset telephone number within the 2060 that is associated with Selcall number received receive incoming Telcalls from the HF network and forward these manually to the telephone network receive incoming telephone calls and connect the telephone user to the HF network To operate the 2060 in manual mode press the button for 2 seconds until the MAN icon is shown on the display status line NOTE If ALE ...

Page 28: ...of a preset ALE call directed to your 2060 it will be displayed on the front panel and an alarm will sound To on forward the call To on forward the call to the preset telephone stored in your 2060 and associated with the received preset number press the key The 2060 will display the transfer call window press the key or the key The 2060 will now attempt to go online and dial the requested phone nu...

Page 29: ...nd answered the 2060 shows the call length in the bottom right hand section of the screen This means that the HF transceiver and the telephone user are now able to communicate to each other Receiving a Telcall from an HF station On receipt of a Telcall directed to your 2060 it will be displayed on the front panel and an alarm will sound 29 of 133 ...

Page 30: ... connect the HF user and the telephone user Incoming phone calls When the 2060 is in Manual mode all incoming telephone calls are ignored They are recognised but not answered A standard telephone should be connected to the Phone socket on the back of the 2060 the call can then be manually answered by the operator The operator can then Selcall the required HF station using the manual operator s con...

Page 31: ...ss the key to cancel the call from the telephone the telephone user can request a Hang up by entering 99 on their DTMF telephone handsets This will cause immediate call completion the telephone user can simply replace the phone to complete the call the subsequent service tones from the telephone network will result in call completion Note the service tones do not commence immediately the telephone...

Page 32: ...he terminate call screen Use the Scroll keys to select Yes Press the key to cancel the call Making a telephone call A standard telephone should be connected to the PHONE socket on the back of the 2060 This can now be used like a standard telephone to make and receive telephone calls 32 of 133 ...

Page 33: ...nd GPS request calls CCIR A four digit selective call system as specified by CCIR 493 Includes Selcall Telcall Beacon Call and GPS request calls Selective call Selcall Selcall is a digital signalling system based on standard CCIR 493 for use on HF networks Each station in an HF network is assigned an individual four or six digit ID identification and can be called using this ID Selective call Telc...

Page 34: ...fic stations These tables are used by the ALE controller to determine the best channel to connect on when commanded by its operator to communicate with another station The Barrett 2060 ALE setup is controlled by the transceiver that is connected to it The transceiver s ALE controller memory stores up to 10 000 sets of LQA information 100 channel configurations up to 20 self address configurations ...

Page 35: ...n on a particular channel and vice versa When a Beacon Call is sent to another station if the channel being used is open the remote station sends back a distinctive 4 tone revertive signal The operator can judge the quality of the channel for communications purposes by the strength and clarity of this distinctive tone Using Beacon Calls on several available channels will determine which channel is...

Page 36: ...ten for the distinctive 4 tone revertive signal from the station you have called If no revertive call is heard or it was difficult to hear try another channel and repeat the process until the best channel is found Receiving a Beacon Call When an interconnect receives a beacon request call it responds by transmitting the Beacon Call revertive tones 36 of 133 ...

Page 37: ...f the station you wish to call then press the key or the key the display will show as follows wait for the selective call to be sent listen for revertive tone from the called station that indicates the call was successful If no revertive tone is heard or it was difficult to hear try another channel and repeat the process until a good channel is found If a revertive tone is heard but you receive no...

Page 38: ...lay shows the call as follows The audible alarm will sound for thirty seconds and then time out To cancel the alarm before the time out period press PTT or any key other than the key To dial the preset number press the key to show the Send Call menu The transfer call option will now be shown Press the key or the key to begin the dial process The 2060 will look for dial tone if no dial tone is seen...

Page 39: ...ial the assigned telephone number Once the number is dialled and answered the 2060 will be online To end the phone call press the key This will bring up the terminate call menu Selecting Yes will force the 2060 to disconnect the telephone user 39 of 133 ...

Page 40: ...ne interconnect Making a direct dial telephone call sending a Telcall select the channel you want to send the Telcall on Beacon Call can be used to select the best channel listen for traffic on that channel if no traffic is heard then continue press the key select Telcall with the Scroll keys then press the key or the key enter the Selcall ID of the destination station 40 of 133 ...

Page 41: ... the Telcall to be sent the display will show as follows listen for revertive tone from the called station that indicates the call was successful If no revertive call is heard try another channel and repeat the process When the call is successful wait for telephone connection to be made and proceed with call 41 of 133 ...

Page 42: ...tablish ALE links from the front panel of the 2060 press the key select ALE Call with the Scroll keys then press the key or the key use the scroll keys to select the destination station then press the key or the key use the scroll keys to select the 2060 self ID station to use 42 of 133 ...

Page 43: ...LE link attempt Once an ALE link is established any invalid key presses will make a message appear on the 2060 display Disconnecting ALE calls press the key use the scroll keys to select Terminate All Links then press the key or the key 43 of 133 ...

Page 44: ...nning When a Selcall signal is detected no matter which mute type is selected the transceiver will stop scanning and decode the Selcall The interconnect will only stop scanning when a Selcall is detected ALE Selcall Scanning When an ALE signal is detected no matter which mute type is selected the transceiver will stop scanning and attempt to decode the ALE call In this mode the interconnect will a...

Page 45: ...back into mute after the call is completed Single Channel Monitoring Manual Mode The 2060 stays muted until a call is received at which point the 2060 will un mute It will not go back into mute after the call is completed Scan mute Scan mute is enabled and disabled through the protected menu See Scan Settings Scan Mute section of the manual Scanning Auto Mode The 2060 stays muted until a call is r...

Page 46: ...of the selected channel The mode key will only temporarily set the mode for a selected channel the mode reverting to that channel s programmed mode after the channel is changed or the interconnect is turned off Press the key repeatedly to select the required mode 46 of 133 ...

Page 47: ...on Beacon Call can be used to select the best channel listen for traffic on that channel if no traffic is heard then press the key select GPS Request with the Scroll keys then press the key or the key enter the identification of the station you want to request the GPS position from then press the key or the key twice 47 of 133 ...

Page 48: ...ch the following will be displayed The remote transceiver GPS position or the following error messages The GPS unit is not providing data to the remote transceiver There is no GPS unit fitted to the remote transceiver There was no response from the remote station 48 of 133 ...

Page 49: ...us All sections of the Menus are operated using the similar key press sequences In this section when describing the functions available in the Menu system it is assumed the operator is familiar with the following press the key to enter the Standard Menu section press the key for more than 2 seconds to enter the Protected Menu section use the Scroll keys to select the menu item you require then pre...

Page 50: ... Use the and keys to scroll back and forth through the identification pages Displays the telephone interconnects software version DSP version core version the interconnects Selcall IDs and the battery voltage in receive 50 of 133 ...

Page 51: ...llows the backlight level on the LCD display to be adjusted to one of three viewing levels High Medium or Low Use the Scroll keys to select the level required example Medium when the level required is displayed press the key 51 of 133 ...

Page 52: ...ight stays on for a short time from the last key press for a long time from the last key press or so that the backlight is permanently on or off Use the Scroll keys to select the required setting example Always on When the setting required is displayed press the key 52 of 133 ...

Page 53: ...o enter the protected menu press and hold the for approx 2 seconds General Setting the clock press the key Use the Scroll keys to set the current time for example 13 15 1 15 PM When time is set press the key 53 of 133 ...

Page 54: ...Setting the date press the key Use the Scroll keys and as shown on the screen to set the current date for example 13 March 2007 When date is entered press the key 54 of 133 ...

Page 55: ...Automatic VOX This section allows the automatic VOX to be enabled or disabled Use the Scroll keys to select the required setting When the required setting is displayed press the key 55 of 133 ...

Page 56: ...s section allows the VOX timeout to be set The VOX timeout will stop the VOX from continuously transmitting if the VOX sensitivity has been set too high When the VOX timeout value is displayed press the key 56 of 133 ...

Page 57: ...e set The VOX hang time sets the length of time the VOX will stay on after a voice signal is finished this will help with voice continuity in environments where voice signal burst are very short When the VOX timeout value is displayed press the key 57 of 133 ...

Page 58: ...vailable are Low This makes the VOX less sensitive Used where voice signals are high and noise levels are very low Medium This is the standard VOX setting used where voice levels are stronger then noise levels High This makes the VOX more sensitive Used where voice signals are low and noise levels are high When the VOX required sensitivity level is displayed press the key 58 of 133 ...

Page 59: ... This is used to calculate charges for phone calls Done either by a time connected method or using the different types of PSTN charging pulses that are generated on the phone line by some telephone exchanges When the VOX timeout value is displayed press the key 59 of 133 ...

Page 60: ...efix This section allows the interconnects hopping prefix to be set This is used during secure calls between HF stations and telephone subscribers When the hopping prefix has been entered press the key 60 of 133 ...

Page 61: ... operator to enable and disable the ALE functionality of the 2060 This menu is only available if the transceiver connected to the 2060 has got the ALE option fitted When required ALE state has been entered press the key 61 of 133 ...

Page 62: ...060 if the installation is for use in a local transceiver configuration or a local receiver remote transceiver configuration Normally this is set to RX TX common Use the Scroll keys to select setting required example shows RX TX Common press the key 62 of 133 ...

Page 63: ...Local line out level This section sets the transmit audio level to the local transceiver 0dB is the default Use the Scroll keys to select setting required example shows 0 dBm press the key 63 of 133 ...

Page 64: ...n level Sets the receive audio level from the local transceiver the lower the level the higher the line amplifier gain Use the Scroll keys to select the Line in level required example 0 dBm press the key 64 of 133 ...

Page 65: ...Aux line out level This section sets the transmit audio level to the auxiliary connector 0dB is the default Use the Scroll keys to select the level required example 0 dBm press the key 65 of 133 ...

Page 66: ...ments Settings available are Weak Medium and Strong It should be noted that as the depth is increased the processed human voice gets a more metallic quality press the key Use the Scroll keys to select the noise reduction depth required example Medium When the noise reduction required is displayed press the key 66 of 133 ...

Page 67: ...l potentially cause the VOX and DTMF to incorrectly operate whilst also compromising the performance of the cadence detector Phone Level Out The audio level to line is set up in this menu This level can be increased up to 0dBm for phone lines with loss Typically this level can be set to 5dBm for most lines press the key Use the Scroll keys to select the level required example 5dBm When the level r...

Page 68: ...s thus recommended that the operator ring the same number the 2060 is connected to and utilise the busy cadences to correctly adjust the level press the key The Phone Level In warning screen will be displayed press any key to continue enter the telephone number you want to call usually the same number that the 2060 is connected to then press the key 68 of 133 ...

Page 69: ...ed will be dialled after the number is dialled the phone level in Rx Level setup screen will be shown Adjust the receive gain by using the left and right arrow keys level should be set within the Ideal area Once the correct level has been set press the key This will save the level 69 of 133 ...

Page 70: ...tings Two different selective call IDs can be set within the Barrett 2060 telephone interconnect as follows Selcall ID Setting 4 digit Selcall self ID Setting Six Digit ID Setting 6 digit Selcall self ID 70 of 133 ...

Page 71: ... each programmed channel This gives HF station operators the ability to know if an interconnect is available and also signal quality The period can be set from 1 to 60 minutes at intervals of 1 minute or the beacon can be disabled Use the Scroll keys to select the setting required example shows selection of periodic beacon every 30 minutes press the key 71 of 133 ...

Page 72: ...l first There are 2 settings available True This requires a Selcall to be sent before the telephone operator can transmit into the HF network False The telephone operator can transmit into the HF network as soon as the 2060 answers an incoming phone call Use the Scroll keys to select the setting required example True make the telephone operator send a Selcall before allowing transmit press the key...

Page 73: ...efixes are used to disable HF stations from making telephone calls to phone numbers beginning with the barred prefix Up to 10 different prefixes can be specified with each having up to 8 digits Toll free prefixes Toll free prefixes allow phone numbers with the specified prefix to be treated as a toll free number for charging purposes 73 of 133 ...

Page 74: ...STD prefixes STD prefixes define which phone numbers are treated as STD numbers based on the selected prefix 74 of 133 ...

Page 75: ...e uses pulse or tone dialling press the key Use the Scroll keys to select the dialling method to be used required example Tone When the dialling method required is displayed press the key NOTE Pulse dialling is not available when Australian ring and busy cadences are selected 75 of 133 ...

Page 76: ...dial tone is present The time is measured in seconds Dial tone checking can also be disabled press the key Use the Scroll keys to select the time to wait for dial tone to be seen example 4 seconds When the dial tone wait time required is displayed press the key 76 of 133 ...

Page 77: ...is only effective when tone dialling is selected The time is measured in milliseconds press the key Use the Scroll keys to select the DTMF pulse length to be seen example 70 milliseconds When the DTMF pulse length required is displayed press the key 77 of 133 ...

Page 78: ...ng when dialling out before deciding the call is valid Time is in 10 second intervals press the key Use the Scroll keys to select the time to wait for a ring detect to be seen example 50 seconds When the wait for ring time required is displayed press the key 78 of 133 ...

Page 79: ...stead of using the line cadences To use line reversal detection the phone line the 2060 is connected to must have this facility fitted You should request this facility from your local supplier press the key Use the Scroll keys to select line reversal detection example Disabled When the correct line reversal setting is displayed press the key 79 of 133 ...

Page 80: ...r of rings before the 2060 will answer This is used in Auto mode press the key Use the Scroll keys to select number of rings before answering the incoming call example 2 rings When the correct number of rings is displayed press the key 80 of 133 ...

Page 81: ...ings the 2060 will wait for before determining the number dialled is not going to answer press the key Use the Scroll keys to select number of rings before hanging up example 5 rings When the correct number of rings is displayed press the key 81 of 133 ...

Page 82: ...so as to allow other people the use of the interconnect Call length is set in minutes from 1 to 60 or unlimited press the key Use the Scroll keys to select maximum allowed call length example 30 minutes When the required call length is displayed press the key 82 of 133 ...

Page 83: ...adences that need to be received before the interconnect hangs up press the key Use the Scroll keys to select number of busy tones required before hanging up the call example 4 hang ups When the correct number of hang ups is displayed press the key 83 of 133 ...

Page 84: ...This option dials a prefix before dialling an out going phone number This is used by some PABX systems to obtain an external line Up to eight digits can entered Entering no digits disables the PABX prefix 84 of 133 ...

Page 85: ...one digits that designates a local call non STD Six to ten digits can be selected press the key Use the Scroll keys to select local telephone number length example 8 digits When the required local telephone number length is displayed press the key 85 of 133 ...

Page 86: ...o calculate if the telephone number dialled is in fact a STD number One to four digits can be selected press the key Use the Scroll keys to select the STD prefix length example 2 digits When the required STD telephone number prefix length is displayed press the key 86 of 133 ...

Page 87: ...umbers menu corresponds to the last 2 digits of the 2060 s Selcall ID Each preset number can be up to 16 digits long press the key Use the Scroll keys to select the preset number address to edit example Entry 02 When the required STD telephone number prefix length is displayed press the key Enter the required preset telephone number then press the key 87 of 133 ...

Page 88: ...eature automatically sets the ring and busy cadences in the 2060 based on the country selected press the key Use the Scroll keys to select the required country example United States When the required country is displayed press the key 88 of 133 ...

Page 89: ...tor set the busy on and off times ring tone allows the operator to set 2 on tone lengths and 2 off tone lengths The example below will set up a busy on tone length press the key Use the Scroll keys to select either the busy tone or the ring tone example Busy Tone When the tone to be set is displayed press the key Use the Scroll keys to select either the busy on tone or the busy off tone example Bu...

Page 90: ...Press the key Enter the required busy on time in milliseconds then press the key 90 of 133 ...

Page 91: ...ne signals The 2060 allows the operator to enter telephone numbers to dial so that ring and busy signals can be sampled For the 2060 to operate at optimal level the busy and ring tones generated from the dialled numbers must be correct Busy tone Press the key to enter the learn busy tone option Enter the phone number to dial Press the key 91 of 133 ...

Page 92: ...nce dial tone is detected the 2060 will dial the telephone number entered and begin learning the busy tone The learning phase takes 15 seconds then the cadence values are stored If dial tone is not detected an error will be shown 92 of 133 ...

Page 93: ...r the phone number to dial Press the key The 2060 will now look for dial tone Once dial tone is detected the 2060 will dial the telephone number entered and begin learning the ring tone The learning phase takes 15 seconds then the cadence values are stored 93 of 133 ...

Page 94: ...If dial tone is not detected an error will be shown 94 of 133 ...

Page 95: ...its on a channel after scan has been stopped after a Selcall signal has been detected The dwell time can be set from 1 to 10 seconds Use the Scroll keys to select the scan dwell time required example 5 seconds When the setting required is selected press the key 95 of 133 ...

Page 96: ...ly resume scanning from the last operation i e key press or PTT The scan resume time period can be set between 1 and 30 minutes or it can be disabled Use the Scroll keys to select the scan resume time required example 5 minutes When the setting required is selected press the key 96 of 133 ...

Page 97: ...art up This option sets whether or not the 2060 will resume scanning after a power down Use the Scroll keys to select the scan on start up example On When the setting required is selected press the key 97 of 133 ...

Page 98: ...Scan mute This option sets whether or not the 2060 will be muted during scan Use the Scroll keys to select the scan mute setting example On When the setting required is selected press the key 98 of 133 ...

Page 99: ... Scroll keys to select the Add Entry option The Add Entry option will only be displayed if unassigned channels are available Press the key The Add Entry screen will now be displayed use the Scroll keys to select the channel to be added to the scan table Press the key The channel will be added to the scan table 99 of 133 ...

Page 100: ...earch Entry screen will now be displayed use the Scroll keys to scroll through the scan table entries Press the key when the scan entry to be modified is reached The channel list will now be highlighted use the Scroll keys to scroll through the available channels Press the key when the required channel is reached 100 of 133 ...

Page 101: ...he key The Search Entry screen will now be displayed use the Scroll keys to select the scan entry to be deleted from the scan table Press and hold the key for 2 seconds The Erase Entry confirmation screen will now be shown Use the Scroll keys to select Yes then press the to confirm deletion 101 of 133 ...

Page 102: ...ne Message is played on air to the HF network when the 2060 tries to go online but doesn t see dial tone Access denied message The Access Denied is played on air to the HF network or online to the telephone user when a Selcall ID without the correct level of security is accessed Selcall Telcall etc Each message can be recorded played or restored to a default message The default message used in the...

Page 103: ...sage Use the Scroll keys to select the Welcome Message option Press the key Use the Scroll keys to select the Record Message option Press the key Press the microphone PTT button to begin recording The message can be up 60 seconds long 103 of 133 ...

Page 104: ...Once the message is completed release the PTT button Press the before pressing the PTT to abort the recording process 104 of 133 ...

Page 105: ...To play a message for example Welcome Message Use the Scroll keys to select the Welcome Message option Press the key Use the Scroll keys to select the Play Message option Press the key 105 of 133 ...

Page 106: ...To restore a message for example Welcome Message Use the Scroll keys to select the Welcome Message option Press the key Use the Scroll keys to select the Restore Message option Press the key 106 of 133 ...

Page 107: ...g Selcall Preset Local this means that the selected IDs can access the telephone system through preset telephone numbers using Selcall and local telephone numbers using Telcall Preset Local STD this means that the selected IDs can access the telephone system through preset telephone numbers using Selcall local and STD telephone numbers using Telcall All this means that the selected IDs can access ...

Page 108: ...digit ID Press the key Then enter the ending Selcall ID For setting phone access levels for a single Selcall ID enter the same ID as the starting ID Press the key Then use the Scroll keys to select All Press the key The selected IDs will now be programmed 108 of 133 ...

Page 109: ... by a telephone operator Selcalls Only this means that the selected IDs can only be called using Selcall no telephone number can be sent to that ID Selcalls and Telcalls this means that the selected IDs can be called using Selcall or Telcall Press the key example shown Setting ID 1234 to have Selcalls and Telcalls Enter the starting Selcall ID This can be either a 4 digit or 6 digit ID 109 of 133 ...

Page 110: ...all ID For setting transceiver access levels for a single Selcall ID enter the same ID as the starting ID Press the key Then use the Scroll keys to select Selcalls and Telcalls Press the key The selected IDs will now be programmed 110 of 133 ...

Page 111: ...mple shown Show ID 1234 access levels The operator can use the Scroll keys to scroll to the Selcall ID required for viewing or the operator can enter the Selcall ID directly by using the digit keys then pressing This can be either a 4 digit or 6 digit ID Press the key The access level for that Selcall ID will be displayed 111 of 133 ...

Page 112: ...le Preset Only this means that the selected ID can access the telephone system through preset telephone numbers by sending only 2 digits via the ALE Phone call option in the transceiver Preset and Telcalls this means that the selected ID can call pre dialled and full telephone numbers via the ALE Phone call option in the transceiver 2 digits for pre dialled numbers more than 2 digits for all other...

Page 113: ...Use the Scroll keys to scroll to the ALE ID required for viewing modifying then press Use the Scroll keys to select Preset and Telcalls Press the key The selected ID will now be programmed 113 of 133 ...

Page 114: ...up secure call IDs for individual or groups of Selcall IDs Press the key example shown Setting ID 1234 to have secure key 4568 Enter the starting Selcall ID This can be either a 4 digit or 6 digit ID Press the key Then enter the ending Selcall ID For setting transceiver access levels for a single Selcall ID enter the same ID as the starting ID 114 of 133 ...

Page 115: ...ll now be programmed Clearing secure call keys To clear secure call keys from a particular Selcall ID just press the key at the Program Secure Key screen without entering any digits This will reset the secure call key for the ID IDs selected Once cleared a confirmation screen will be shown 115 of 133 ...

Page 116: ...w ID 1234 secure call key The operator can use the Scroll keys to scroll to the Selcall ID required for viewing or the operator can enter the Selcall ID directly by using the digit keys then pressing This can be either a 4 digit or 6 digit ID Press the key The secure call key for that Selcall ID will be displayed 116 of 133 ...

Page 117: ...meters clear and view logging data status Restore defaults This restores all user defined parameters of the 2060 to default values Press the key example shown Restoring defaults Use the Scroll keys to select Confirm Press the key The system settings will now be defaulted 117 of 133 ...

Page 118: ...his will reset all transceiver and phone access levels Press the key example shown Reset Access Levels Use the Scroll keys to select Confirm Press the key All phone and transceiver access levels will now be reset 118 of 133 ...

Page 119: ...ll keys This clears all secure call keys from all Selcall IDs Press the key example shown Erasing Secure Call keys Use the Scroll keys to select Confirm Press the key The secure call keys will now be erased 119 of 133 ...

Page 120: ...rammed channels and set channel 1 to a 10MHz default frequency Press the key example shown Erasing Channels Use the Scroll keys to select Confirm Press the key The channels will now be erased and channel will be defaulted to 10MHz 120 of 133 ...

Page 121: ...numbers This clears all the preset telephone numbers Press the key example shown Erasing preset numbers Use the Scroll keys to select Confirm Press the key All preset telephone numbers will now be cleared 121 of 133 ...

Page 122: ...View data log This will display how full the call billing log is Press the key 122 of 133 ...

Page 123: ...y software The Barrett 2060 supervisory software should be loaded onto a PC using the instructions supplied with the package Programming using the Barrett cable P N BCA90023 BCA204020 To program the 2060 using the RS 232 port of your PC or Laptop plug one of the cables mentioned above into the PC or laptop s serial port The other end should be plugged it the RS 232 socket of the 2060 Your PC or la...

Page 124: ...ode first select the channel you want to program then press the key Transmit and receive frequencies Use the numeric keypad to enter the receive frequency example 5940 kHz then press the or the key twice if a new number has been entered Use the numeric keypad to enter the transmit frequency then press the or key twice if a new number has been entered 124 of 133 ...

Page 125: ...keys to select the required Selcall format then press the or key This last key press displays the following screen indicating the channel programming is complete The channel program sequence can be aborted at any stage in the programming sequence by pressing the key Antenna socket selection Each channel can be directed to use either the default antenna socket or the auxiliary antenna socket This i...

Page 126: ...Note the default antenna socket is ANT 1 the Auxiliary antenna socket is ANT 2 Use the Scroll keys to select the required antenna socket 1 or 2 then press the or key 126 of 133 ...

Page 127: ...a channel from the 2060 program the transmit and receive frequency to 0 0 kHz Then try to change channels the 2060 will display the following confirmation screen Use the Scroll keys to select Yes Press the key The channel will now be erased 127 of 133 ...

Page 128: ...Installing the Barrett 2060 Interconnect Barrett Communications recommends that any installation should only be carried out by suitably qualified technicians 128 of 133 ...

Page 129: ...ds from the 2022 power supply to the 2050 transceiver and the 2060 Interconnect Connect a suitable antenna to the 2050 transceiver ANTENNA socket If a speaker is required plug it into the 2060 SPEAKER socket For an installation where no operator will be required only the PSTN line needs to be connected This is connected to the 2060 LINE socket If an operator is needed then a phone handset needs to...

Page 130: ...3 N C 4 N C 5 N C A1 13 8 VDC input 13 8 VDC A2 13 8 VDC Ground 13 8VDC Ground RS232 connector 9 pin female D connector on rear panel Pin Name Description of function Level 1 2 Tx Data RS 232 data output True RS 232 3 Rx Data RS 232 data input True RS 232 4 5 RS 232 Gnd RS 232 Ground 0V 6 7 8 9 130 of 133 ...

Page 131: ...BUS connector 9 pin male D connector on rear panel Pin Name Description of function Level 1 RS485 Line 1 RS485 Bus Line 2 RS485 Line 2 RS485 Bus Line 3 4 5 6 7 8 9 131 of 133 ...

Page 132: ...Amp 0 10V 9 PTT Out PTT Output Active low 0V 10 11 Bal Tx Audio In Balanced Tx audio input with pin 24 600 Ω 24dBm to 0dBm 12 Bal Rx Audio Out Balanced Rx audio output with pin 25 600 Ω 6dBm to 9dBm 13 Ground Ground 0V 14 15 16 17 18 19 20 21 22 23 13 8 V Fused Input 13 8V Input 11VDC to 15VDC 13 8V 24 Bal Tx Audio Outpout Balanced Tx audio output with pin 11 600 Ω 24dBm to 0dBm 25 Bal Rx Audio Ou...

Page 133: ...mp 0 10V 9 PTT Out PTT Output Active low 0V 10 11 Bal Tx Audio In Balanced Tx audio input with pin 24 600 Ω 24dBm to 0dBm 12 Bal Rx Audio Out Balanced Rx audio output with pin 25 600 Ω 6dBm to 9dBm 13 Ground Ground 0V 14 15 16 17 18 19 20 21 22 23 13 8 V Fused Input 13 8V Input 11VDC to 15VDC 13 8V 24 Bal Tx Audio Output Balanced Tx audio output with pin 11 600 Ω 24dBm to 0dBm 25 Bal Rx Audio Out ...

Reviews: