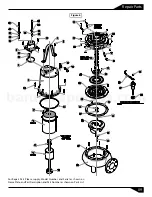
Impeller and Volute -
Install impeller
(29) by appling a thin film of oil to
motor shaft and slide impeller
straight onto shaft, keeping keyways
lined up. Drive key (13) into keyway.
Locate washer, apply thread lock
primer (such as Loctite® Primer T), let
set per manufacturer's directions.
Apply thread locking compound to
threads on cap screw, and thread into
shaft and torque to 35 ft/lbs.
Place gasket (32) on volute and install
impeller and motor assembly over
studs and onto volute (33). Apply
thread locking compound to threads
of studs (25) and thread nuts (26)
onto studs and torque to 24 ft/lbs.
Check for binding by rotating
impeller. Clearance between the
impeller and volute should be
approximately 0.012 inch.
08
Service
G T1 T7 T2 T8 T3 T9 T4 T5 T6
G L1
L2
L3
G
RE
EN
BL
AC
K
RE
D
W
H
IT
E
MOTOR LEADS
THREE-PHASE 230V AC
Cable
Motor Lead Number
Green
Green
Black
1 and 7
Red
2 and 8
White
3 and 9
4, 5 and 6
together
Figure 5
T2 T3 T4 T7 T5 T8 T6 T9
G
L2 L3
RE
D
W
H
IT
E
MOTOR LEADS
T1
L1
BL
AC
K
G
G
G
RE
EN
THREE-PHASE 460V AC
Cable
Motor Lead Number
Green
Green
Black
1
Red
2
White
3
4 and 7 together
5 and 8 together
6 and 9 together
Figure 5
G
G
GREEN
P1 P2
L1
BLA
CK
L2
WHITE
THERMOSTAT
N/C
WHITE
WHITE
N/O
S1 S2
L3
RED
L4
ORANGE
SE
N
SO
R
SE
N
SO
R
ORANGE
ORANGE
TEMPERATURE
SENSOR
MOISTURE
SENSOR
CONTROL CABLE
Control Cable
Lead Number
Black
L1 (Temperature)
White
L2 (Temperature)
Red
L3 (Moisture)
Orange
L4 (Moisture)
Green
Ground
Figure 5
barmesapumps.com
SINGLE-PHASE 230V AC
Cable
Motor Lead Number
Green
Green
Black
1
Red
2
White
3
Figure 5
G T1 T2
G L1 L2
G
RE
EN
BL
AC
K
RE
D
MOTOR LEADS
T3
L3
W
H
IT
E
SINGLE PHASE 230 VOLT AC
Capacitor/Relay Pack For Control Panels
5
2
1
SR
START
RUN
L1
L2
B
RUN
R
START
W
COMMON


