Connecting the signal cables
39
Connecting the signal cables
To connect the signal cables to the display:
1.
Unpack the display and put it on a solid flat surface.
2.
Make sure the computer is turned off.
3.
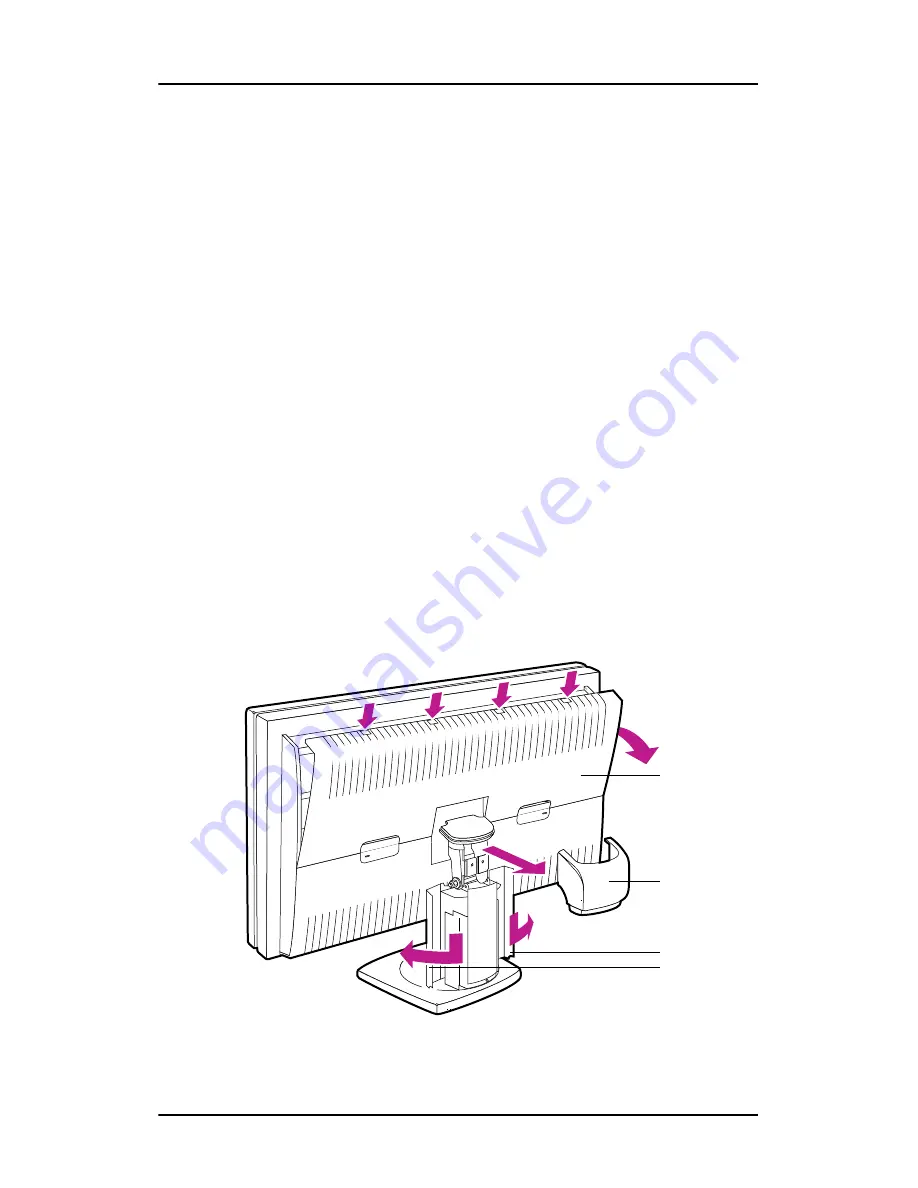
To get access to the connectors, remove the connector
compartment cover (1).
To remove the cover, gently pull one side of the cover backward
to put the cover clips under stress. Then one by one, starting at
the side where you are pulling, release the 4 cover clips by
pressing with the other hand on top of the cover where the clips
are located (see drawing below).
4.
To facilitate cable routing afterwards, remove the display stand
neck cover (2). Therefore, first tilt the display panel in upright
position. Then lift and pull backward the neck cover.
5.
Also to facilitate cable routing afterwards, open both cable duct
covers (3).
Figure 12: Remove covers before connecting signal cables
1
2
3
Summary of Contents for LCD Display
Page 1: ...Getting Started Guide Nio Fusion...
Page 2: ...This page intentionally left blank 2 This page intentionally left blank...
Page 7: ...Preface 7 Preface...
Page 20: ...Recommendations for using your display system This page intentionally left blank 20...
Page 21: ...Display controller installation 21 Display controller installation...
Page 30: ...Display Controller Installation This page intentionally left blank 30...
Page 31: ...Display installation 31 Display installation...
Page 42: ...Connecting the signal cables 42 Figure 15 Control panel...
Page 48: ...Cleaning instructions This page intentionally left blank 48...
Page 49: ...Software installation 49 Software installation...
Page 57: ...Where to get more information 57 Where to get more information...
Page 59: ...Where to get more information 59...
Page 60: ...Where to get more information This page intentionally left blank 60...
Page 61: ...Troubleshooting 61 Troubleshooting...
Page 66: ...Configuring Windows This page intentionally left blank 66...
Page 67: ...Technical specifications 67 Technical specifications...
Page 70: ...Technical specifications This page intentionally left blank 70...
Page 71: ...Warranty Statement 71 Warranty Statement...
Page 77: ...Warranty Statement 77...
Page 78: ...Warranty Statement 78...
Page 79: ...Warranty Statement 79...


